


 Welcome to Deves Technet.com Forums. I encourage everyone to register so we can get a better idea of the traffic and its usefulness. Please leave a word or two describing your stay and what we can do to make it more enjoyable. Thanks!
 Tweet
Tweet
Welcome to the 60th Tip of the Week! I keep threatening to stop doing this because it IS hard to think up new material on your own. I really appreciate it when someone makes a suggestion. This means YOU!
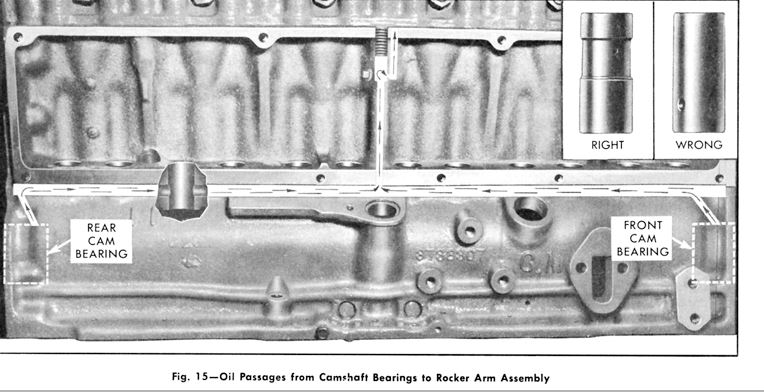
This week we are discussing the top end oiling for the 1954-1962 235/261 Engine. The earlier 216 is much different in that it uses a copper line that goes through the engine block to get oil to the upper Rocker Assembly. That diagram is HERE. The later model engines had internal passages that are cast into the engine block/head. After awhile, the passages get blocked with crud and the rocker assembly gets starved for oil even when oil pressure looks great. There are a few things you can do to prevent this blockage in the first place. They are:
1) Install a PCV system to evacuate crankcase gasses that mix with the oil and cause part of the crud.
2) Ensure your oil filter is clean and working.
3) If you have slits in your valve cover, remove the cover, clean the inside well with lacquer thinner and then plug those holes with JB Weld. Nobody can see the difference from the outside, but you will no longer have under-hood road grime just entering your engine. Then put a Stant 10064 or equivalent Oil Breather Cap on the Valve cover.
If you have a copper line that goes from the rear inlet port on the drivers side of the engine around the back of the engine to the passenger side's Head (Center Port) then it is probably too late for you. Someone did that because oil was not getting to the Rocker Assembly. This was NOT done at the factory. To fix this correctly, I would like for you to carefully read Dave's Blog Post On This Issue and then continue here.
The easiest way to get your oil flowing again is to add a copper line from the rear OUT port (drivers side) all the way around to the Head's Center port on the Passenger side. The easy way however is not the Correct way, and will eventually come back to bite you. Let's resolve to fix this issue, and here is a step by step How-To...
1) Remove the Valve Cover. Get a Fel-Pro VS50190C 7/16" (extra thick) valve cover gasket. Seal the gasket to the Head, not the cover! This creates an oil dam that will reduce your oil leakage.
2) With the Valve Cover Removed, start the engine and look carefully at each of the Rockers. The rockers have a very small hole on top that should WEEP a small amount of oil from each of them.
3) The oil comes in from the Head through a looped fixture. Do you also see oil coming out of that Looped Fixture? If yes, to both of the above, everything is currently operating normally.
4) Remove the copper line from the Drivers side to the Passenger side center Head Port and Cap both of the holes off with a 1/8" NPT Plug. Do not leave them open.
5) Check Steps 1 thru 3 above. Is the same amount of oil getting to the rockers? If so, the copper line was never needed. If not, we need to find the stoppage.
Finding the plugged oil passage:
1) Depending on the year of your 235/261 engine, there may or may not be a HOLLOW Head bolt located at the above Loop Fixture. Since you never know what machinist did what during the last rebuild, we need to check to see if you have one. Remove that center (passenger side) Head Bolt and see if it is hollow. Refer to Dave's Blog Post. Next check to see if it is plugged. If plugged, clean it out really good, then do step 1 through 3 above. I use safety wire and kerosene for this.
2) If the bolt is solid, right beside that bolt (inside) is a passage that ports the oil from the lower engine to the upper engine. With some .030 to .040 safety wire, push the wire down the hole to try to unstop the plugged passage. If it's stopped up, step 1 through 3 above. If not, try very quickly starting the vehicle with the head bolt removed. See if Oil shoots up through it. If you do not want oil all over the place, put a shop towel over the opening. If so, your problem is not between the lower engine and the upper engine, it is a plugged up rocker shaft. Be sure to torque your Head Bolt back down to 95 foot pounds.
 3) To unplug the rocker shaft, take pictures of the rocker assembly.. every inch of it, so you know EXACTLY which springs/washers and rockers go where. Remove the 4 bolts holding the rocker assembly to the head. The rocker assembly is split into two parts connected with that Loop Fixture we have been talking about. The rocker shaft that goes the length of the engine is Hollow. Oil is fed through the hollow shaft to lubricate each rocker. Chances are very good the shafts are plugged with grime. Clean them out with safety wire, carb cleaner, whatever does the job. Be sure to get them cleaned all the way through. With each rocker removed, but you are clear as to where they go, clean out each passage. Assemble everything exactly as it was, torque the rocker assembly bolts to 30 foot pounds, then restart the engine.
If all goes well, oil will be restored to the Rocker Assembly. As long as you installed everything correctly, a Valve Adjustment is probably not imperative, however, it's not a bad idea. You can get all the information on how to adjust your valves HERE. Now that wasn't so hard was it? Seeya Next Week!
This week we are discussing the top end oiling for the 1954-1962 235/261 Engine. The earlier 216 is much different in that it uses a copper line that goes through the engine block to get oil to the upper Rocker Assembly. That diagram is HERE. The later model engines had internal passages that are cast into the engine block/head. After awhile, the passages get blocked with crud and the rocker assembly gets starved for oil even when oil pressure looks great. There are a few things you can do to prevent this blockage in the first place. They are:
1) Install a PCV system to evacuate crankcase gasses that mix with the oil and cause part of the crud.
2) Ensure your oil filter is clean and working.
3) If you have slits in your valve cover, remove the cover, clean the inside well with lacquer thinner and then plug those holes with JB Weld. Nobody can see the difference from the outside, but you will no longer have under-hood road grime just entering your engine. Then put a Stant 10064 or equivalent Oil Breather Cap on the Valve cover.
If you have a copper line that goes from the rear inlet port on the drivers side of the engine around the back of the engine to the passenger side's Head (Center Port) then it is probably too late for you. Someone did that because oil was not getting to the Rocker Assembly. This was NOT done at the factory. To fix this correctly, I would like for you to carefully read Dave's Blog Post On This Issue and then continue here.
The easiest way to get your oil flowing again is to add a copper line from the rear OUT port (drivers side) all the way around to the Head's Center port on the Passenger side. The easy way however is not the Correct way, and will eventually come back to bite you. Let's resolve to fix this issue, and here is a step by step How-To...
1) Remove the Valve Cover. Get a Fel-Pro VS50190C 7/16" (extra thick) valve cover gasket. Seal the gasket to the Head, not the cover! This creates an oil dam that will reduce your oil leakage.
2) With the Valve Cover Removed, start the engine and look carefully at each of the Rockers. The rockers have a very small hole on top that should WEEP a small amount of oil from each of them.
3) The oil comes in from the Head through a looped fixture. Do you also see oil coming out of that Looped Fixture? If yes, to both of the above, everything is currently operating normally.
4) Remove the copper line from the Drivers side to the Passenger side center Head Port and Cap both of the holes off with a 1/8" NPT Plug. Do not leave them open.
5) Check Steps 1 thru 3 above. Is the same amount of oil getting to the rockers? If so, the copper line was never needed. If not, we need to find the stoppage.
Finding the plugged oil passage:
1) Depending on the year of your 235/261 engine, there may or may not be a HOLLOW Head bolt located at the above Loop Fixture. Since you never know what machinist did what during the last rebuild, we need to check to see if you have one. Remove that center (passenger side) Head Bolt and see if it is hollow. Refer to Dave's Blog Post. Next check to see if it is plugged. If plugged, clean it out really good, then do step 1 through 3 above. I use safety wire and kerosene for this.
2) If the bolt is solid, right beside that bolt (inside) is a passage that ports the oil from the lower engine to the upper engine. With some .030 to .040 safety wire, push the wire down the hole to try to unstop the plugged passage. If it's stopped up, step 1 through 3 above. If not, try very quickly starting the vehicle with the head bolt removed. See if Oil shoots up through it. If you do not want oil all over the place, put a shop towel over the opening. If so, your problem is not between the lower engine and the upper engine, it is a plugged up rocker shaft. Be sure to torque your Head Bolt back down to 95 foot pounds.
3) To unplug the rocker shaft, take pictures of the rocker assembly.. every inch of it, so you know EXACTLY which springs/washers and rockers go where. Remove the 4 bolts holding the rocker assembly to the head. The rocker assembly is split into two parts connected with that Loop Fixture we have been talking about. The rocker shaft that goes the length of the engine is Hollow. Oil is fed through the hollow shaft to lubricate each rocker. Chances are very good the shafts are plugged with grime. Clean them out with safety wire, carb cleaner, whatever does the job. Be sure to get them cleaned all the way through. With each rocker removed, but you are clear as to where they go, clean out each passage. Assemble everything exactly as it was, torque the rocker assembly bolts to 30 foot pounds, then restart the engine.If all goes well, oil will be restored to the Rocker Assembly. As long as you installed everything correctly, a Valve Adjustment is probably not imperative, however, it's not a bad idea. You can get all the information on how to adjust your valves HERE. Now that wasn't so hard was it? Seeya Next Week!