


 Welcome to Deves Technet.com Forums. I encourage everyone to register so we can get a better idea of the traffic and its usefulness. Please leave a word or two describing your stay and what we can do to make it more enjoyable. Thanks!
 Tweet
Tweet
Note: As with all of the content on this website, you can simply click on any picture to get its largest size. In this way, we can maintain the clearest definition to make it easier for you to see the detail. If the picture is so big you can't see all of it on your screen, all you have to do is hold down CONTROL and move the mouse wheel up and down to resize!
There are always ways to improve these things. Hopefully we will get some input. One day I was looking at ways to hold things around the shop and I ran across something I thought was really cool! You should take a look at this!
 Then, if you thought that was really cool, go to his site and check out all the metal working videos, it is an amazing body of work: http://www.lazzemetalshaping.com/index.cfm

So, I had to make these for myself, but of course that wasn't the end of the story. How do you mount them on the work bench? What if you want them at different heights from the floor up? What if you have large items like truck fenders, doors, hoods, etc? So, I came up with this whole system. It's not just one place in the shop, it's everywhere in the shop. The same problem exists for just about every bench tool you can think of. How to securely mount it at every level in every direction. So, that's why I showed you Lazze's contraption first.

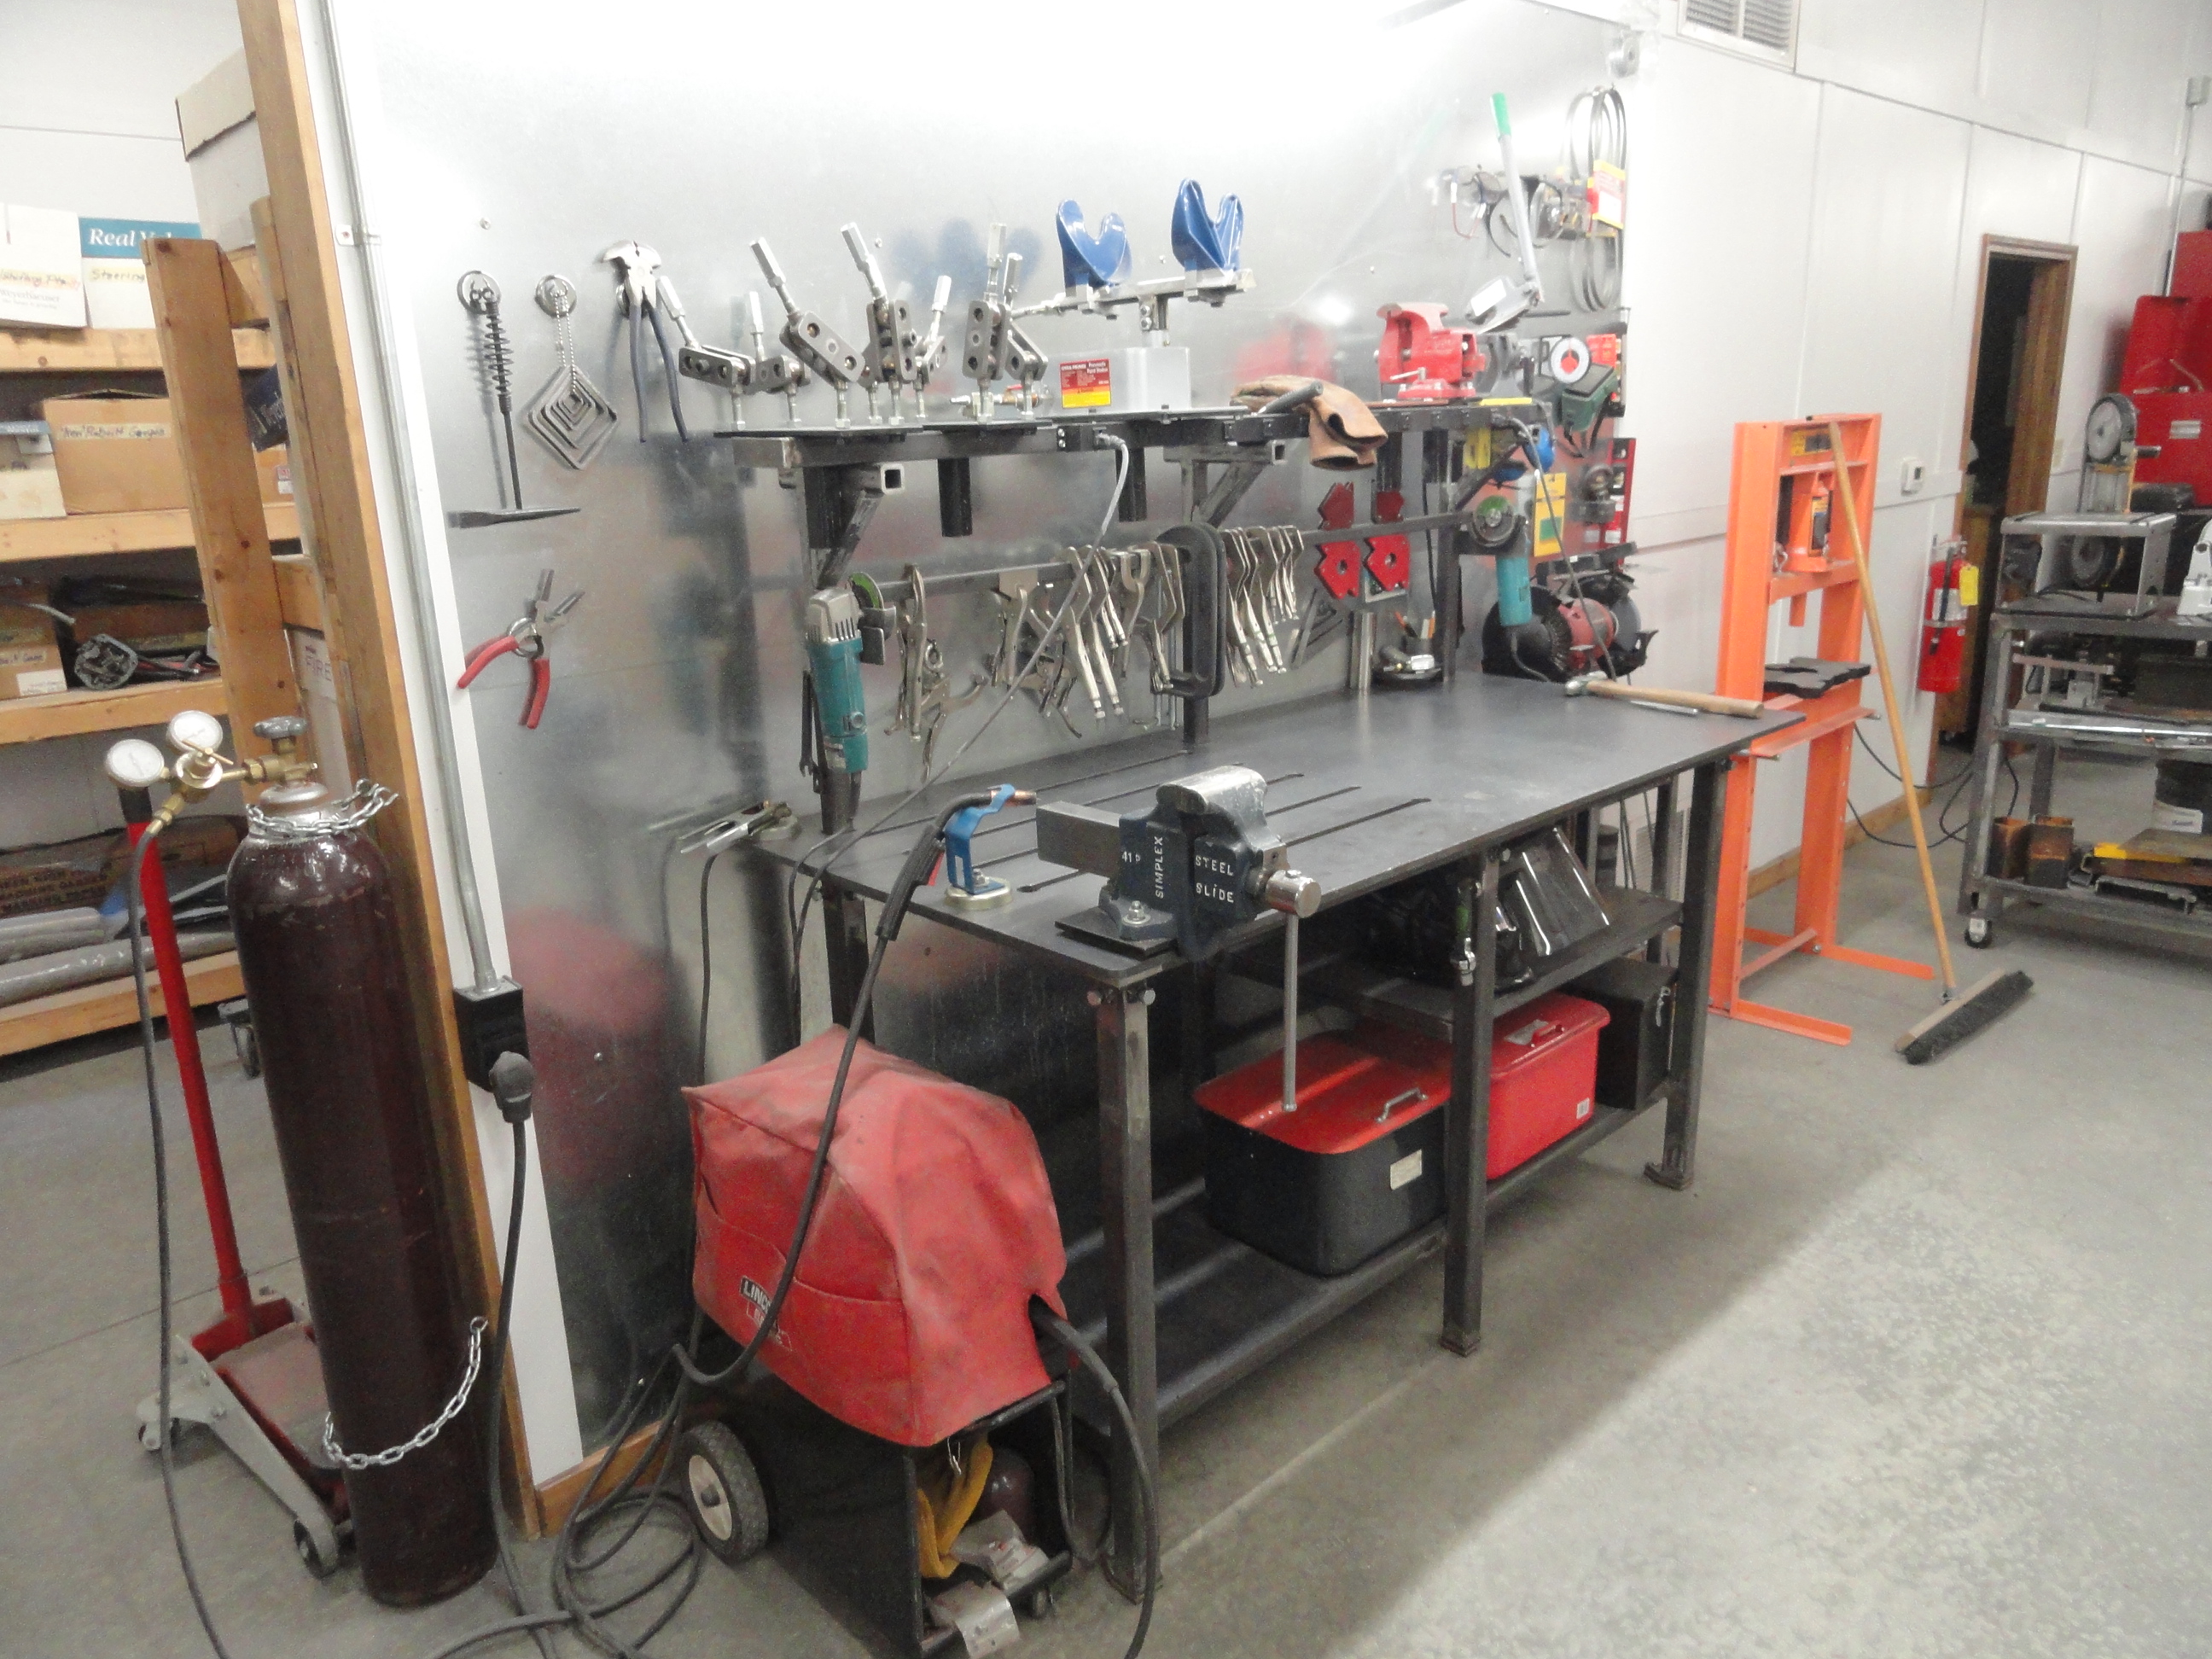
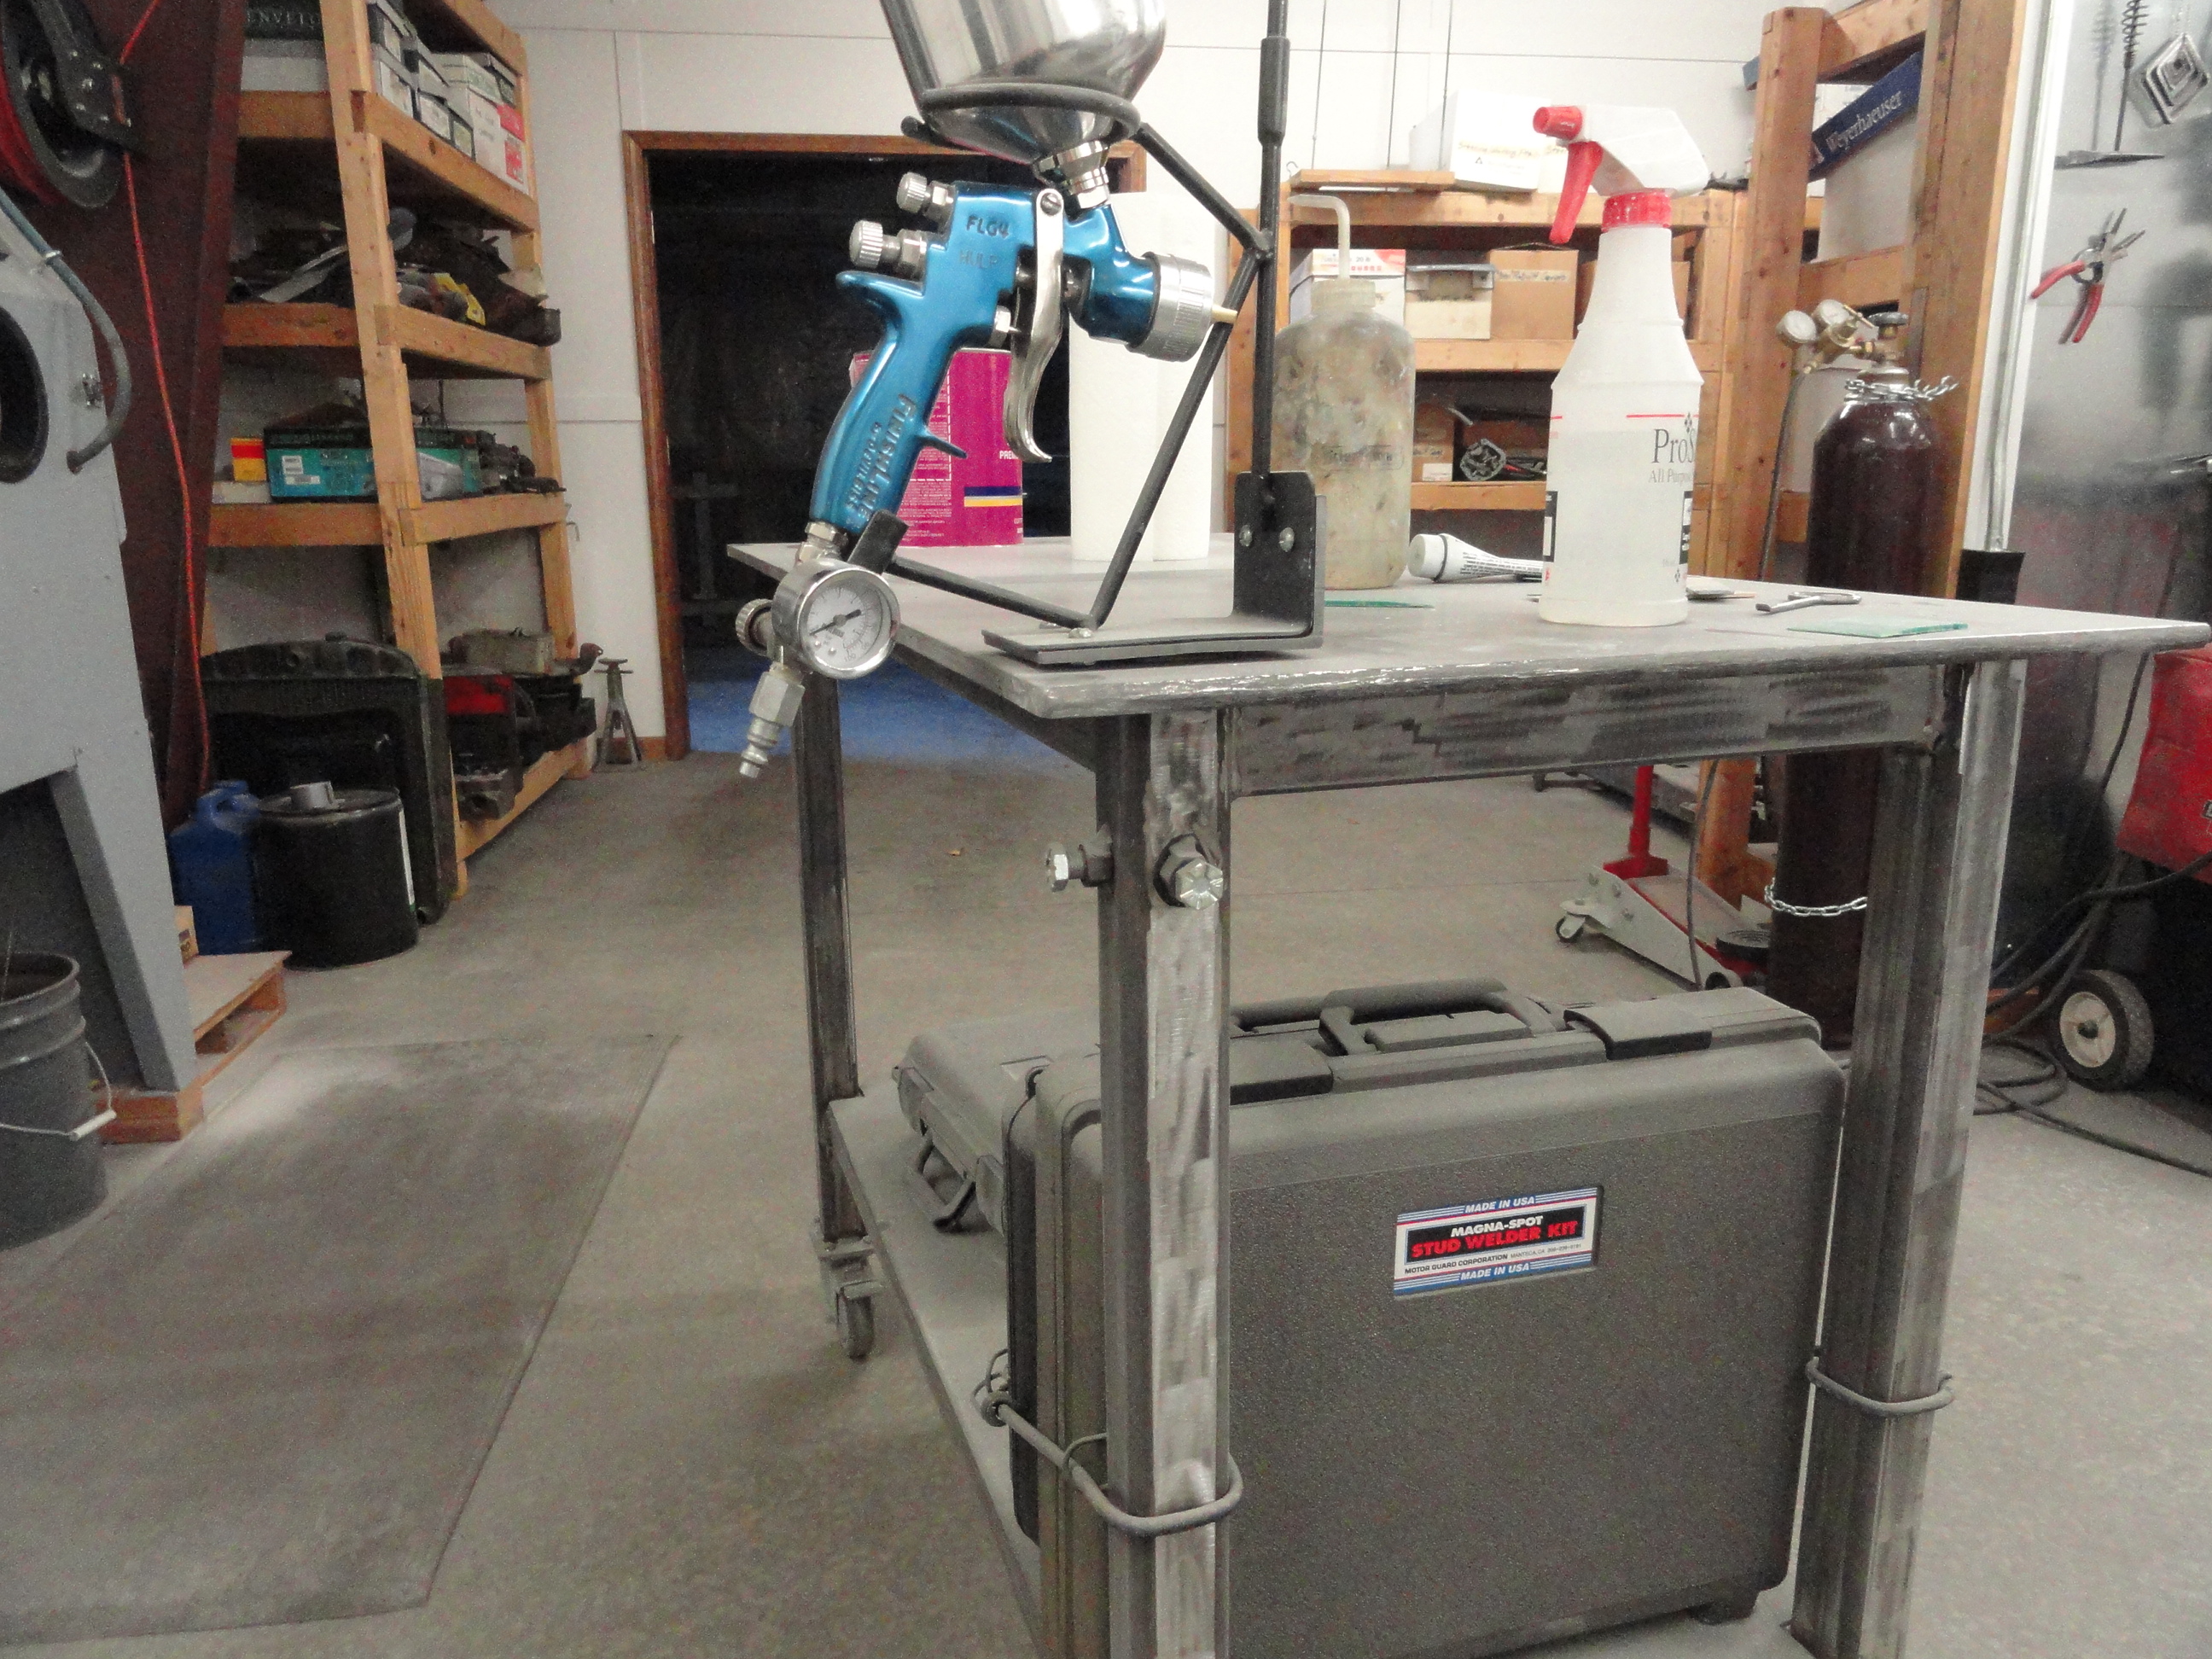
This is a picture of my welding table. After spending a very considerable amount of time here: http://weldingweb.com/forum.php I decided on putting together all the ideas that made sense to me into one really nice welding table. The top is made out of 1/2" by 34" by 72" steel. All six legs are made out of 2" square tubing with 3/16" walls. This was by design. The 3/16" walls are perfect for accommodating 1-1/2" square tubing inside. Not too much slop, just right. The top has 1-1/2" square holes cut just above the legs to allow you to drop 1-1/2" square tubing down in.
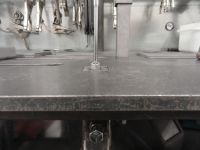
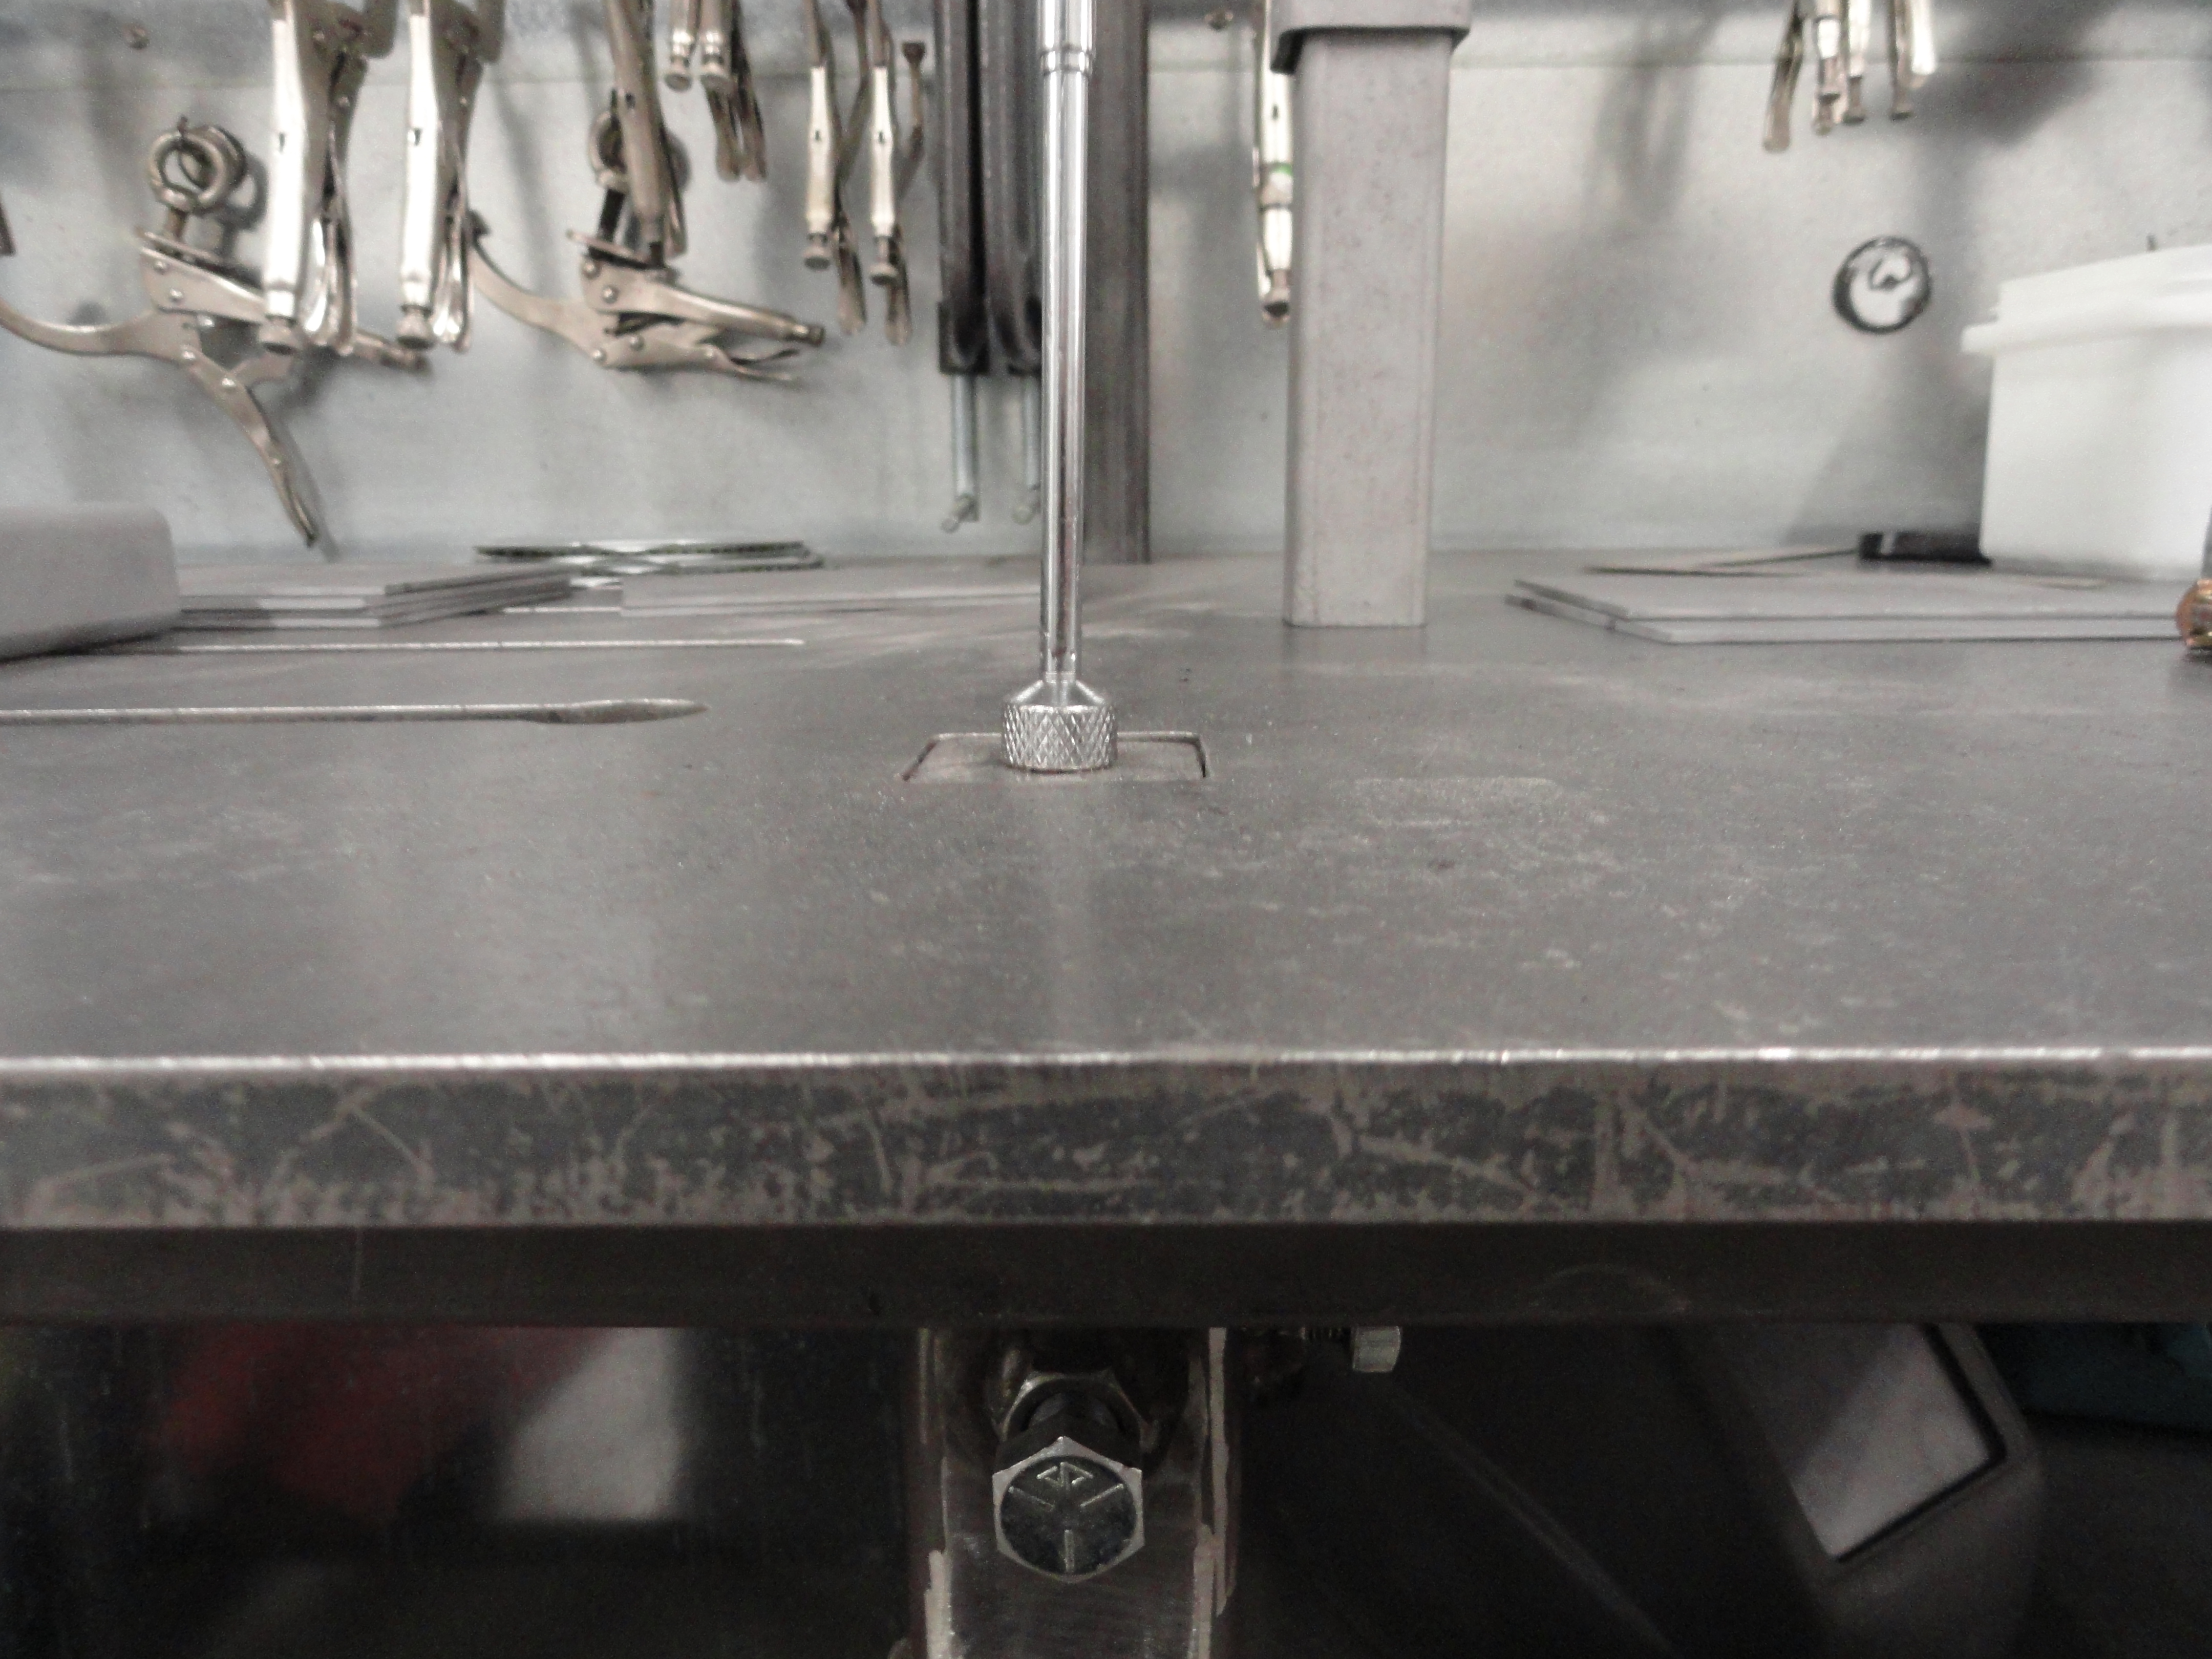
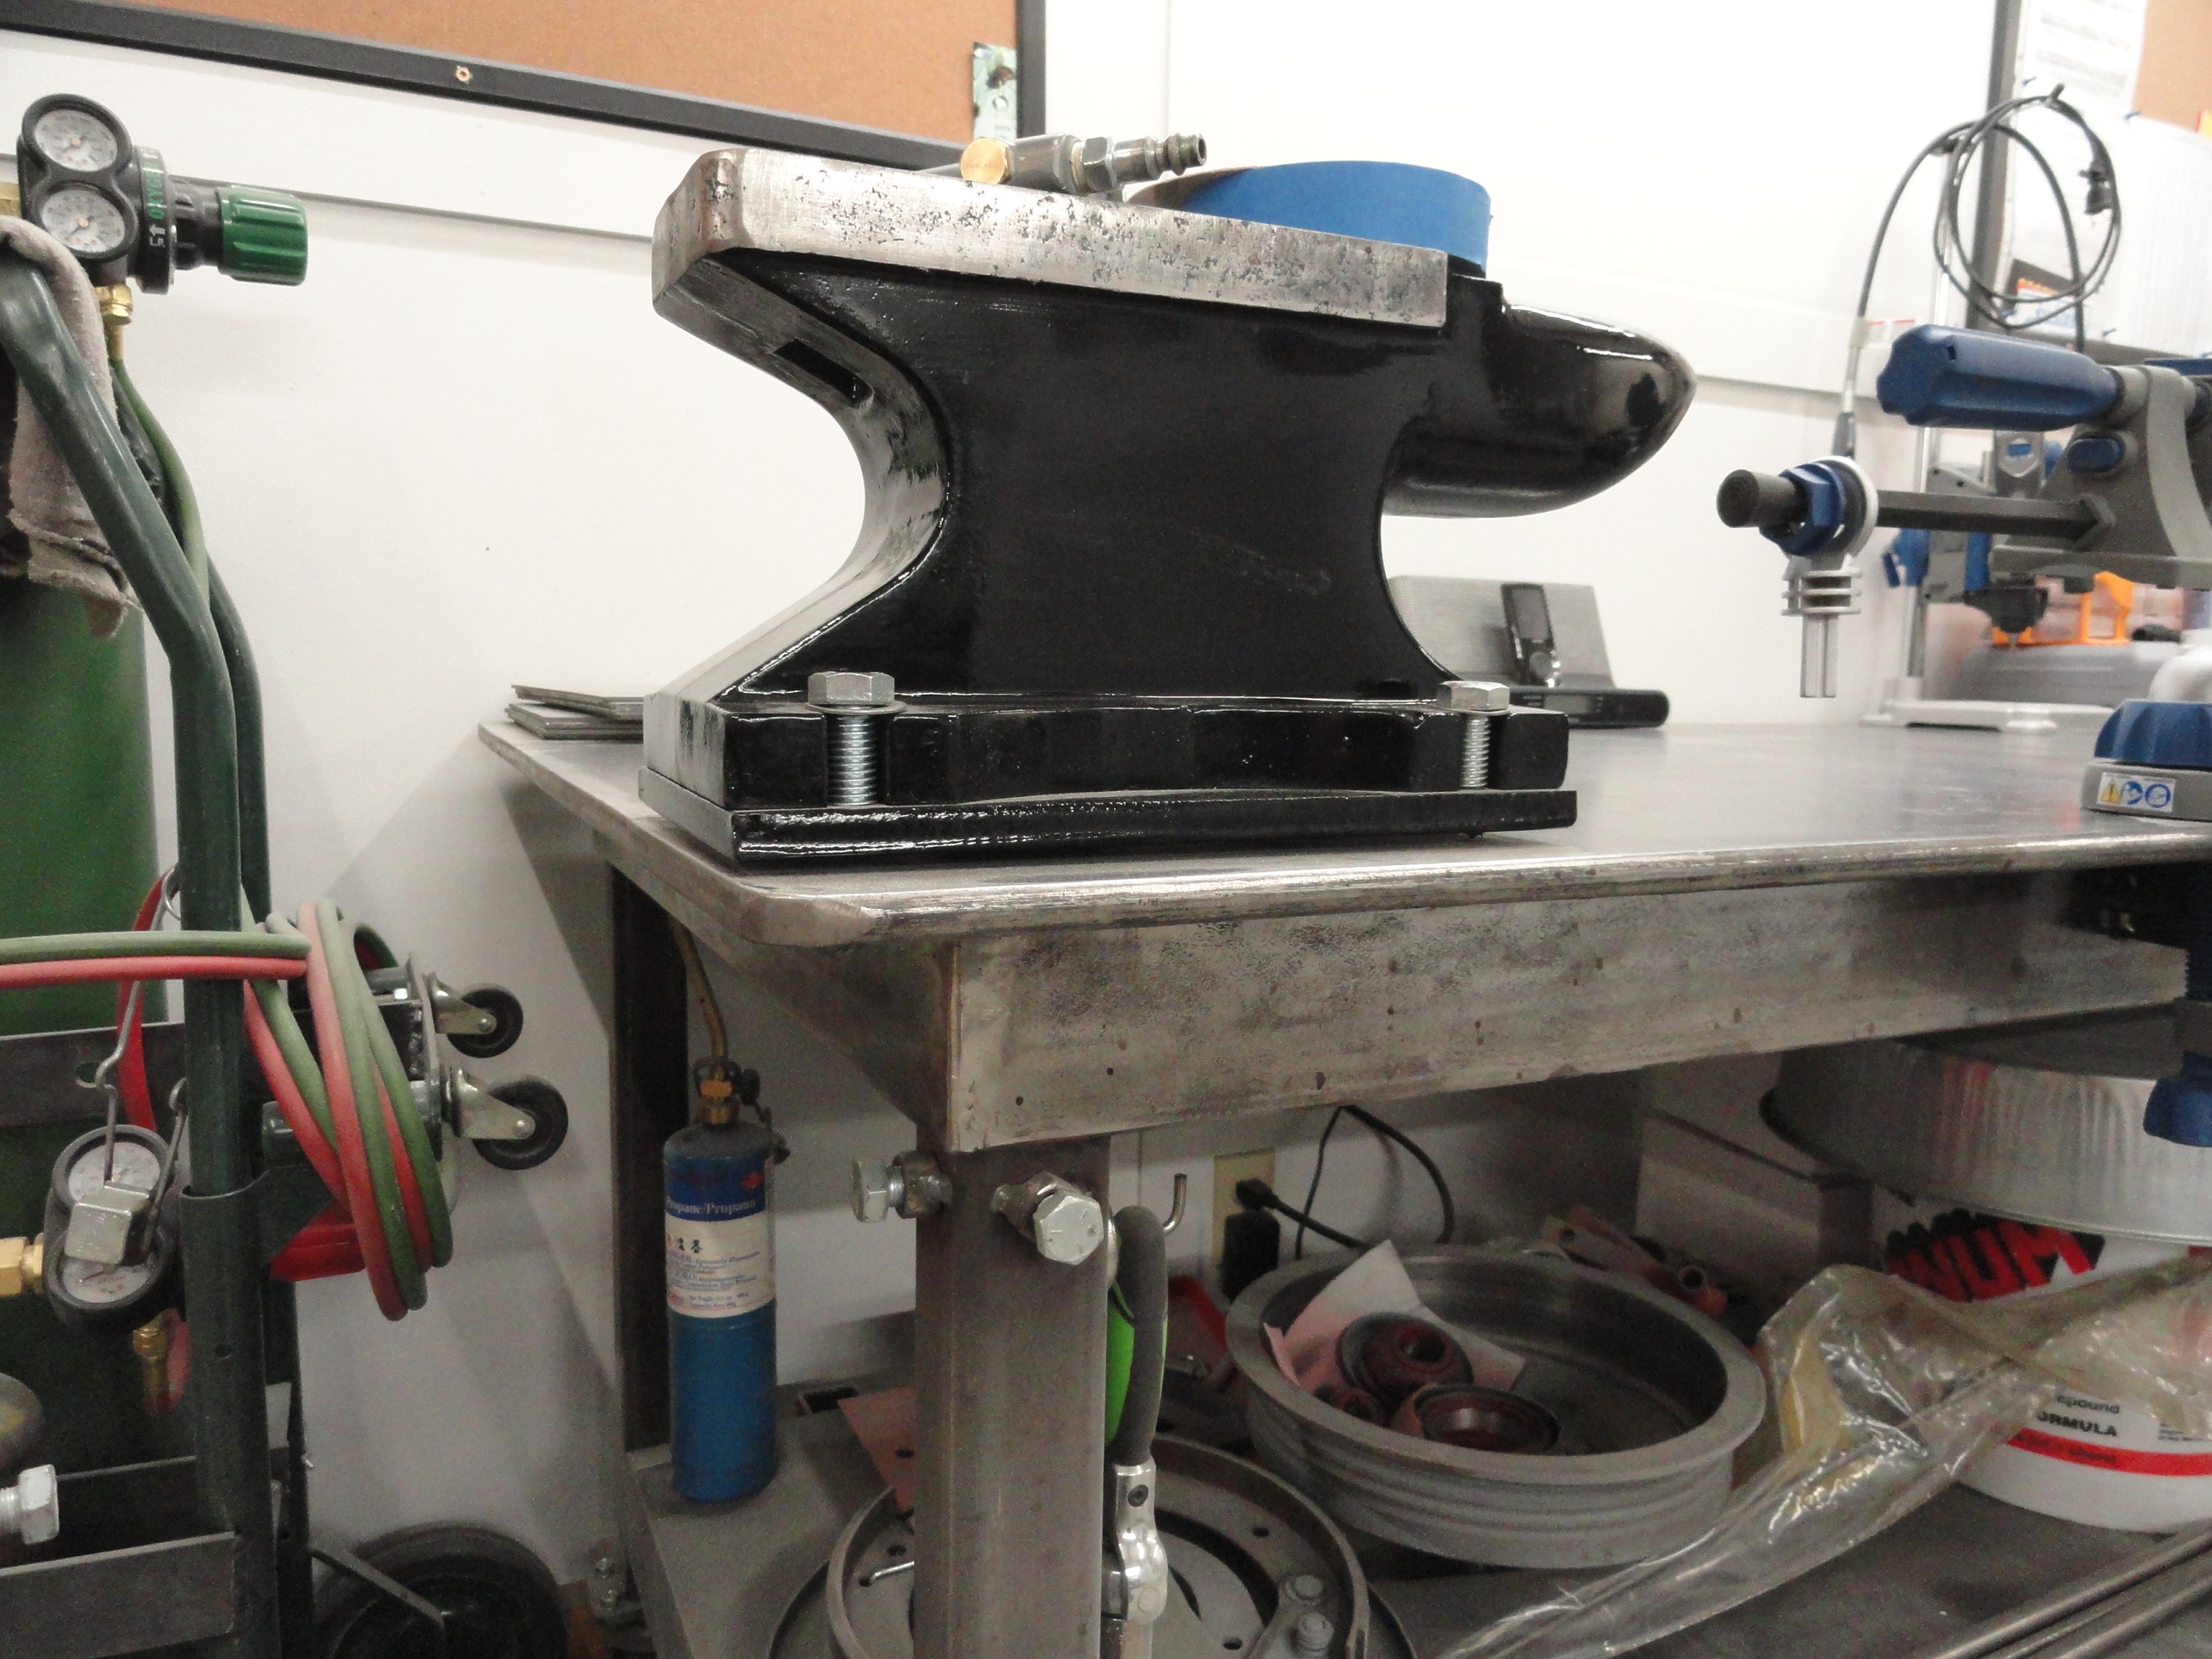
Look closely and you can see (below) the 1/2" welded nuts and bolts (on two sides) that hold whatever you put in the hole. This is why your 1-1/2" square stock needs to also have thick walls, so you don't squash the tube and never get it out! Use at least 3/16" walls. You don't have to gorilla them down anyway since there isn't a lot of slop. The back three holes are used to hold the rack system for holding the various tools and their mountings. The front three holes are for anything you want. I leave my vise in the far left hole, leaving two places to insert things like shears, paint shaker, bench grinder, etc, etc. I made the caps so nothing falls down the hole. The caps just sit on top of the bolts protruding underneath.
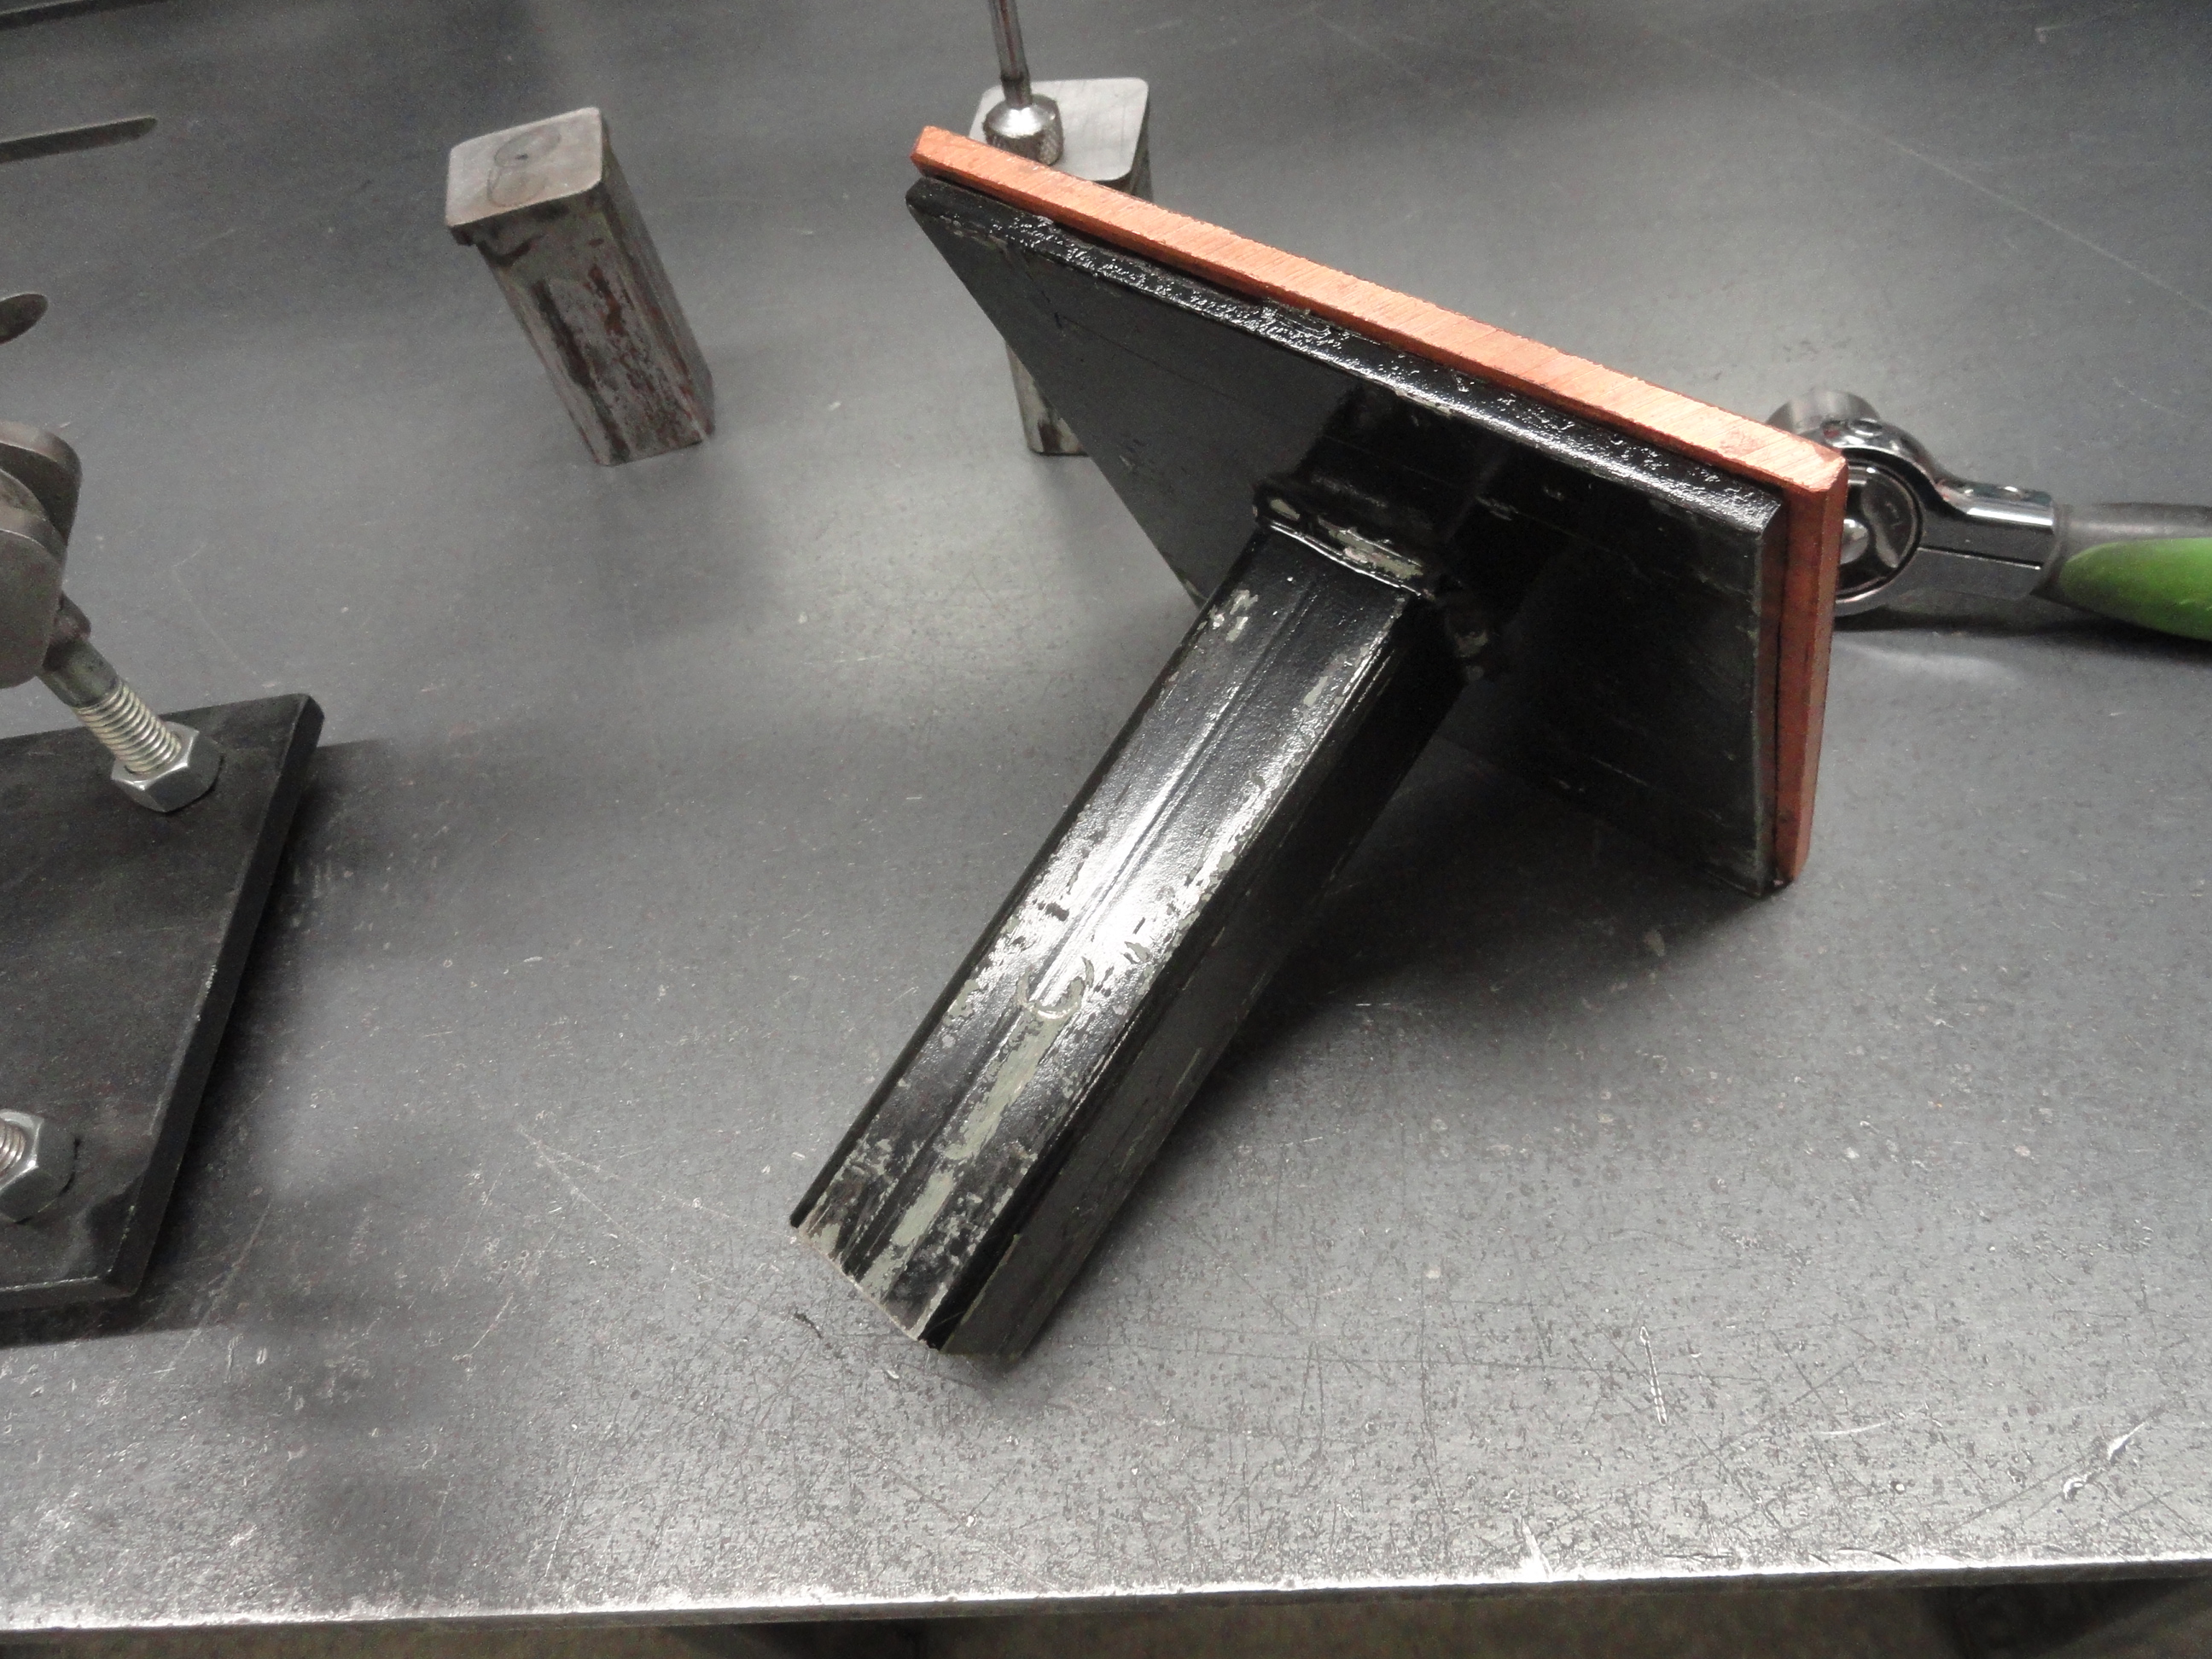
 This is what a typical mount looks like. I use 3/8" steel plate and weld the 1-1/2" by 6 inch square tube on solidly. Everything I have sits on one of those plates. Now I can put any of my tools anywhere in the shop. (The piece of copper shown comes in handy when welding small things together).
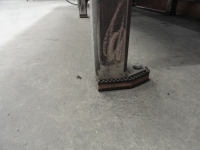 The wall behind the welding table is two 4' x 10' pieces of galvanized steel. I get a lot of welding spatter and this wall really handles that well. Besides, it's magnetic so I can hang stuff on it. The tables legs have small plates welded to the bottom, then I got a nice pad to put between it and the floor. I then bolted the welding table in 4 places firmly to the floor using 1/2" concrete anchor bolts. It's not going anywhere, and where you really appreciate that is when you install the pneumatic paint shaker to the table and run it. Very quiet and solid.
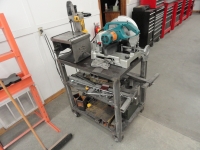
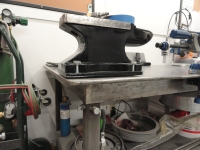
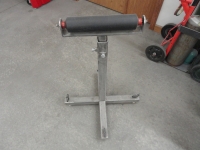
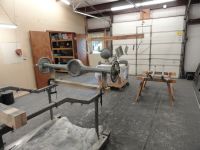
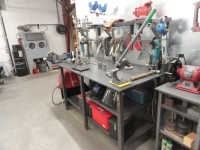 The welding table is really the center of your metal working space, and the way I feel about it, you need a table that fits your space without overwhelming it. The size I chose was in that spirit. The bench grinder table you see in this picture also uses the same setup. This way if I choose to move the bench grinder to another table, or use the bench grinder table for something else, I can. Below are a few other tables set up the very same way. At least one leg has the hole available for other tools. Even the Roller Stand is compliant!
So you can see some planning was involved, but I never thought it would just keep going from there. I have used my shop in this configuration for about 2 years now and do not regret the way it's set up at all.

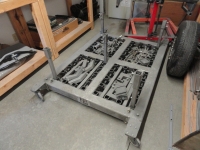
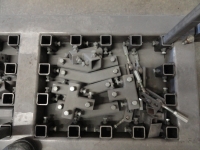
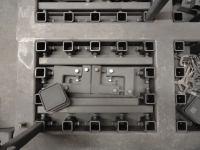
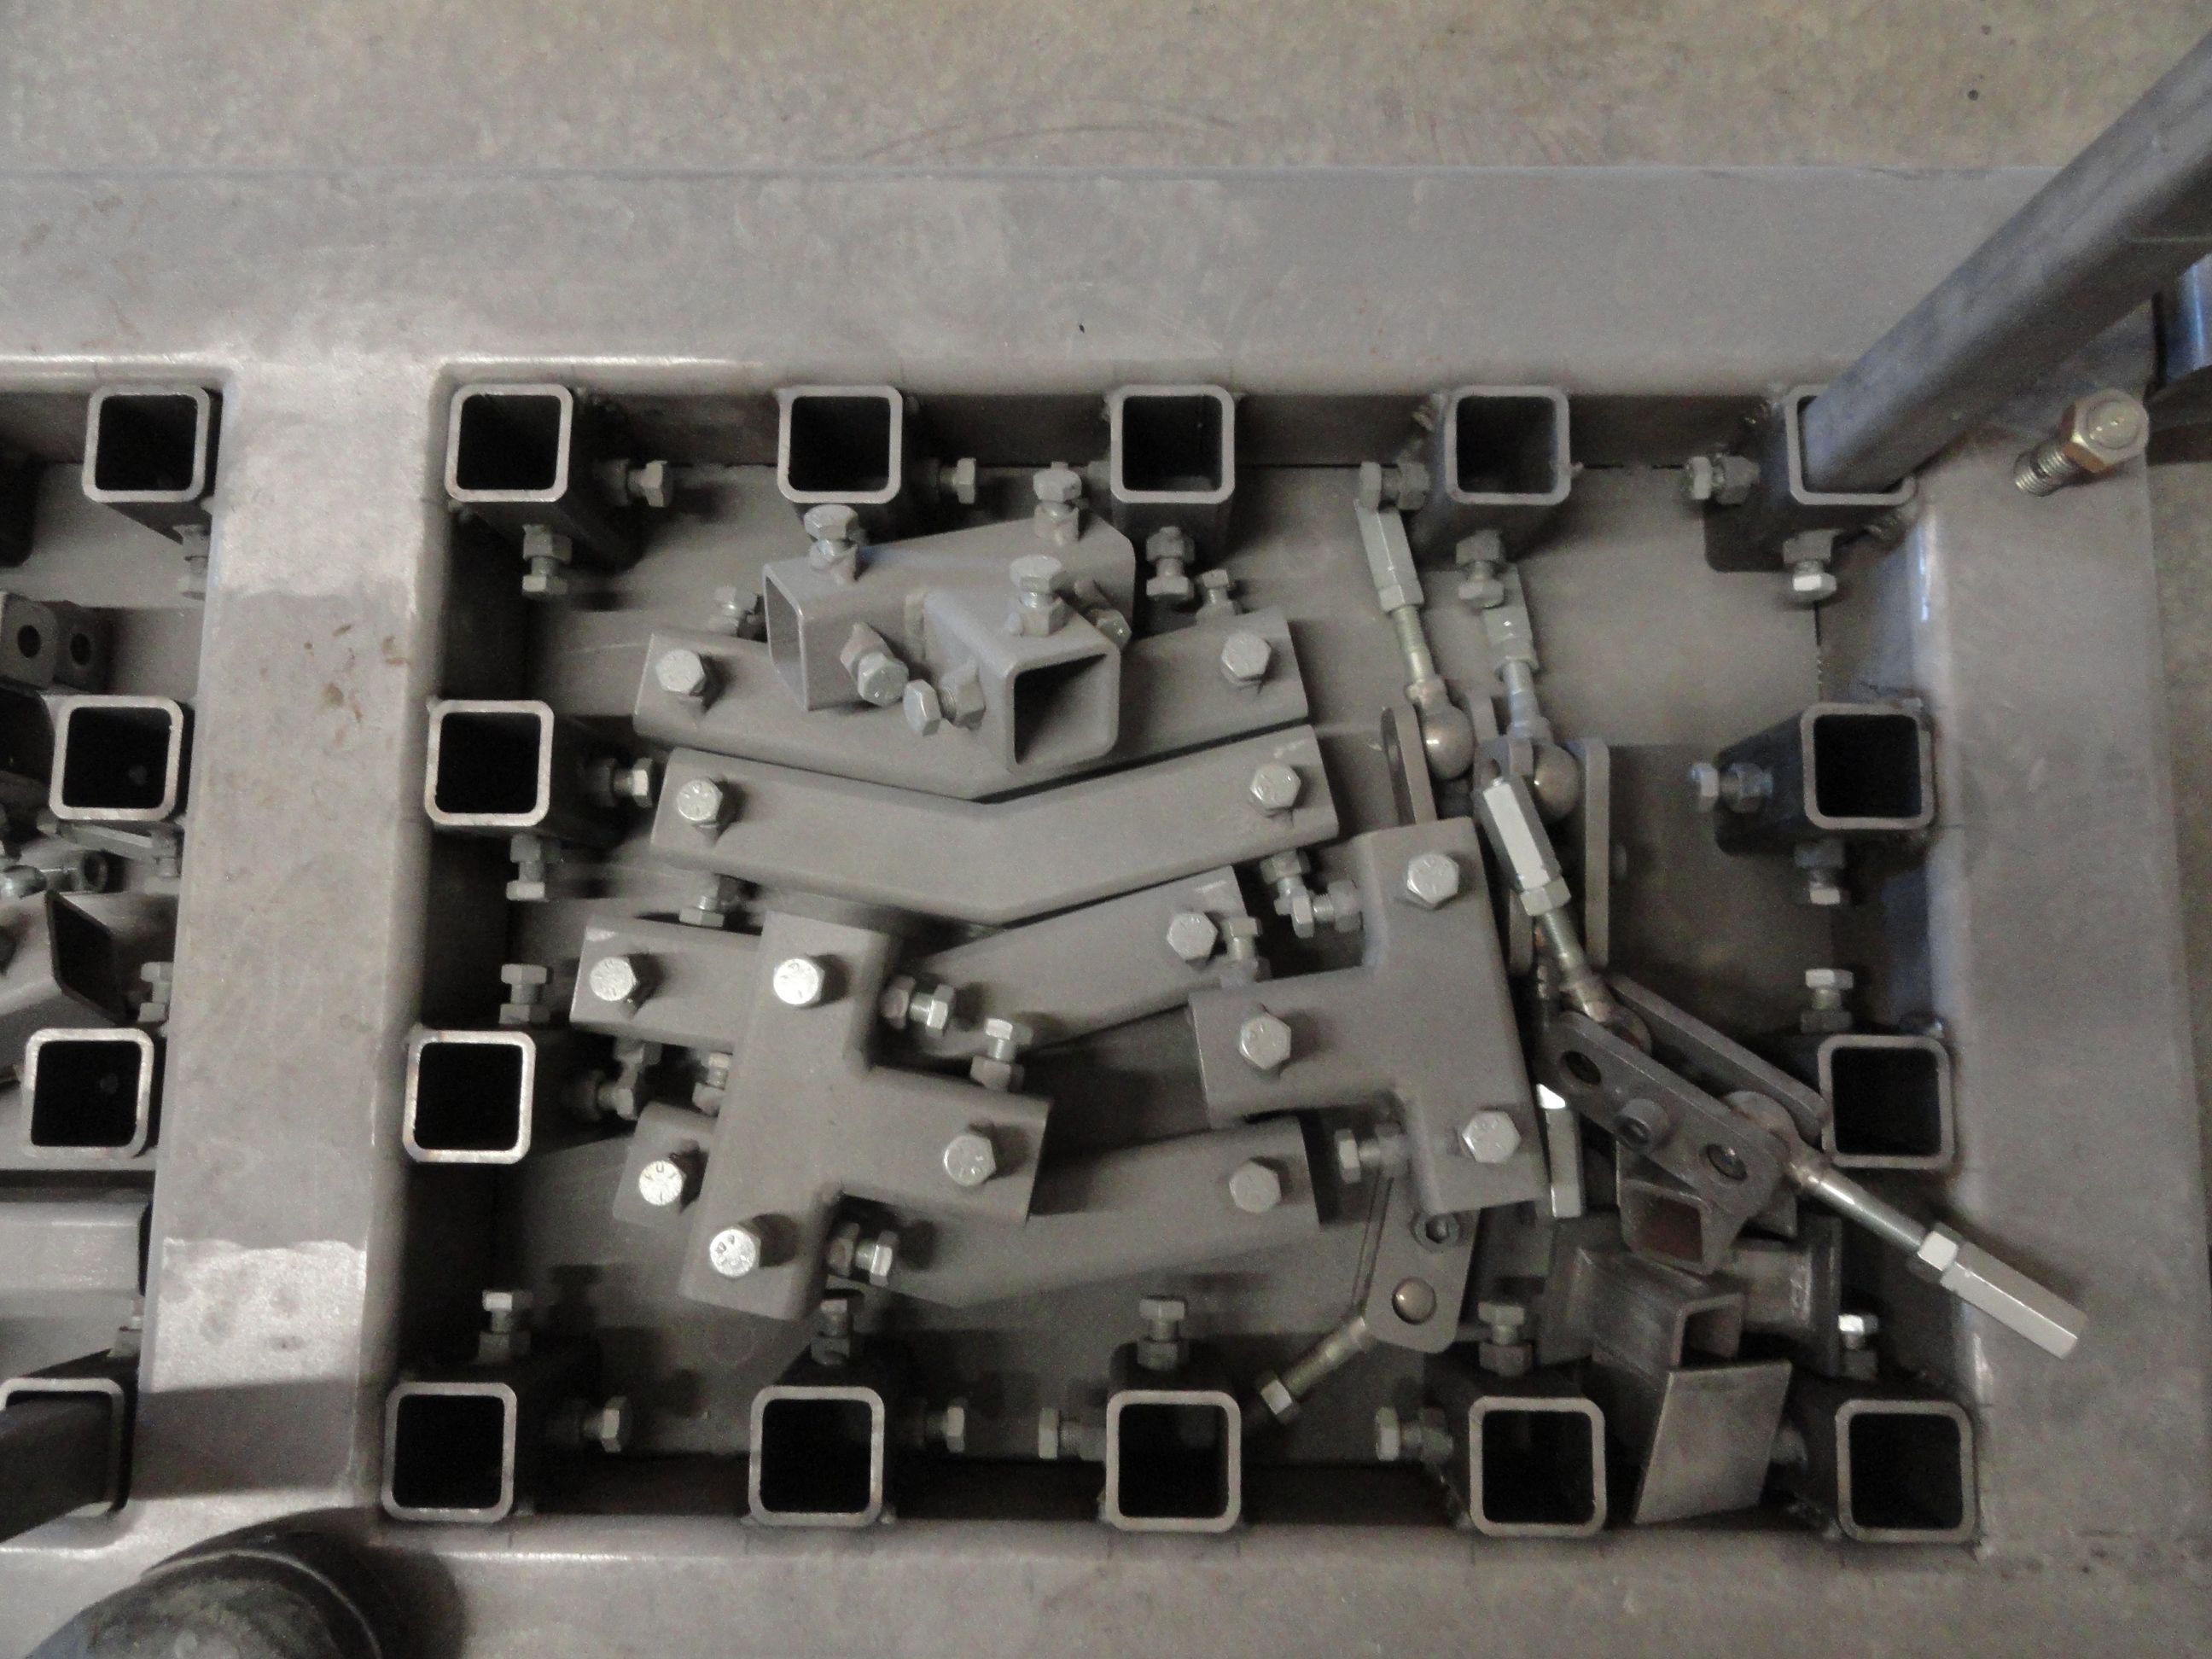
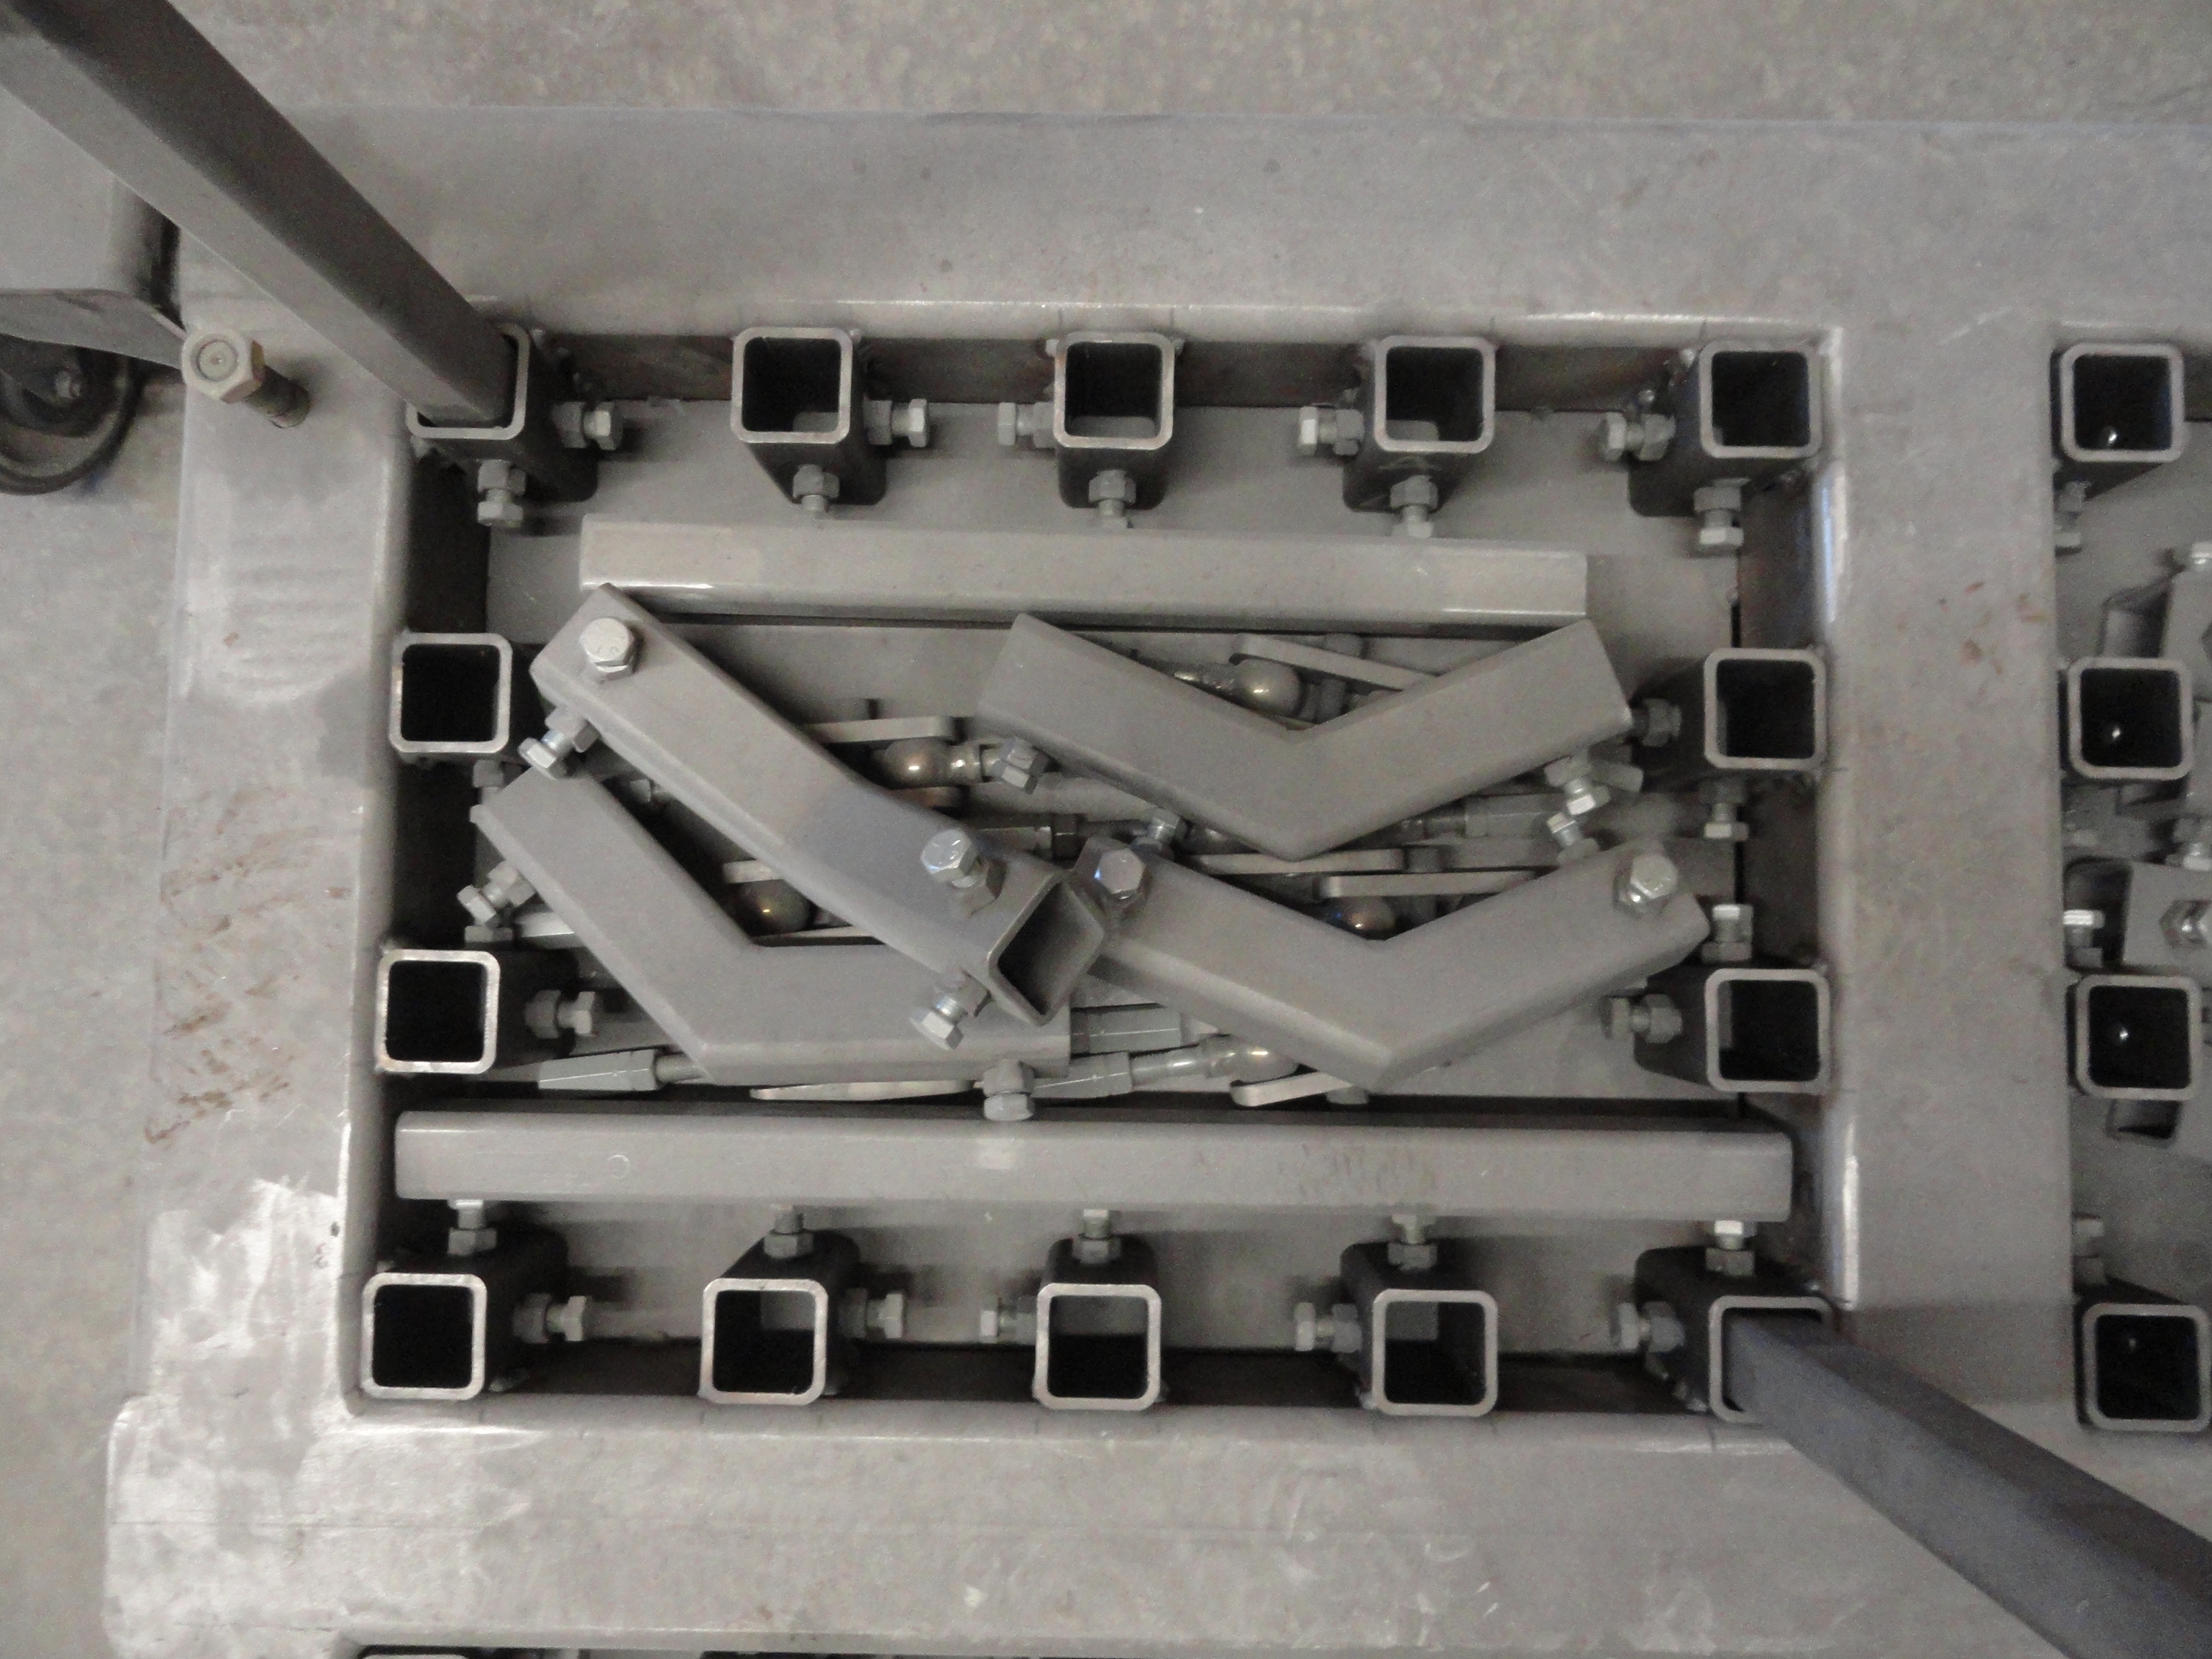
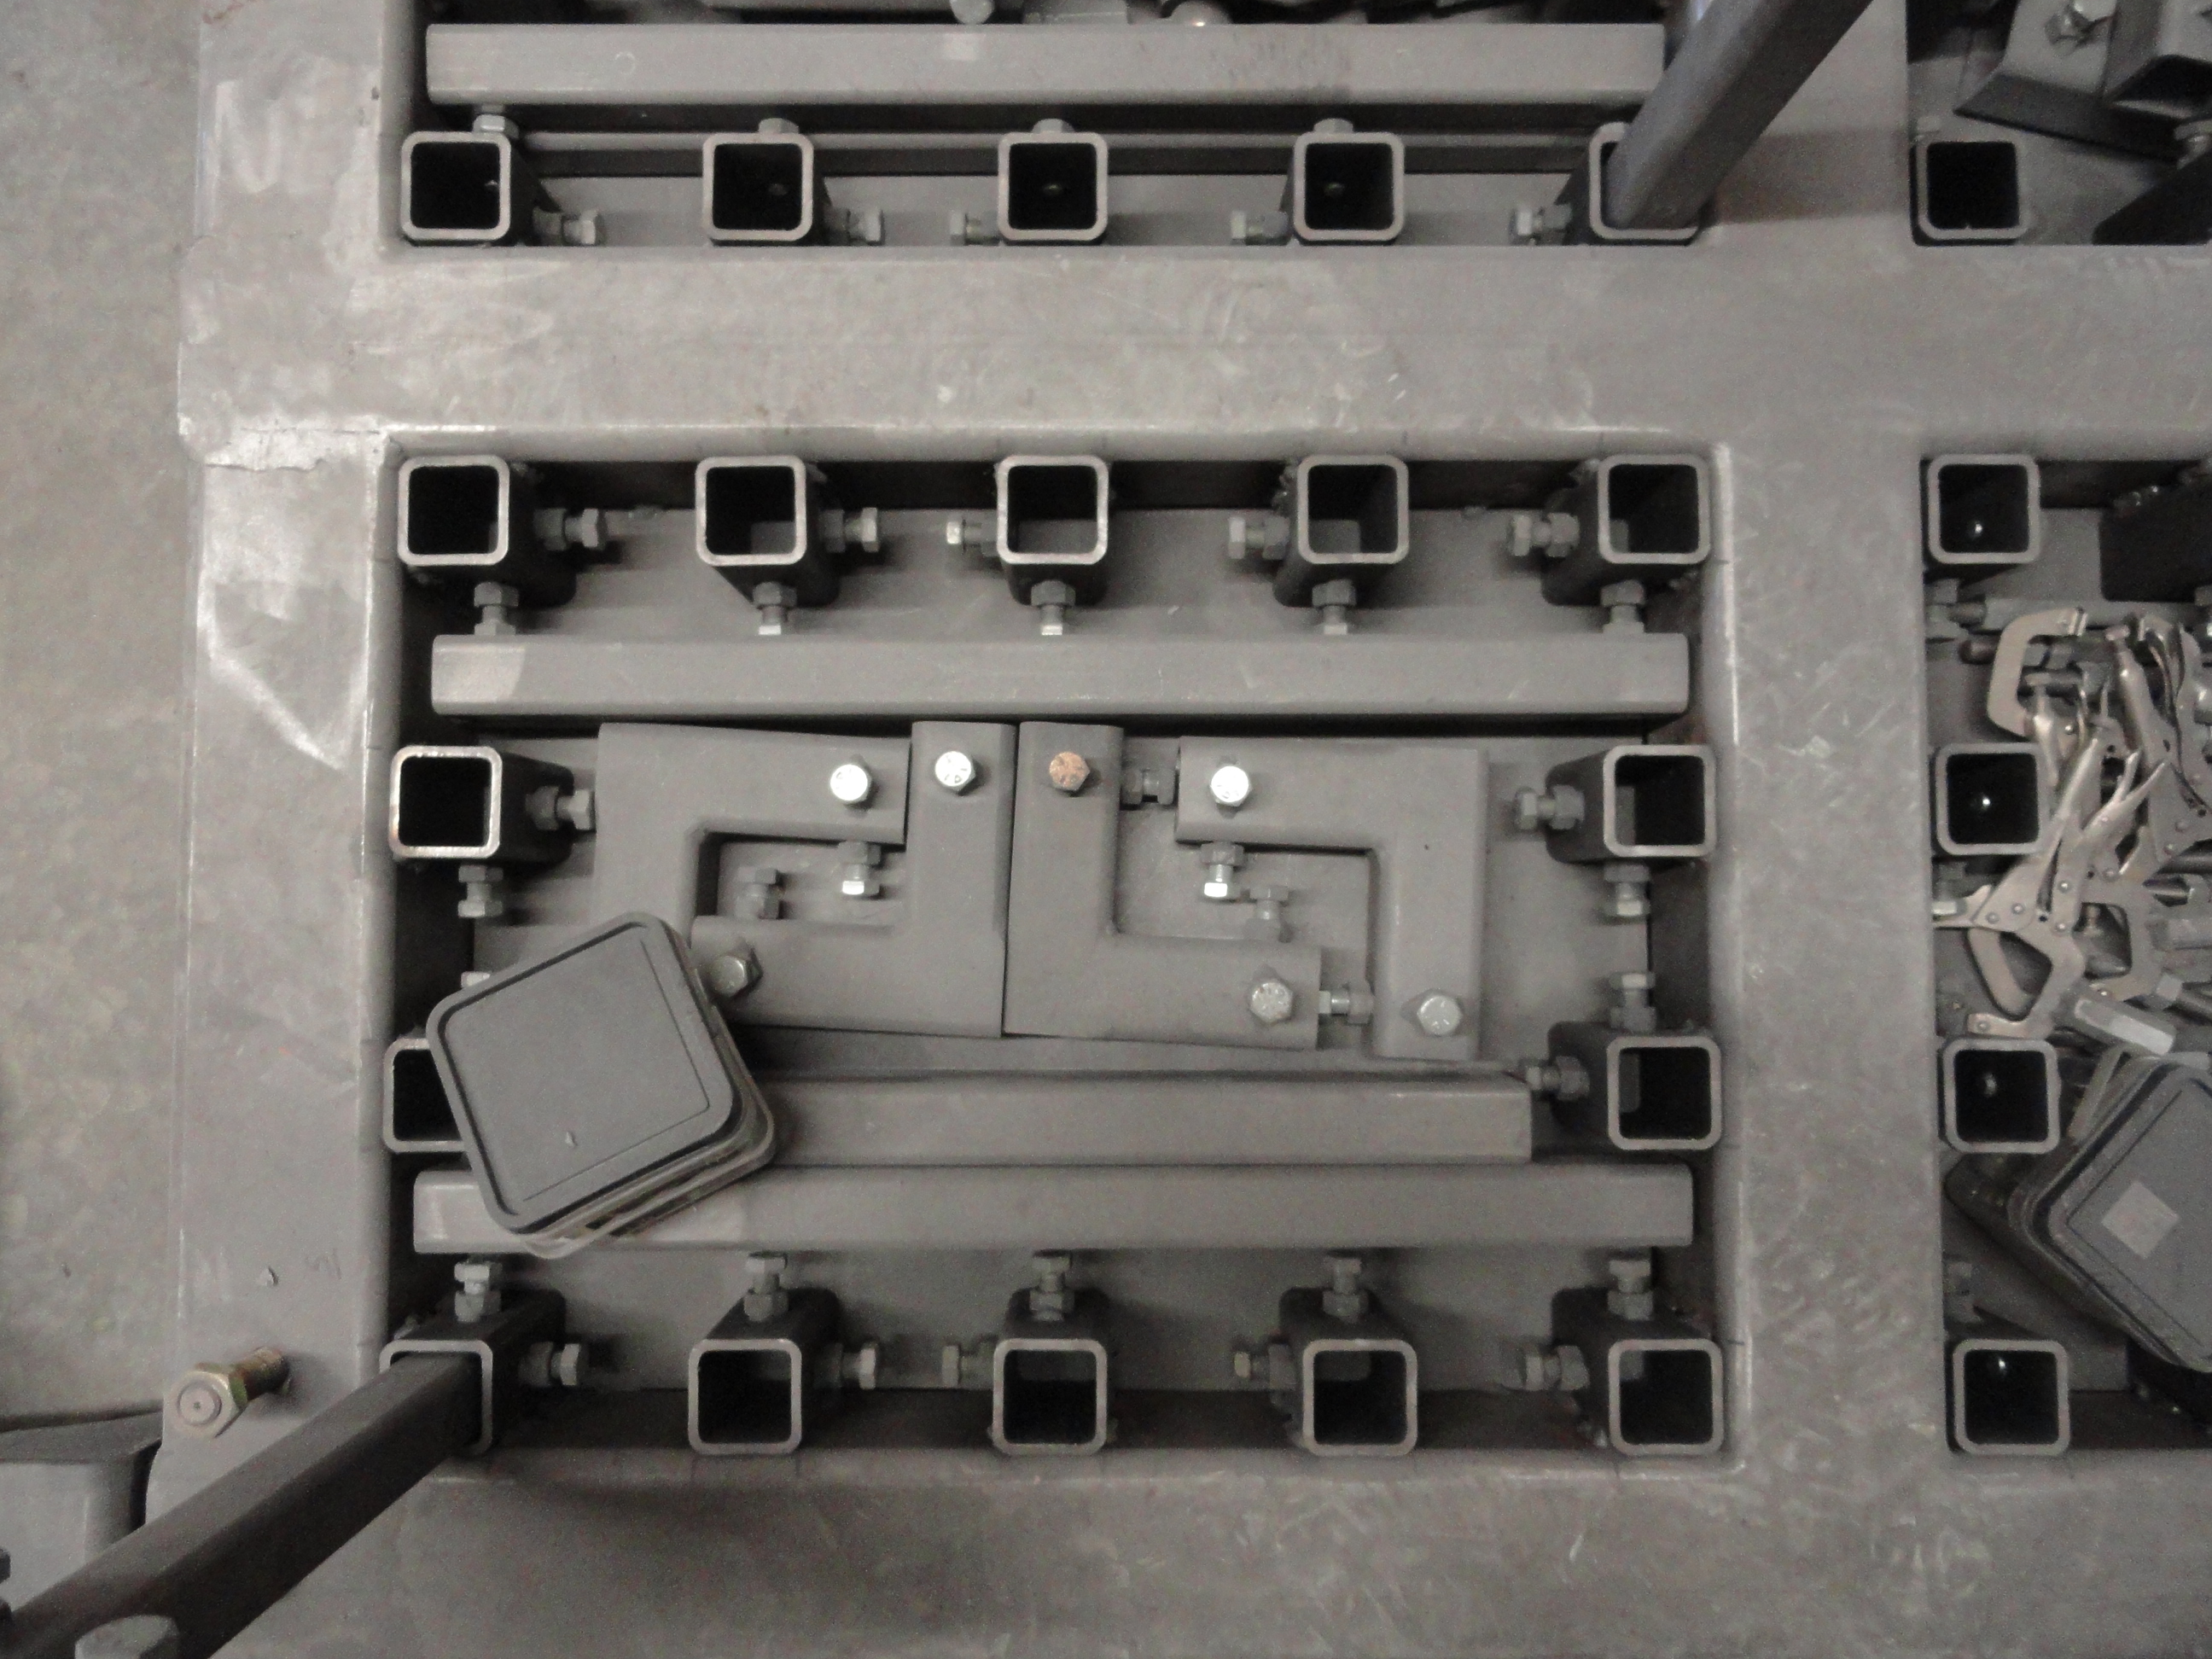
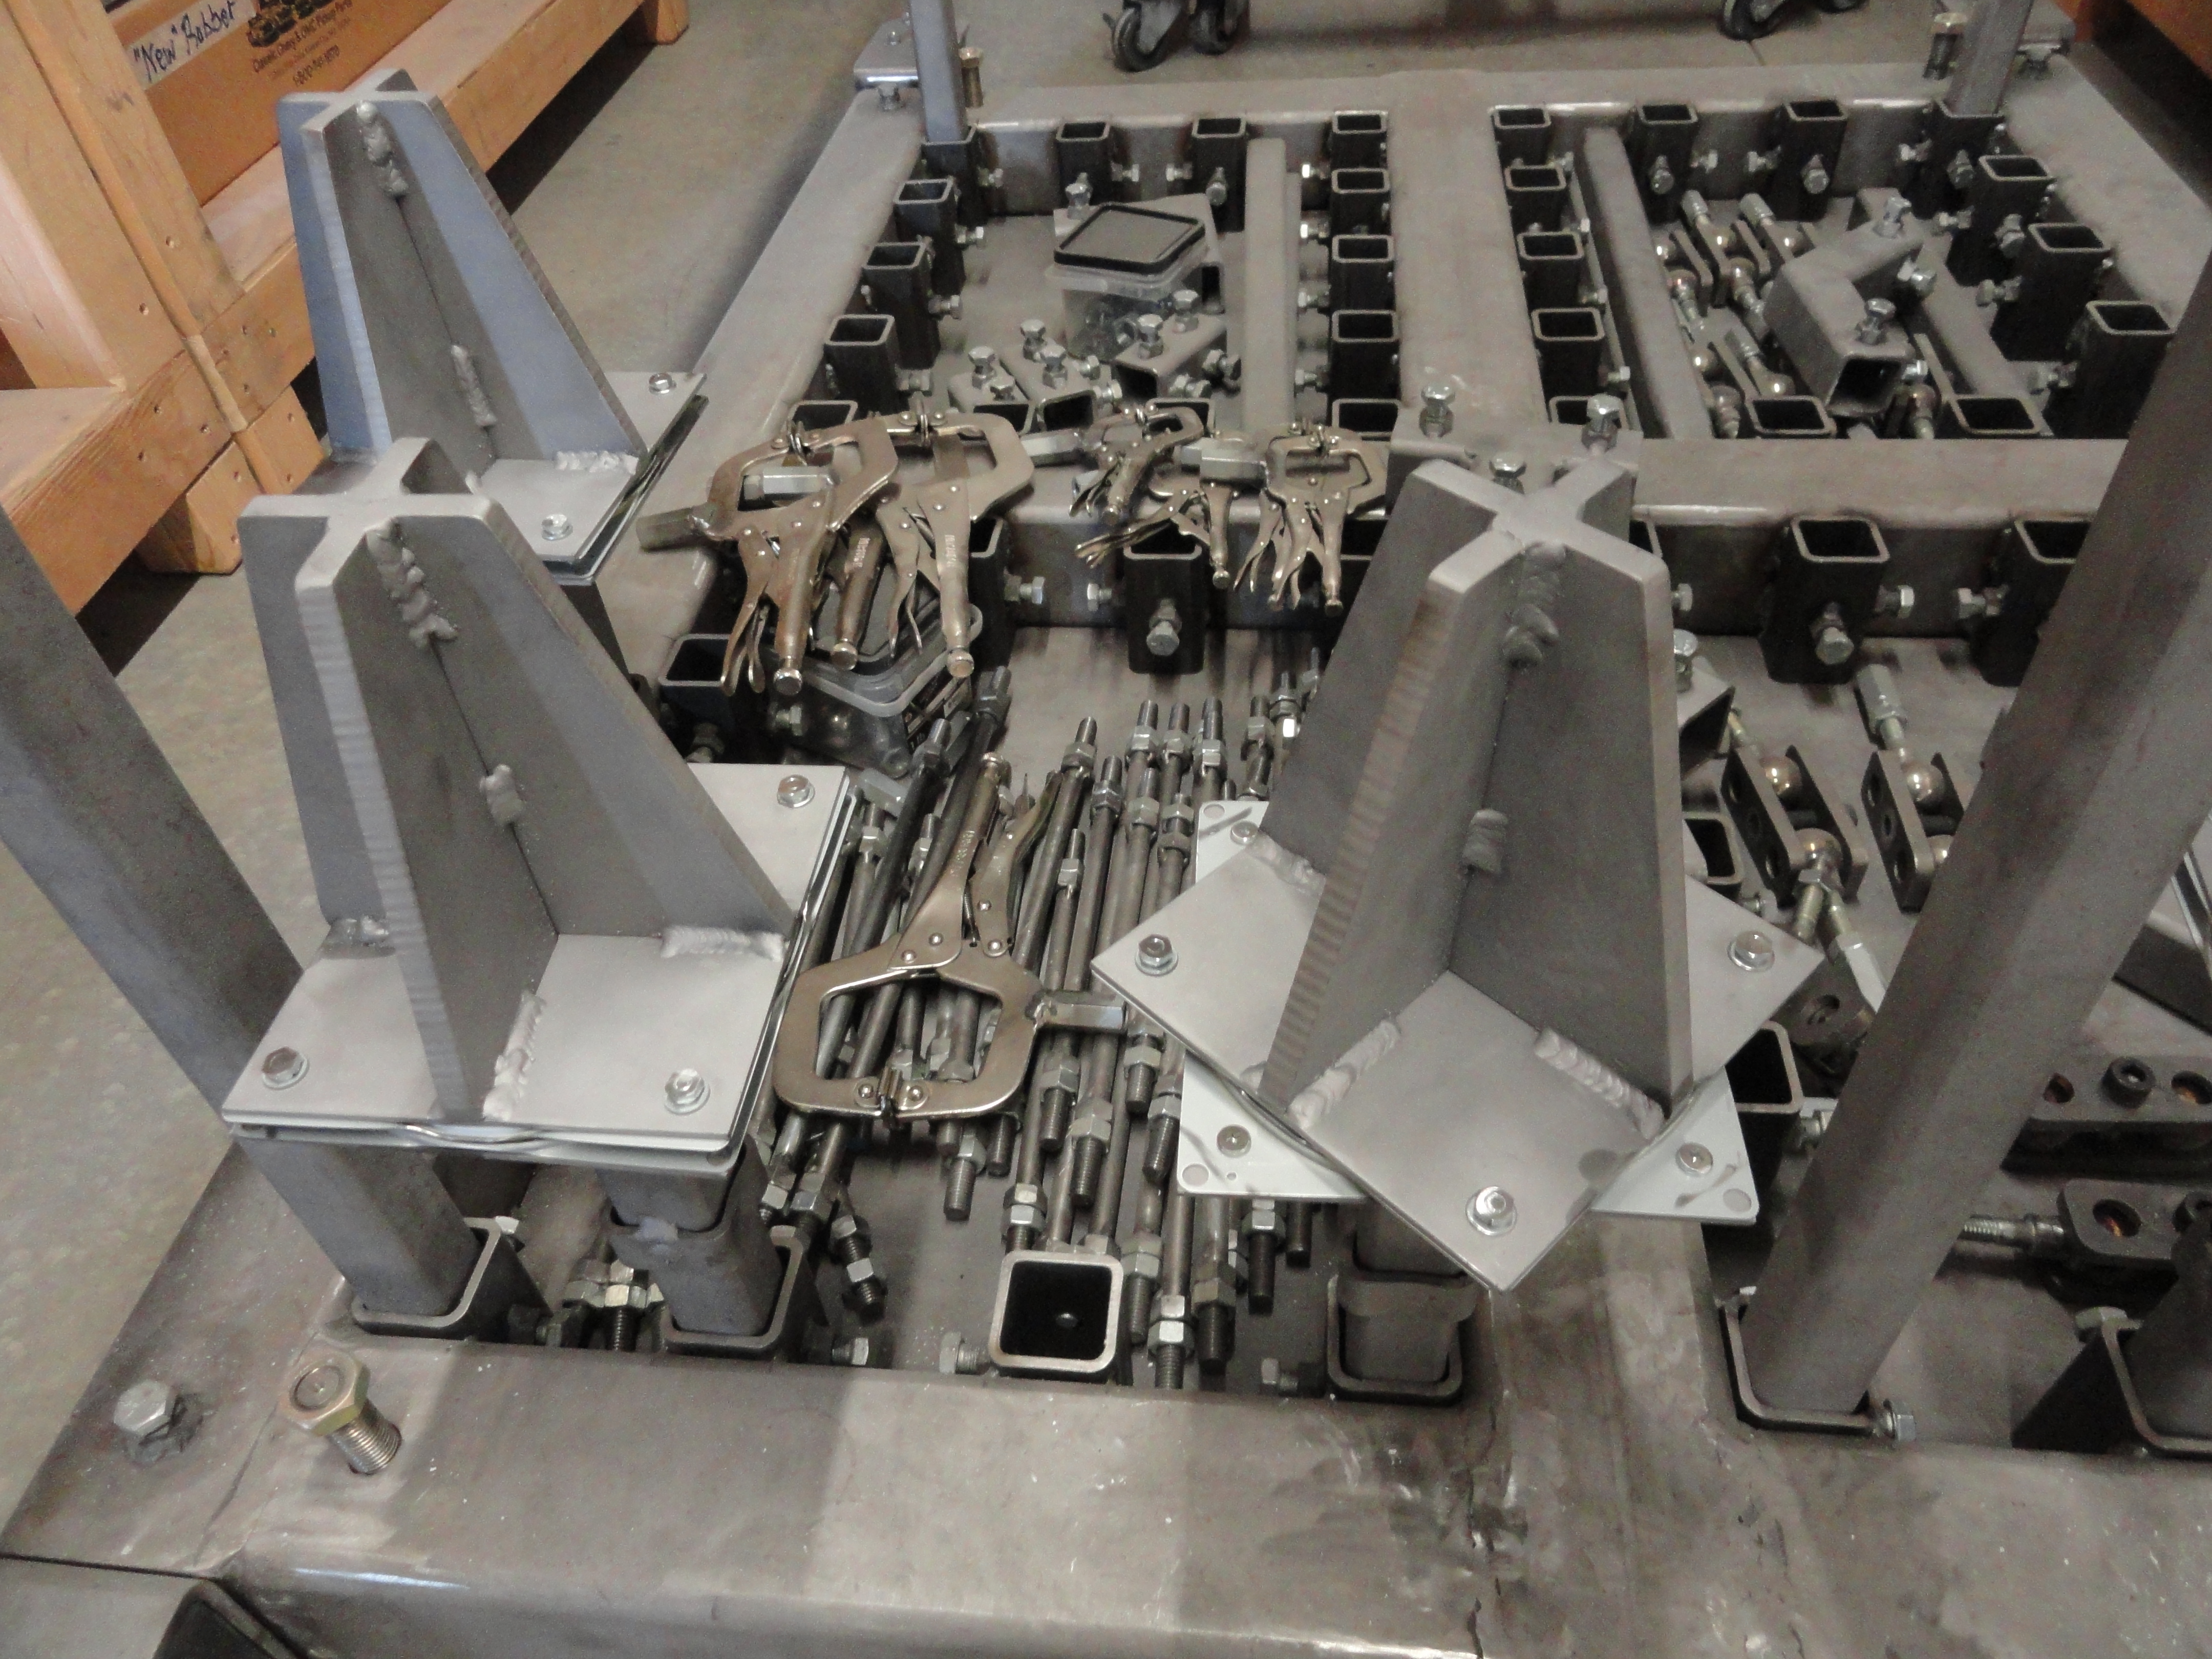
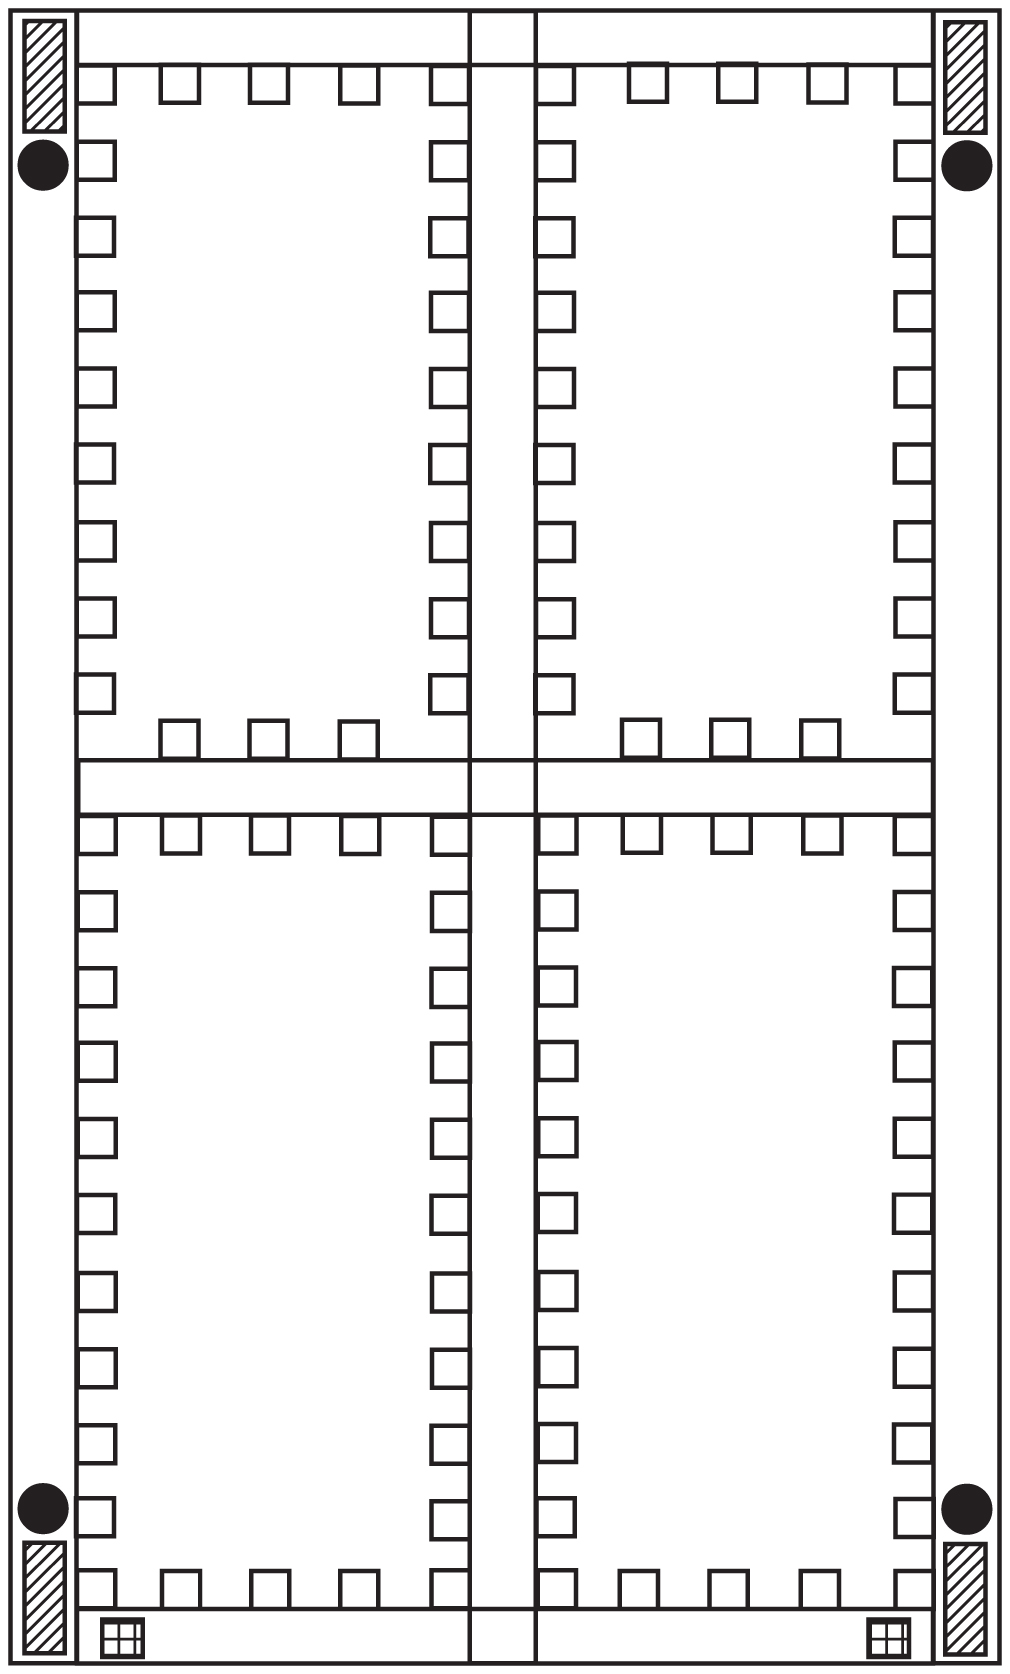 But the story is just beginning! Enter the All-Purpose Body Jig! The jig is made with 4 quadrants to hold the various 'tinker-toy' parts that go with it. It has 14 receivers for each quadrant complete with 2 sides having welded nuts and 1/2" fine thread bolts to lock down whatever you put in it. The jig is made from 4x4 inch square tubing with 1/4" walls. The idea is for it to be very very heavy on purpose so when you enable the 4 heavy duty anchor pads, you can do aggressive sanding, or anything you choose without the jig moving on you. Yet it rolls around pretty nicely on its heavy duty wheels.
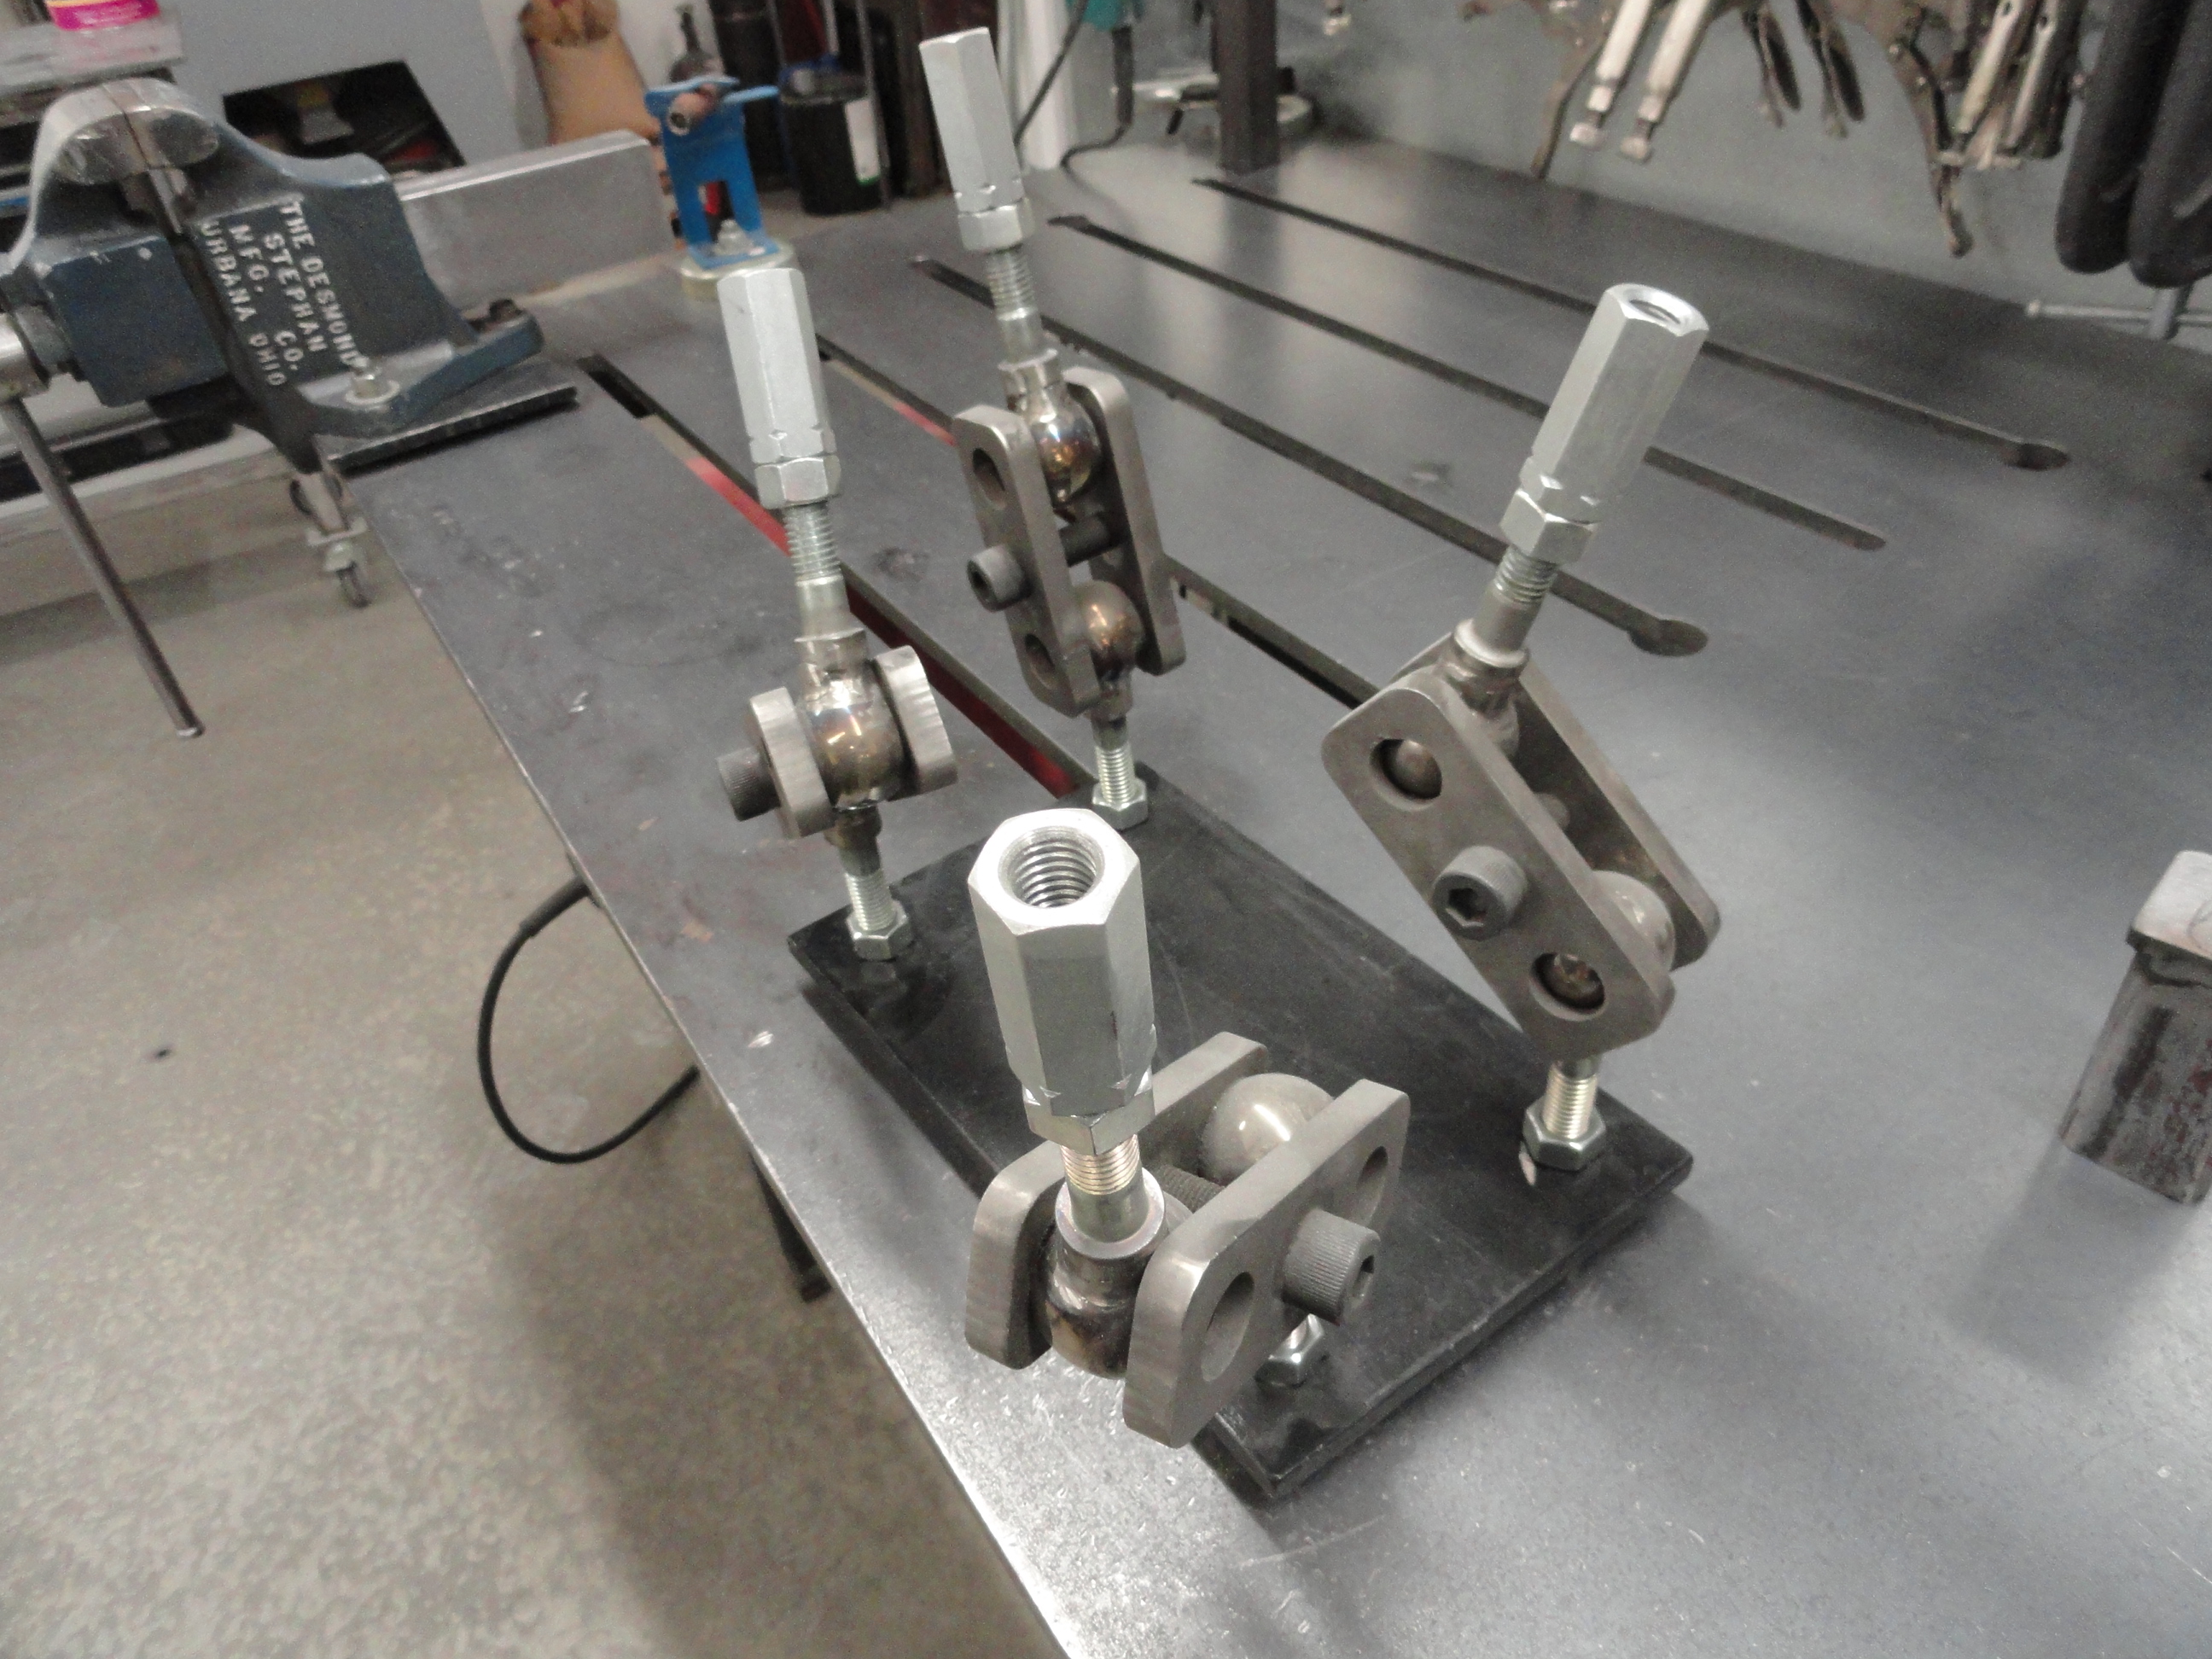
The jig is only about 6 inches off the ground, then however you decide to configure it tops it off. Below is the 4 quadrants so you can see what all tools are part of the jig. Each piece of 1-1/2" tube in various lengths have a cap on the end of them with a welded 1/2" nut on the inside for adding 1/2" threaded round stock to make it more versatile.
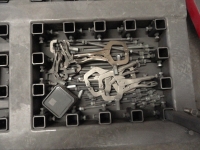
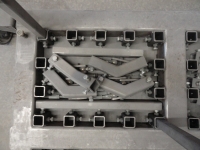
There are several different lengths of 1-1/2" square tubing with the capped ends, vise grips with long nut on one side for threading into the 1/2" round stock, various connector pieces out of 2" with nutted lock-downs, lots of 1/2" threaded round stock for adding more length to whatever you are doing.
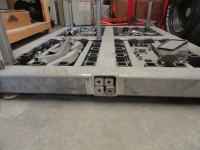
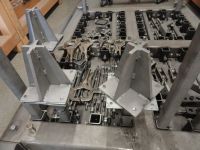
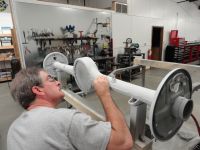
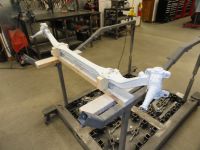

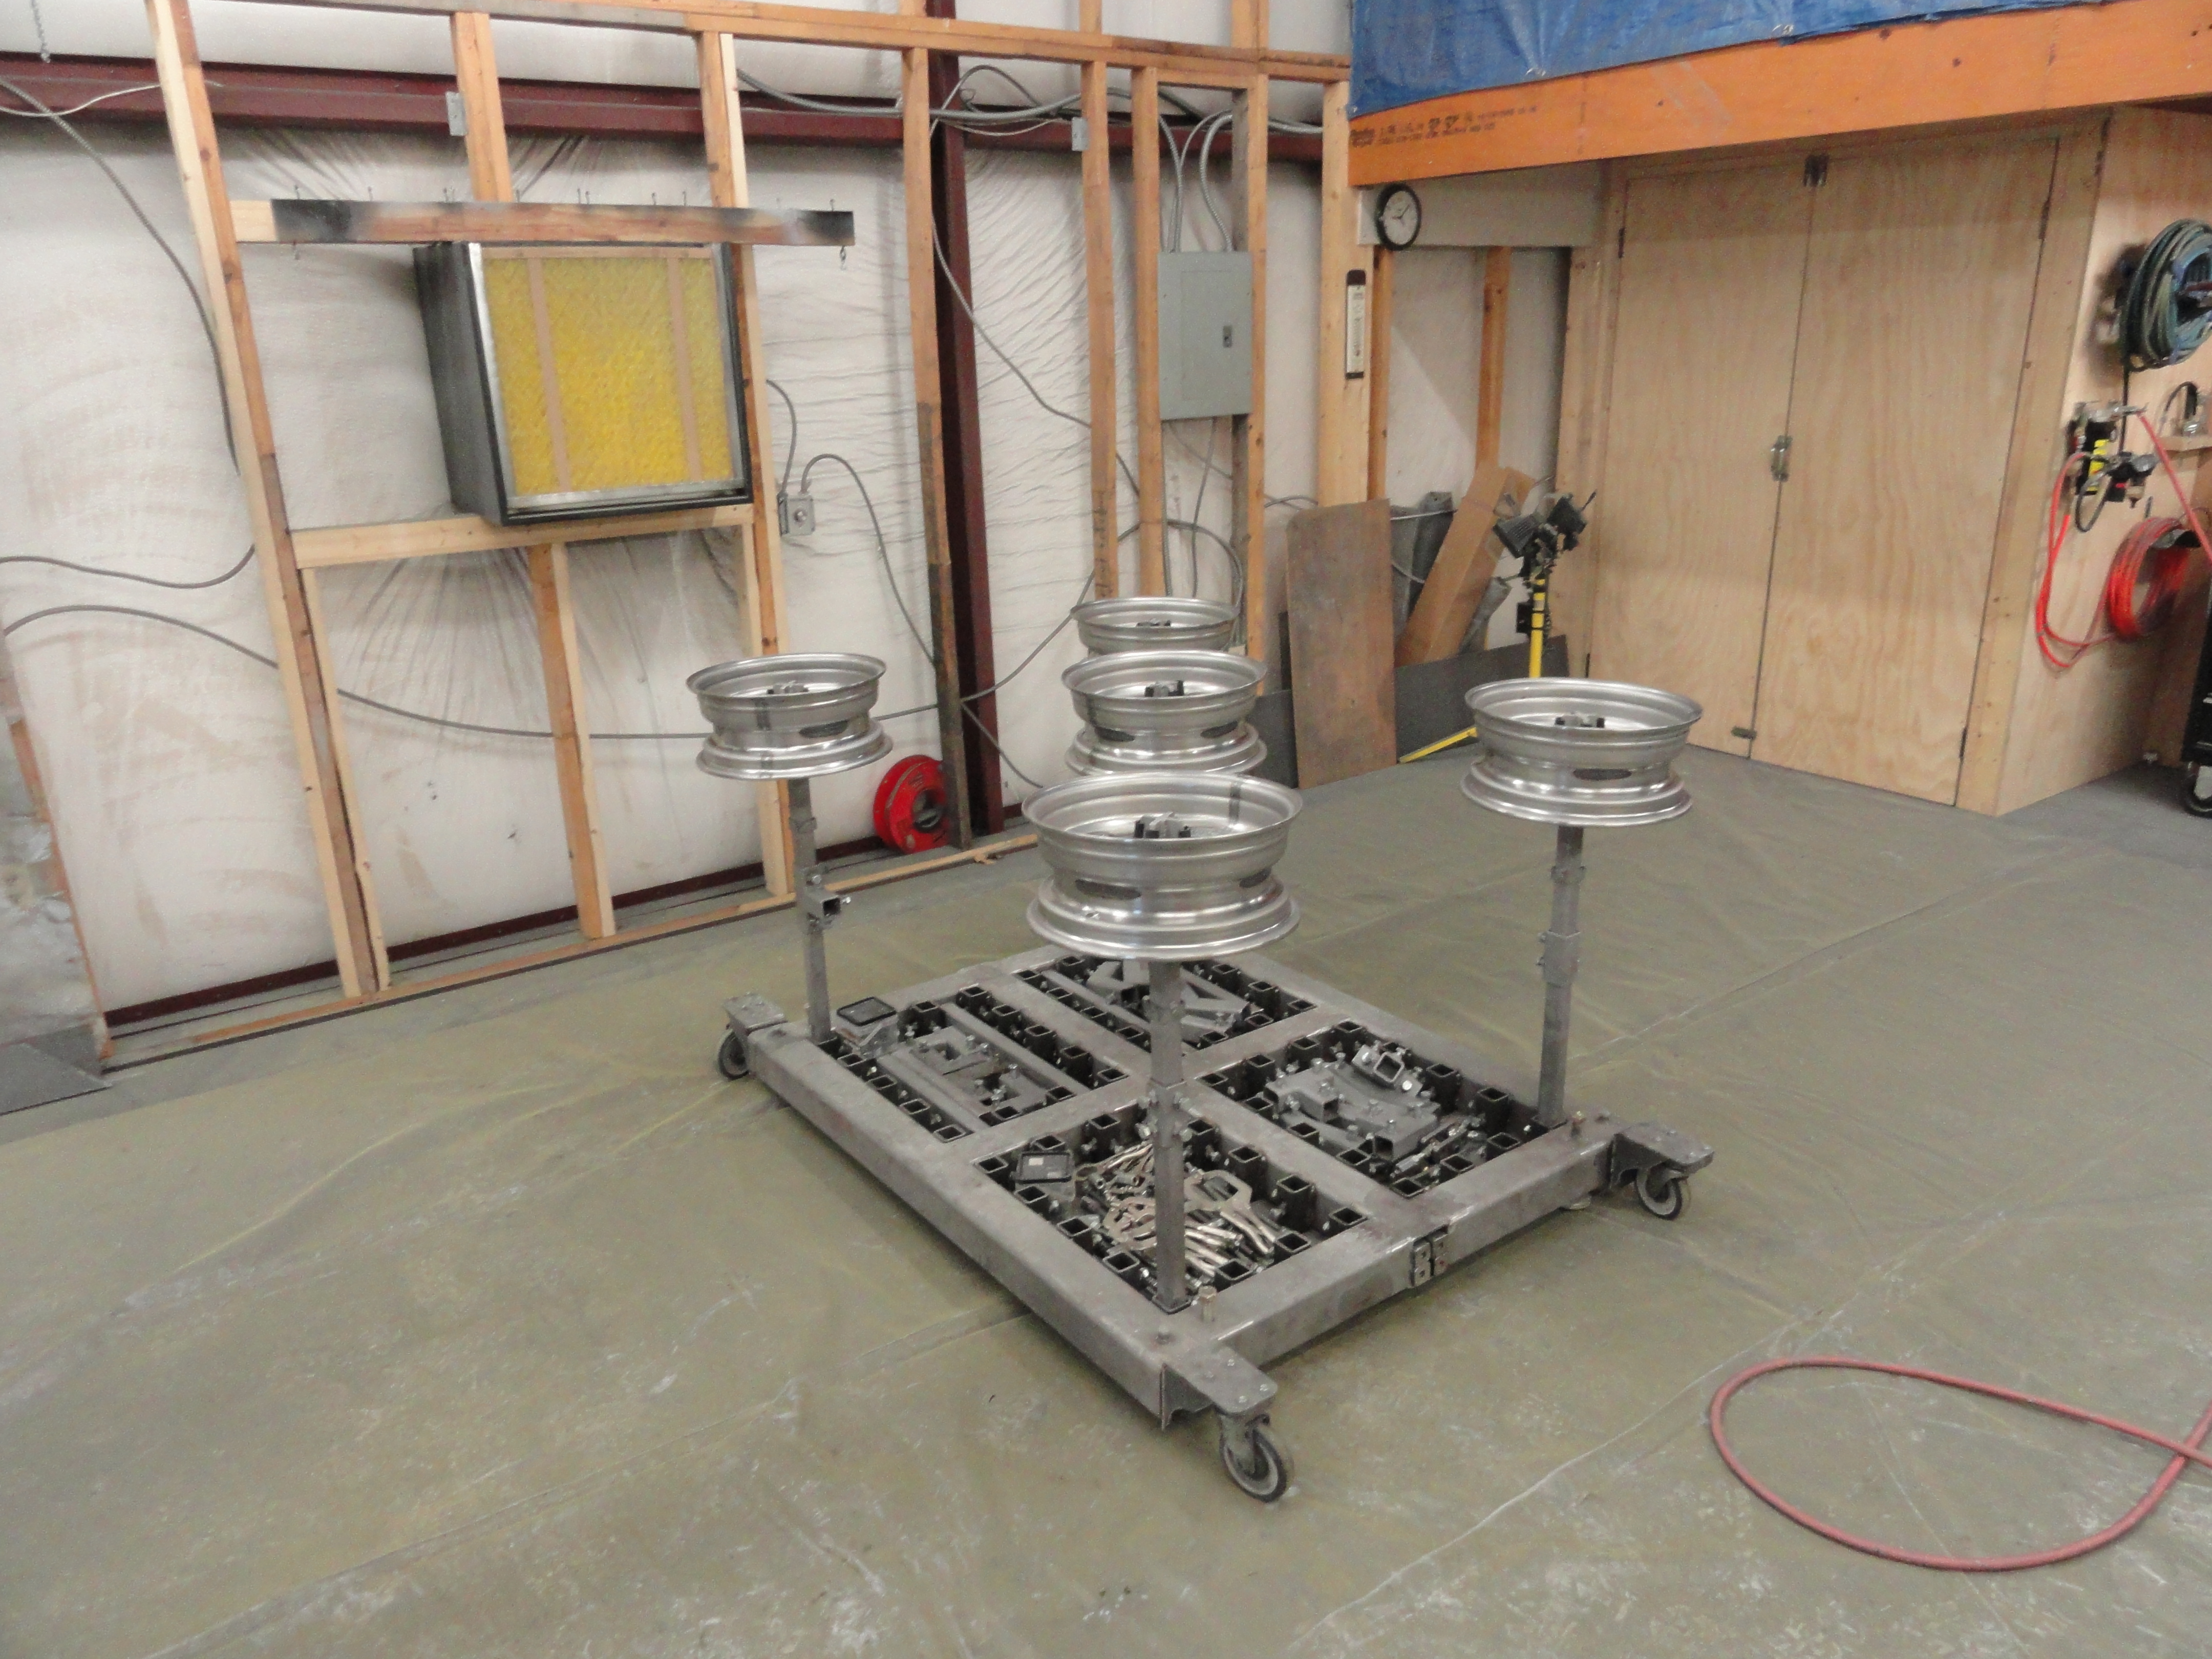
So as you can see, it's a 3 foot by 4 foot jig that allows you to attach fenders, hoods, doors, whatever in any configuration, in any orientation, at any height, anyway you want. With 56 separate receivers built in to the base, you can go anywhere with this thing. The imagination is your only concern. Here are a few things I have done already with it. Mind you, I haven't gotten to most of my body work yet, so I don't have pictures of it in action on doors, hoods, etc yet.
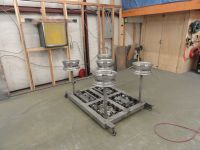
 One of the things I made for it was 5 wheel spinners. They have a lazy susan bearing system in them so that the wheels can very smoothly spin while painting, etc. This is just one of those jigs that takes up floor space but I am not unhappy about it. It is in use pretty much throughout the restoration process. Of course, this is one of those jigs that is never finished because I am already thinking I want some padded rubber for holding doors, etc without marring the surface, so lots more to think about. When you aren't using it, you can put a few parts together and make a dual level table out of it. All of this came from a guy thinking about how to use 2" square tubing to receive 1-1/2" square tubing for mounting stuff in the shop!
More Pictures available at The Site Archive Page!
This article was first published at DevesTechNet.com (c)2015 All Rights Reserved
There are always ways to improve these things. Hopefully we will get some input. One day I was looking at ways to hold things around the shop and I ran across something I thought was really cool! You should take a look at this!
So, I had to make these for myself, but of course that wasn't the end of the story. How do you mount them on the work bench? What if you want them at different heights from the floor up? What if you have large items like truck fenders, doors, hoods, etc? So, I came up with this whole system. It's not just one place in the shop, it's everywhere in the shop. The same problem exists for just about every bench tool you can think of. How to securely mount it at every level in every direction. So, that's why I showed you Lazze's contraption first.

This is a picture of my welding table. After spending a very considerable amount of time here: http://weldingweb.com/forum.php I decided on putting together all the ideas that made sense to me into one really nice welding table. The top is made out of 1/2" by 34" by 72" steel. All six legs are made out of 2" square tubing with 3/16" walls. This was by design. The 3/16" walls are perfect for accommodating 1-1/2" square tubing inside. Not too much slop, just right. The top has 1-1/2" square holes cut just above the legs to allow you to drop 1-1/2" square tubing down in.
Look closely and you can see (below) the 1/2" welded nuts and bolts (on two sides) that hold whatever you put in the hole. This is why your 1-1/2" square stock needs to also have thick walls, so you don't squash the tube and never get it out! Use at least 3/16" walls. You don't have to gorilla them down anyway since there isn't a lot of slop. The back three holes are used to hold the rack system for holding the various tools and their mountings. The front three holes are for anything you want. I leave my vise in the far left hole, leaving two places to insert things like shears, paint shaker, bench grinder, etc, etc. I made the caps so nothing falls down the hole. The caps just sit on top of the bolts protruding underneath.
 This is what a typical mount looks like. I use 3/8" steel plate and weld the 1-1/2" by 6 inch square tube on solidly. Everything I have sits on one of those plates. Now I can put any of my tools anywhere in the shop. (The piece of copper shown comes in handy when welding small things together).
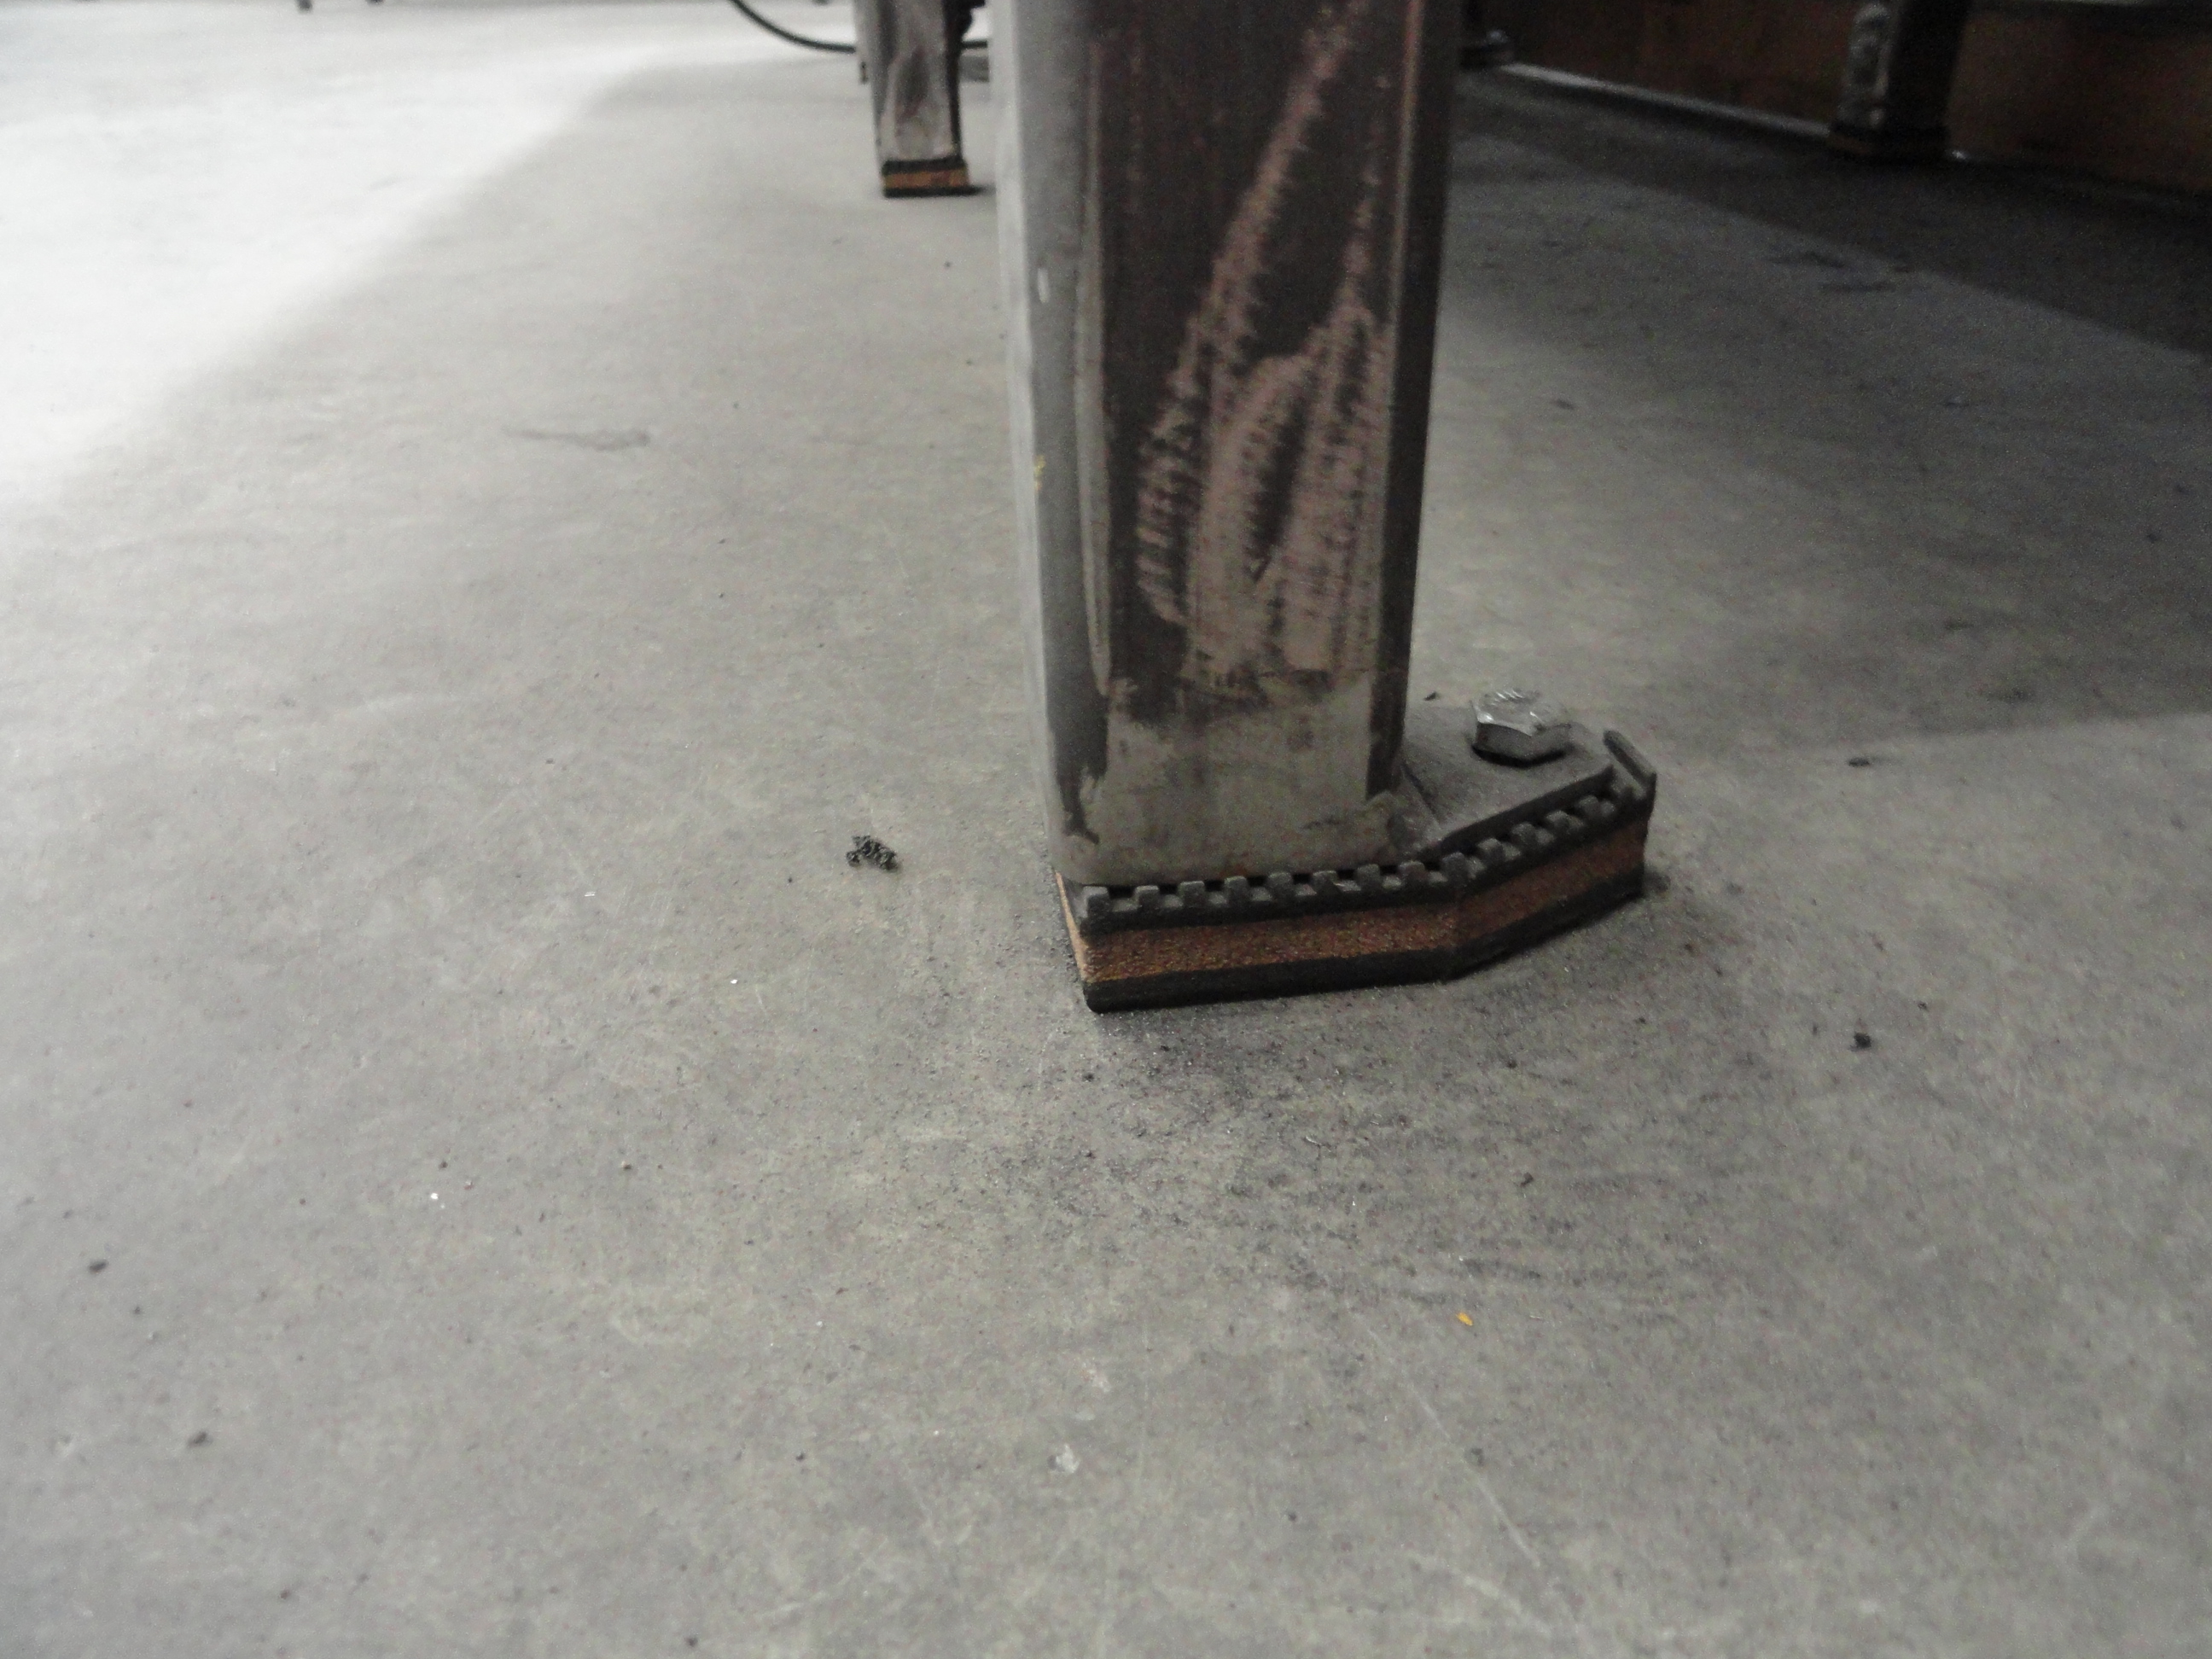 The wall behind the welding table is two 4' x 10' pieces of galvanized steel. I get a lot of welding spatter and this wall really handles that well. Besides, it's magnetic so I can hang stuff on it. The tables legs have small plates welded to the bottom, then I got a nice pad to put between it and the floor. I then bolted the welding table in 4 places firmly to the floor using 1/2" concrete anchor bolts. It's not going anywhere, and where you really appreciate that is when you install the pneumatic paint shaker to the table and run it. Very quiet and solid.
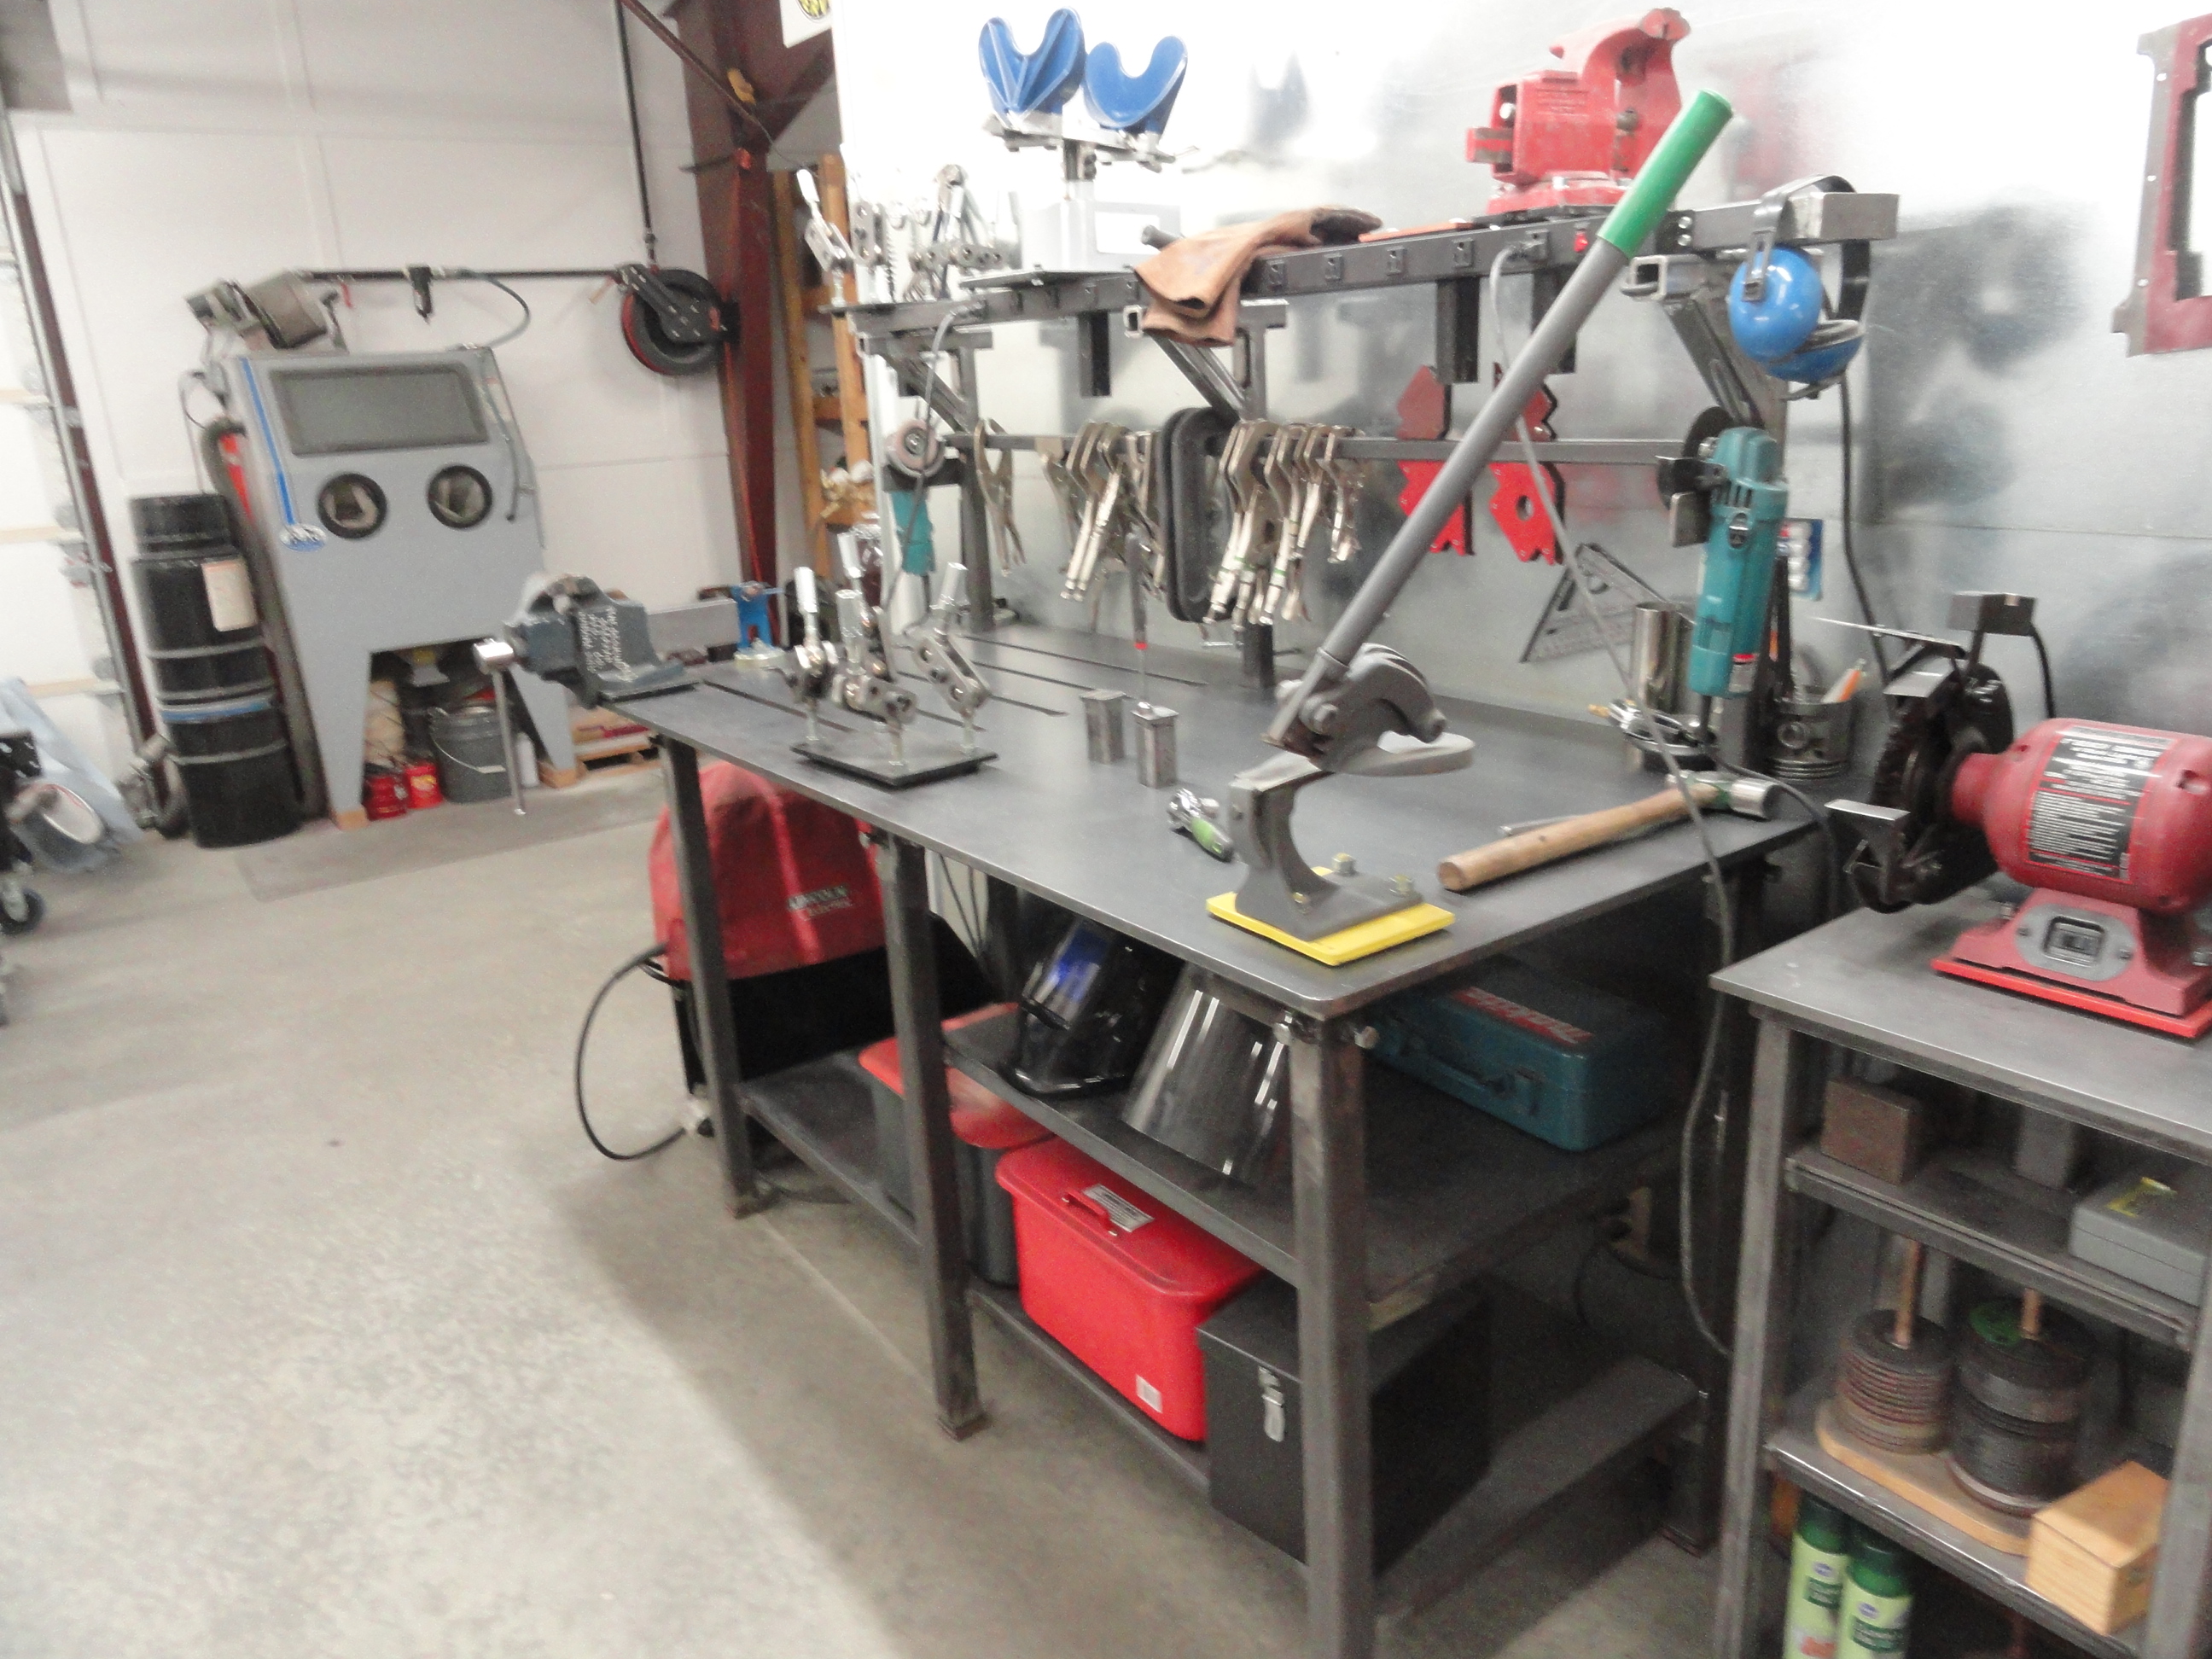 The welding table is really the center of your metal working space, and the way I feel about it, you need a table that fits your space without overwhelming it. The size I chose was in that spirit. The bench grinder table you see in this picture also uses the same setup. This way if I choose to move the bench grinder to another table, or use the bench grinder table for something else, I can. Below are a few other tables set up the very same way. At least one leg has the hole available for other tools. Even the Roller Stand is compliant!
So you can see some planning was involved, but I never thought it would just keep going from there. I have used my shop in this configuration for about 2 years now and do not regret the way it's set up at all.


 But the story is just beginning! Enter the All-Purpose Body Jig! The jig is made with 4 quadrants to hold the various 'tinker-toy' parts that go with it. It has 14 receivers for each quadrant complete with 2 sides having welded nuts and 1/2" fine thread bolts to lock down whatever you put in it. The jig is made from 4x4 inch square tubing with 1/4" walls. The idea is for it to be very very heavy on purpose so when you enable the 4 heavy duty anchor pads, you can do aggressive sanding, or anything you choose without the jig moving on you. Yet it rolls around pretty nicely on its heavy duty wheels.
The jig is only about 6 inches off the ground, then however you decide to configure it tops it off. Below is the 4 quadrants so you can see what all tools are part of the jig. Each piece of 1-1/2" tube in various lengths have a cap on the end of them with a welded 1/2" nut on the inside for adding 1/2" threaded round stock to make it more versatile.

There are several different lengths of 1-1/2" square tubing with the capped ends, vise grips with long nut on one side for threading into the 1/2" round stock, various connector pieces out of 2" with nutted lock-downs, lots of 1/2" threaded round stock for adding more length to whatever you are doing.


So as you can see, it's a 3 foot by 4 foot jig that allows you to attach fenders, hoods, doors, whatever in any configuration, in any orientation, at any height, anyway you want. With 56 separate receivers built in to the base, you can go anywhere with this thing. The imagination is your only concern. Here are a few things I have done already with it. Mind you, I haven't gotten to most of my body work yet, so I don't have pictures of it in action on doors, hoods, etc yet.
 One of the things I made for it was 5 wheel spinners. They have a lazy susan bearing system in them so that the wheels can very smoothly spin while painting, etc. This is just one of those jigs that takes up floor space but I am not unhappy about it. It is in use pretty much throughout the restoration process. Of course, this is one of those jigs that is never finished because I am already thinking I want some padded rubber for holding doors, etc without marring the surface, so lots more to think about. When you aren't using it, you can put a few parts together and make a dual level table out of it. All of this came from a guy thinking about how to use 2" square tubing to receive 1-1/2" square tubing for mounting stuff in the shop!
More Pictures available at The Site Archive Page!
This article was first published at DevesTechNet.com (c)2015 All Rights Reserved