


 Welcome to Deves Technet.com Forums. I encourage everyone to register so we can get a better idea of the traffic and its usefulness. Please leave a word or two describing your stay and what we can do to make it more enjoyable. Thanks!
 Tweet
Tweet
This week and for a few weeks to come I will be discussing how to replace rusted out floor panels, kick panels, structural supports and finish the series with how to restore your door hinges. Hope you are having as much fun as I am! You can see this episode in pictures HERE.
Passenger Side Sheet Metal Part One:
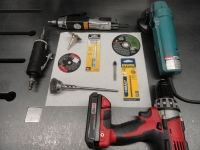
 This is the same 1953 I did the wiring harness on. I can't begin to describe the misery this truck must have went through. I found it sitting in a ditch several years ago so during the rainy season, the cab was just filled with water. I am actually surprised things are not worse. Luckily I didn't pay very much for the truck! Left is a pic of some of the tools needed for this project. Some of these tools are just nice to have. Honestly, most of the work is being done with the Makita Grinder. As you can see, there is a lot of damage. This week we will attack the passenger side, then move on to the driver's side. I am not left handed and find the passenger side to be the most difficult.
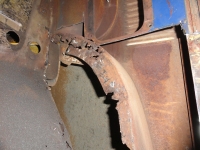
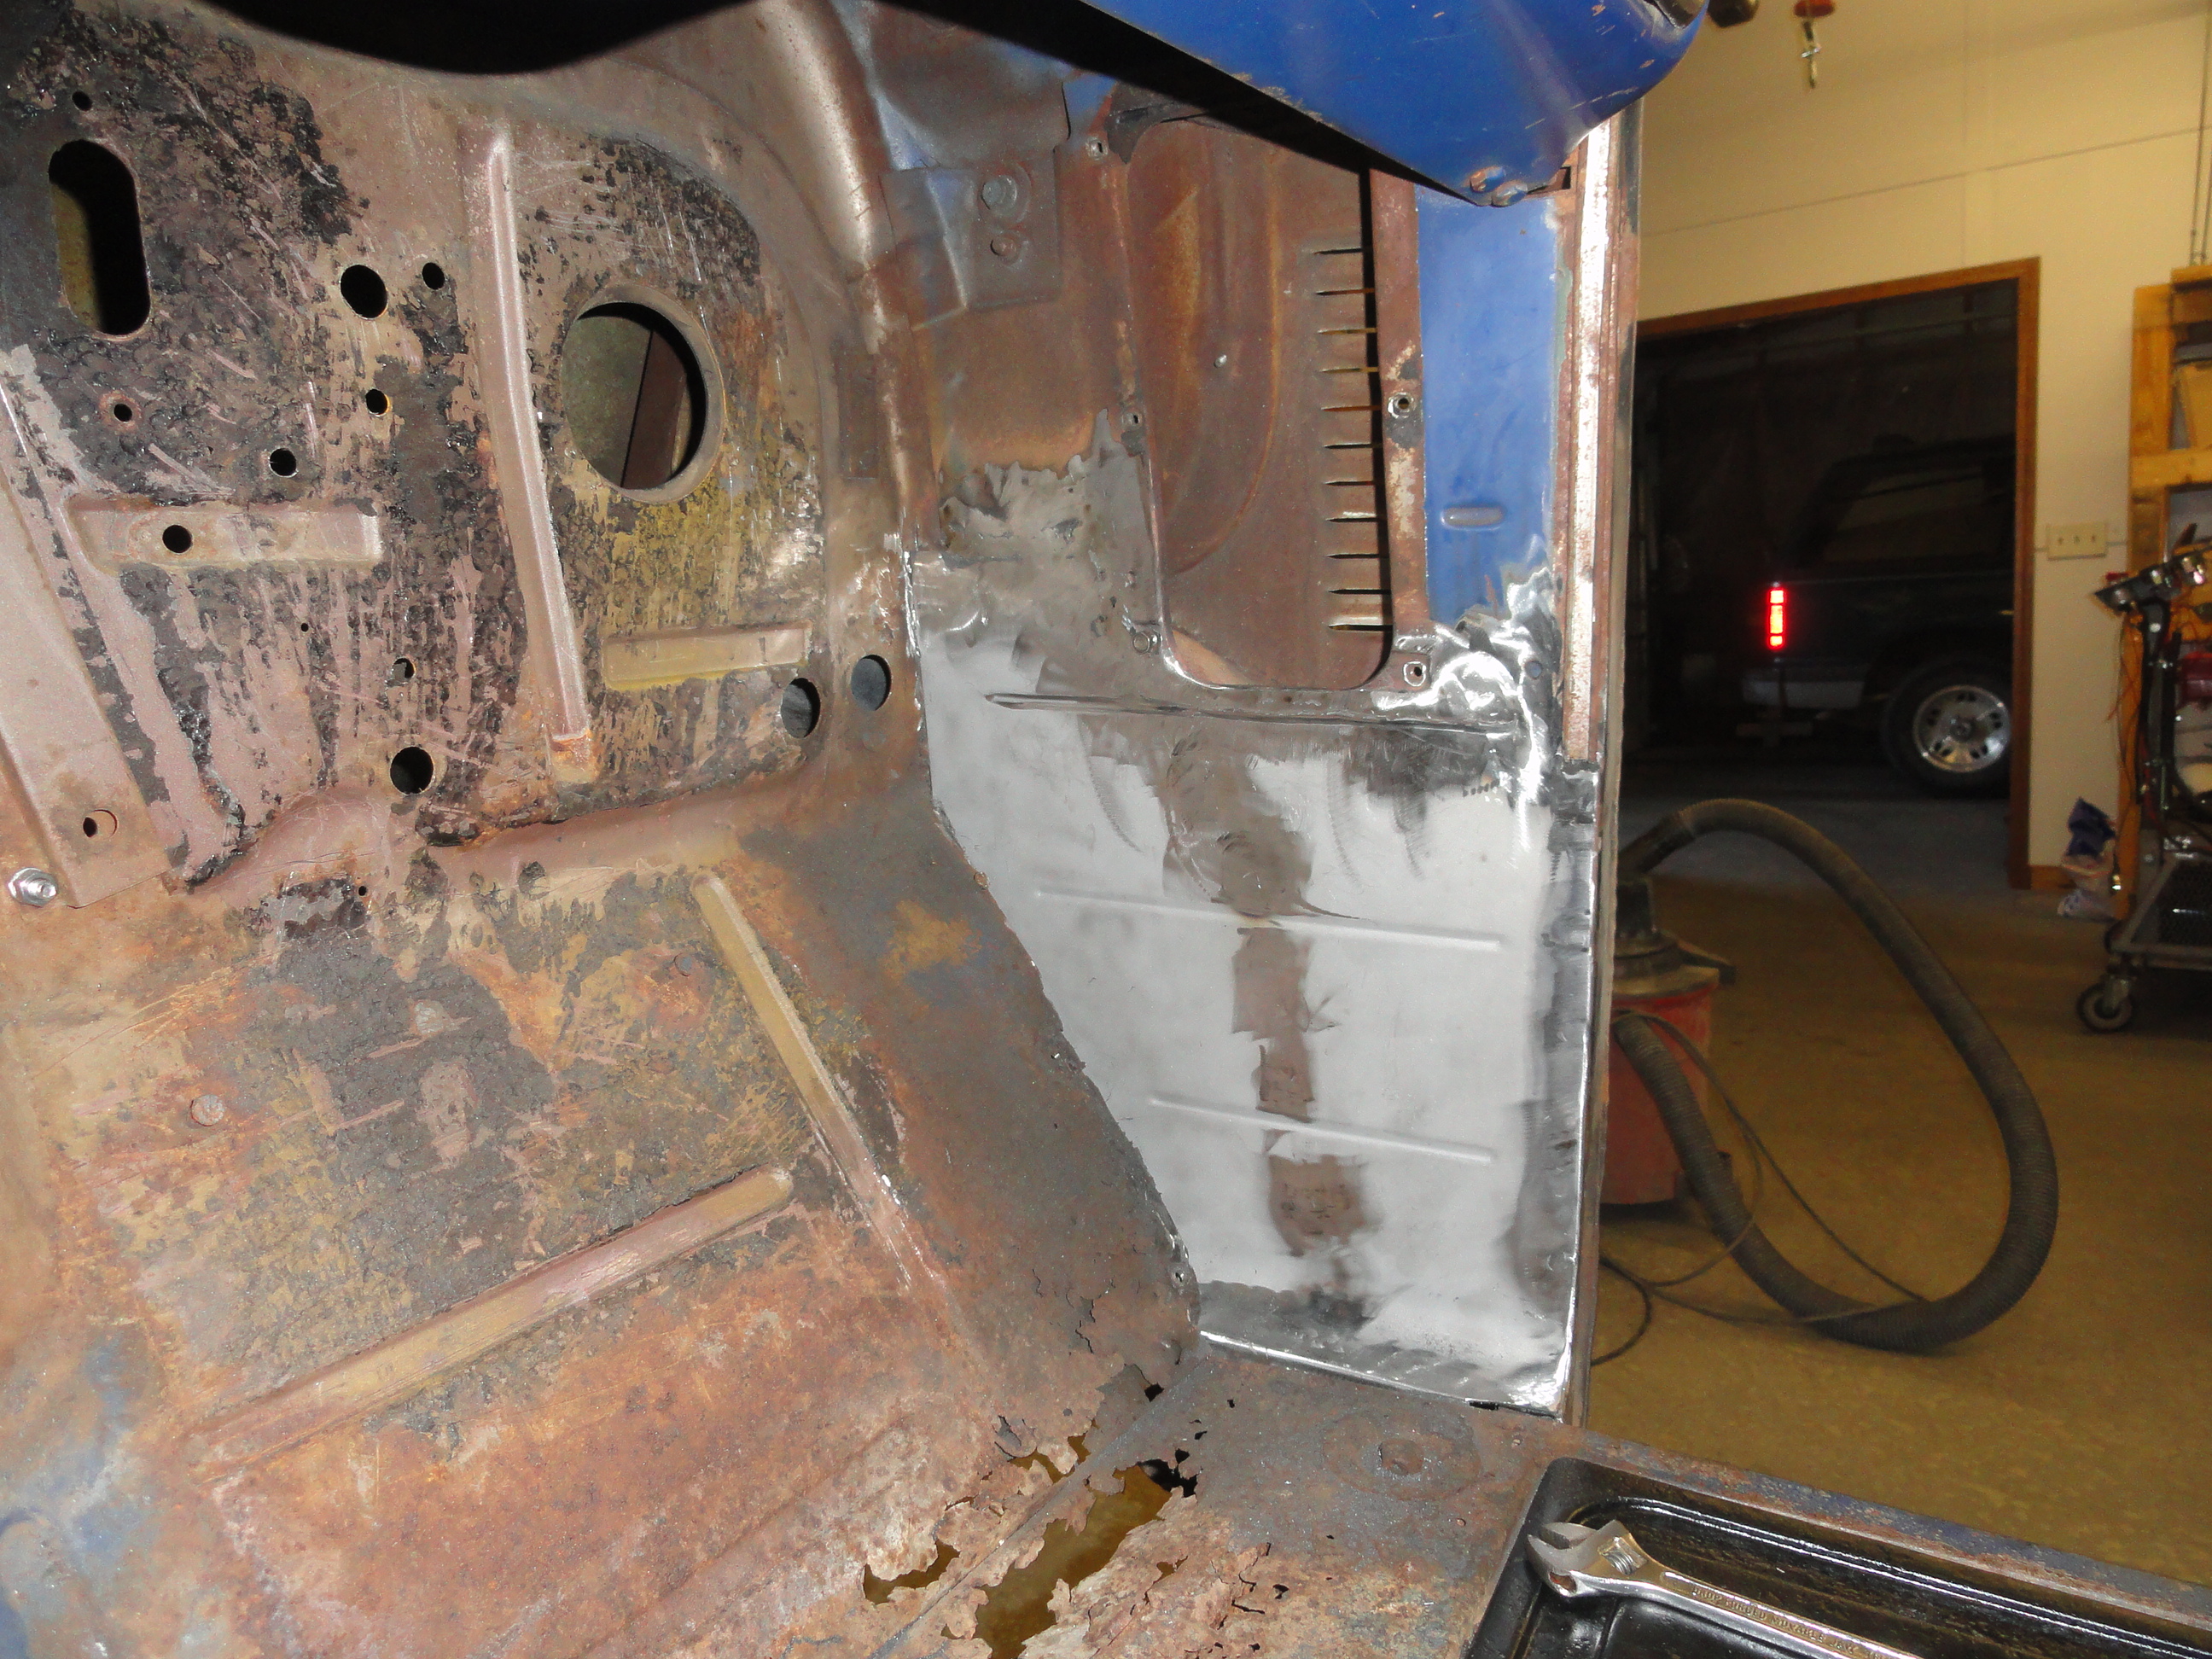
 The first place you must go when doing front cab sheetmetal work is the inside kick panel. The reason we go here first is to get access to the front cowl supports that are hidden behind them. You can replace the entire front cowl supports, but that would require removing the fenders. This makes sense in view of what condition the truck is in, but I decided that removing the fenders is crossing the line. You know, that line between a full frame up resto and a decent daily driver? Well, that is the line for me. Without removing the front fenders, we will patch the existing cowl supports. This may seem daunting, but really it's just a matter of shaping the metal and butt welding in the pieces. I go the the local welding shop and get a large piece of 16 gauge sheet steel for doing this. You can then make cardboard templates to fine tune the shape you want, then lay the cardboard on the sheet metal and make the cuts. I use a Porta-Band Bandsaw for this process, but you can also use tin snips or any other metal cutting shear. The key is to take your time. Use clean steel and use a wire brush on the end of a drill to clean the paint or rust off of the truck in the area you are welding. Clean welds will result.

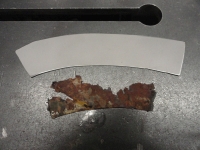
 This is not really that hard folks. Getting over the worry of doing it wrong will be your biggest problem. The next problem is having the patience to do this right. Find the rusted out area and look for pits surrounding the rusted out area. Locate where good metal meets with rusted out metal and cut out the bad area. Usually to make it easier, I cut out a square hole, but in this case, it wasn't that hard to shape a small piece of 16 gauge metal for the patch. Clean both edges for a good solid weld. Everything I do in replacing these pieces is what is called Butt Welding. In other words, there is no overlap of metal. The MIG Welder we use will add metal in the blank space and give it the same strength it had when it was new. Overlapping creates a place for moisture to sit and cause you to have to do it again later.
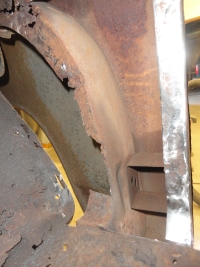
 Metal is notorious for warping and causing more trouble than its worth. To prevent this very nasty phenomena, I do not stitch the piece in place, rather I skip around and try to add weld in the coolest location. Trust me, warping happens before you know it and it's nasty. It caves the metal in or twists it to a point where you wish you hadn't tried to fix it! Skipping around will ensure a nice straight repair job. This very same problem comes into play when Grinding. You can do a nice straight weld, then warp it with your grinder! So skip around when grinding too. Also, take a break and let it cool down if you are worried about it. If that voice in the back of your head is telling you that you may be getting close to warping, Listen! A good wire feed MIG using at least 75% argon/CO2 gas will do. A 110 version is fine since we need a rather low setting.

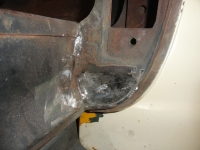
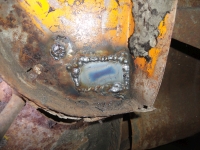
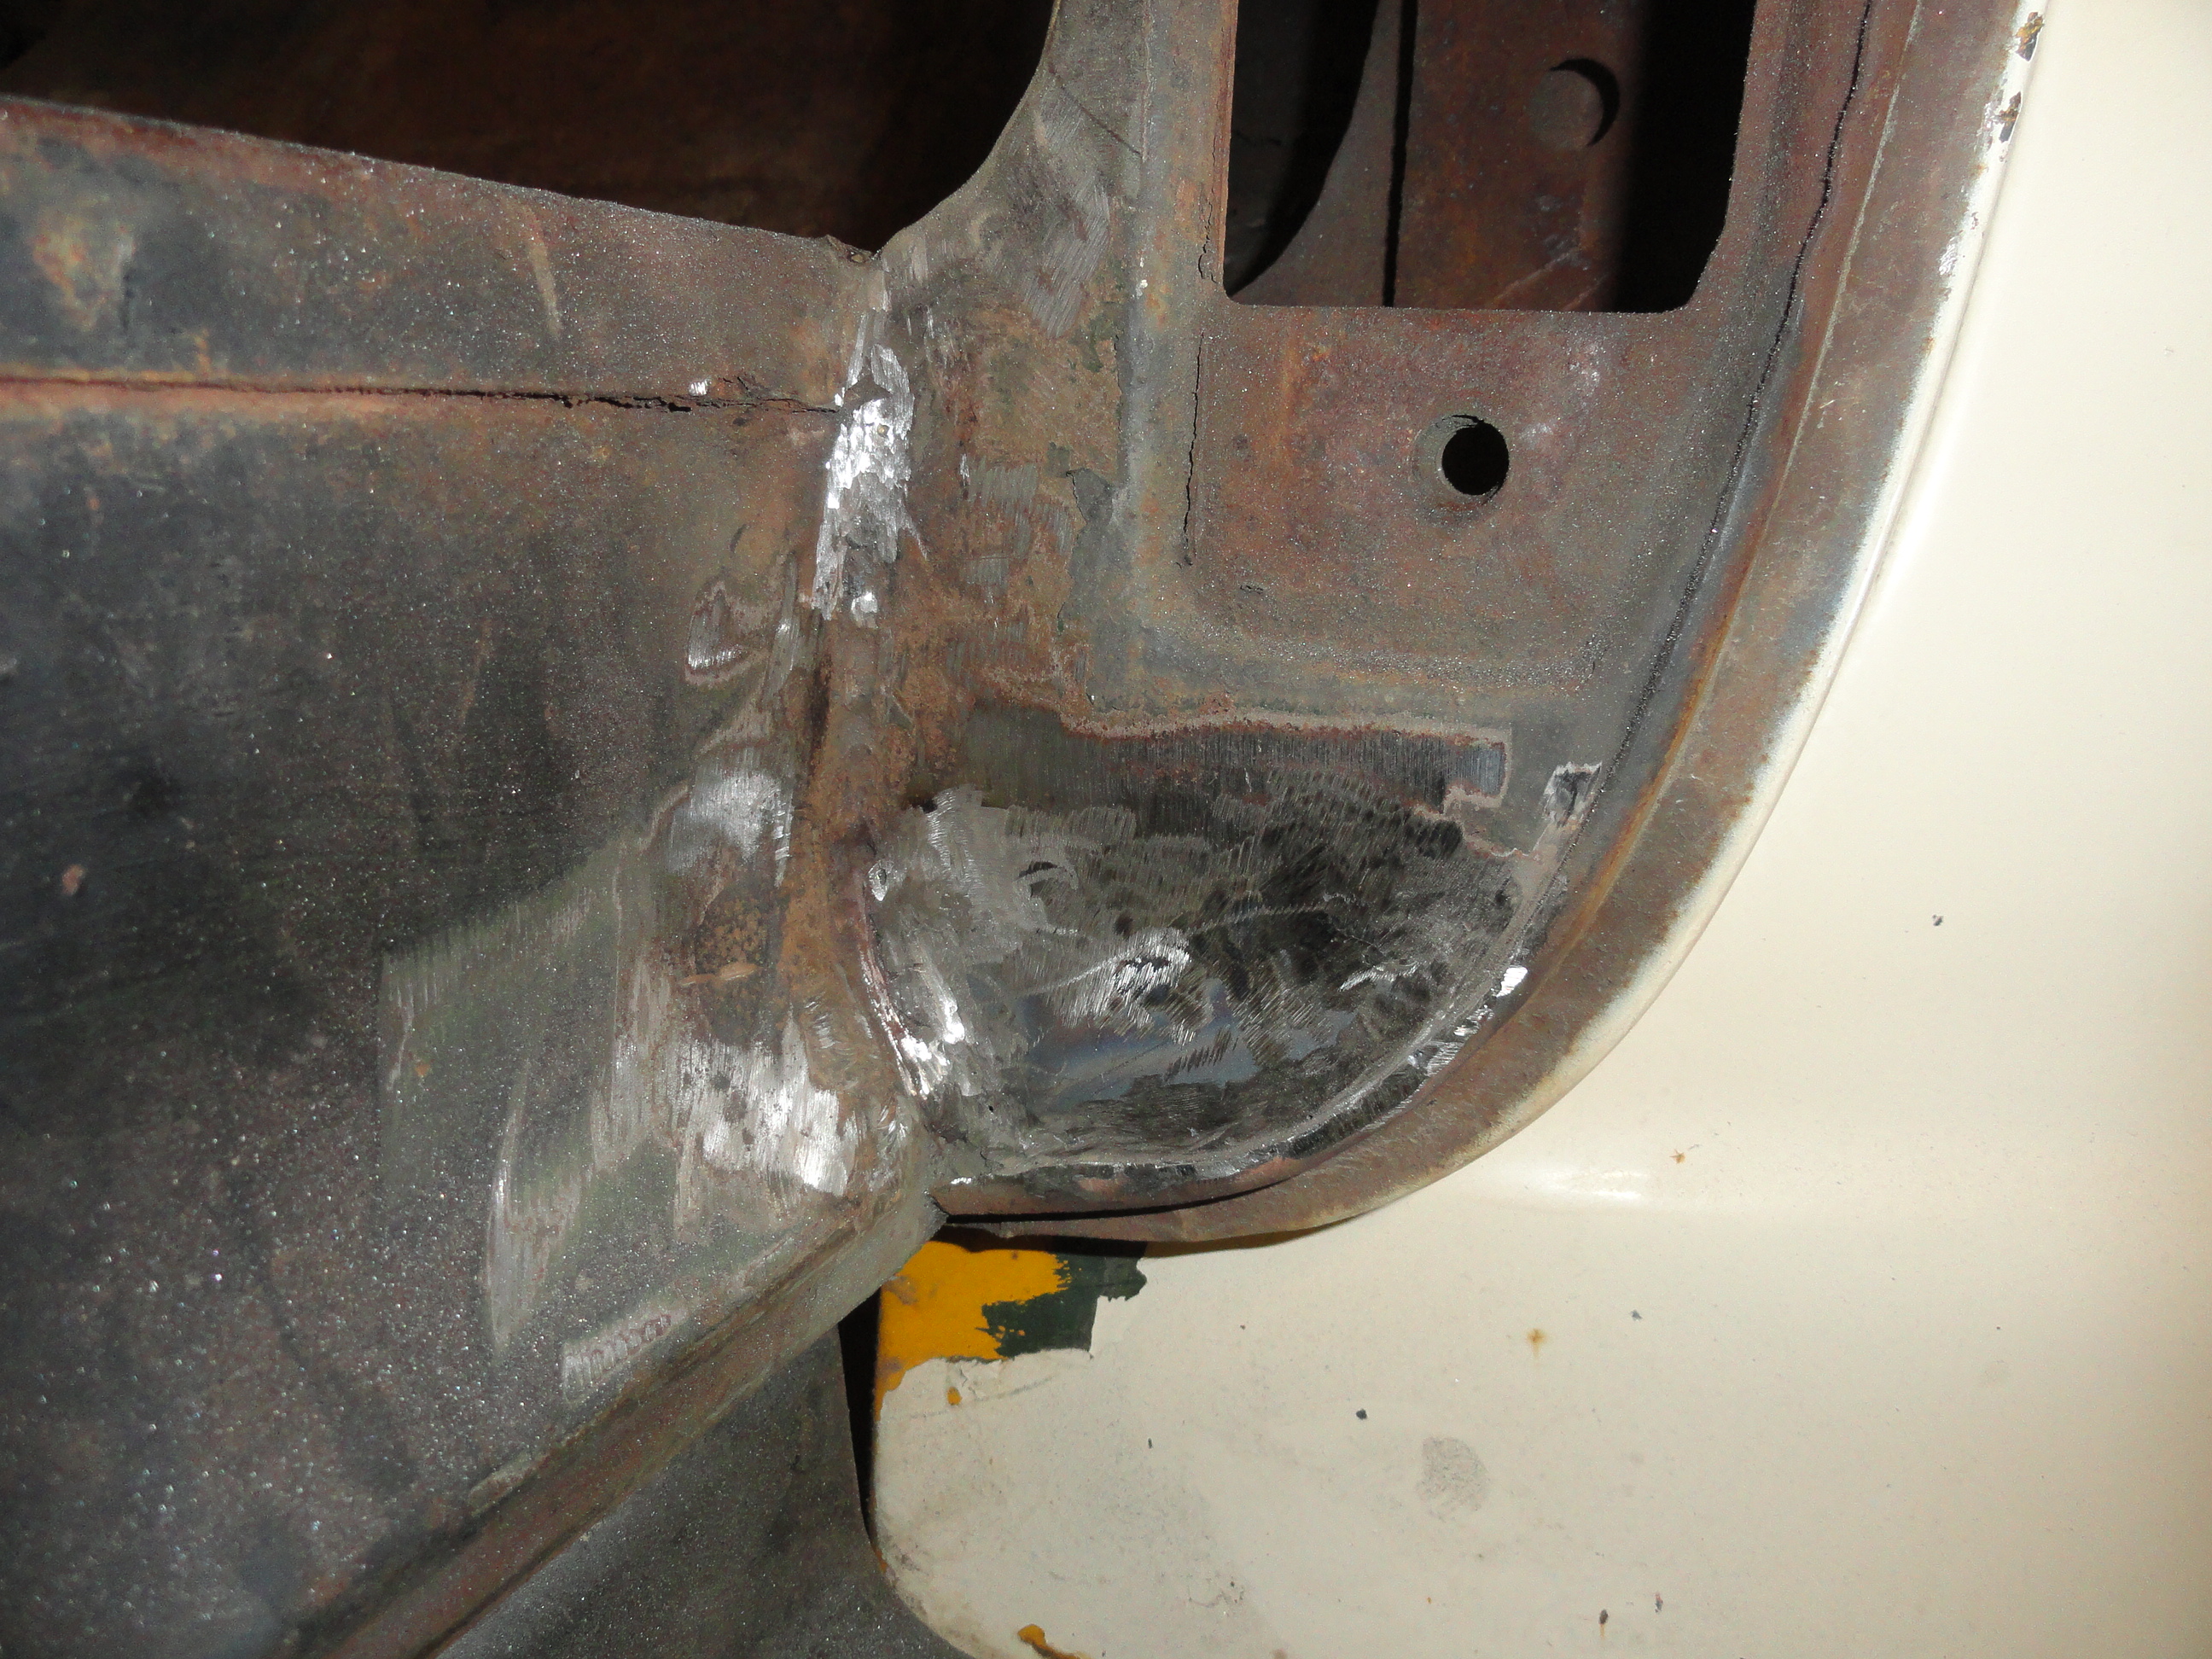
 As you can see there isn't a lot left of this particular area. We will shape a piece and butt weld it in. Remember, you can't butt weld to badly rusted, so you have to grind out the piece far enough back to hit good metal for welding. To hold the piece in place, I just hold it up there and make the first tack, however you can use magnets or those fancy butt welding clamps. Once you get the hang of it, it's really not an issue. Another really handy tool is the vise grip clamps for that. Since welding is very hard on vise grip clamps, I normally get mine at Harbor Freight. They are not good quality at all! The Vise Grip brand is much better, but I have a habit of getting too close to the clamp when welding, so this is a good compromise.
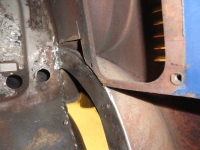
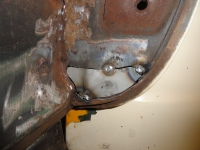
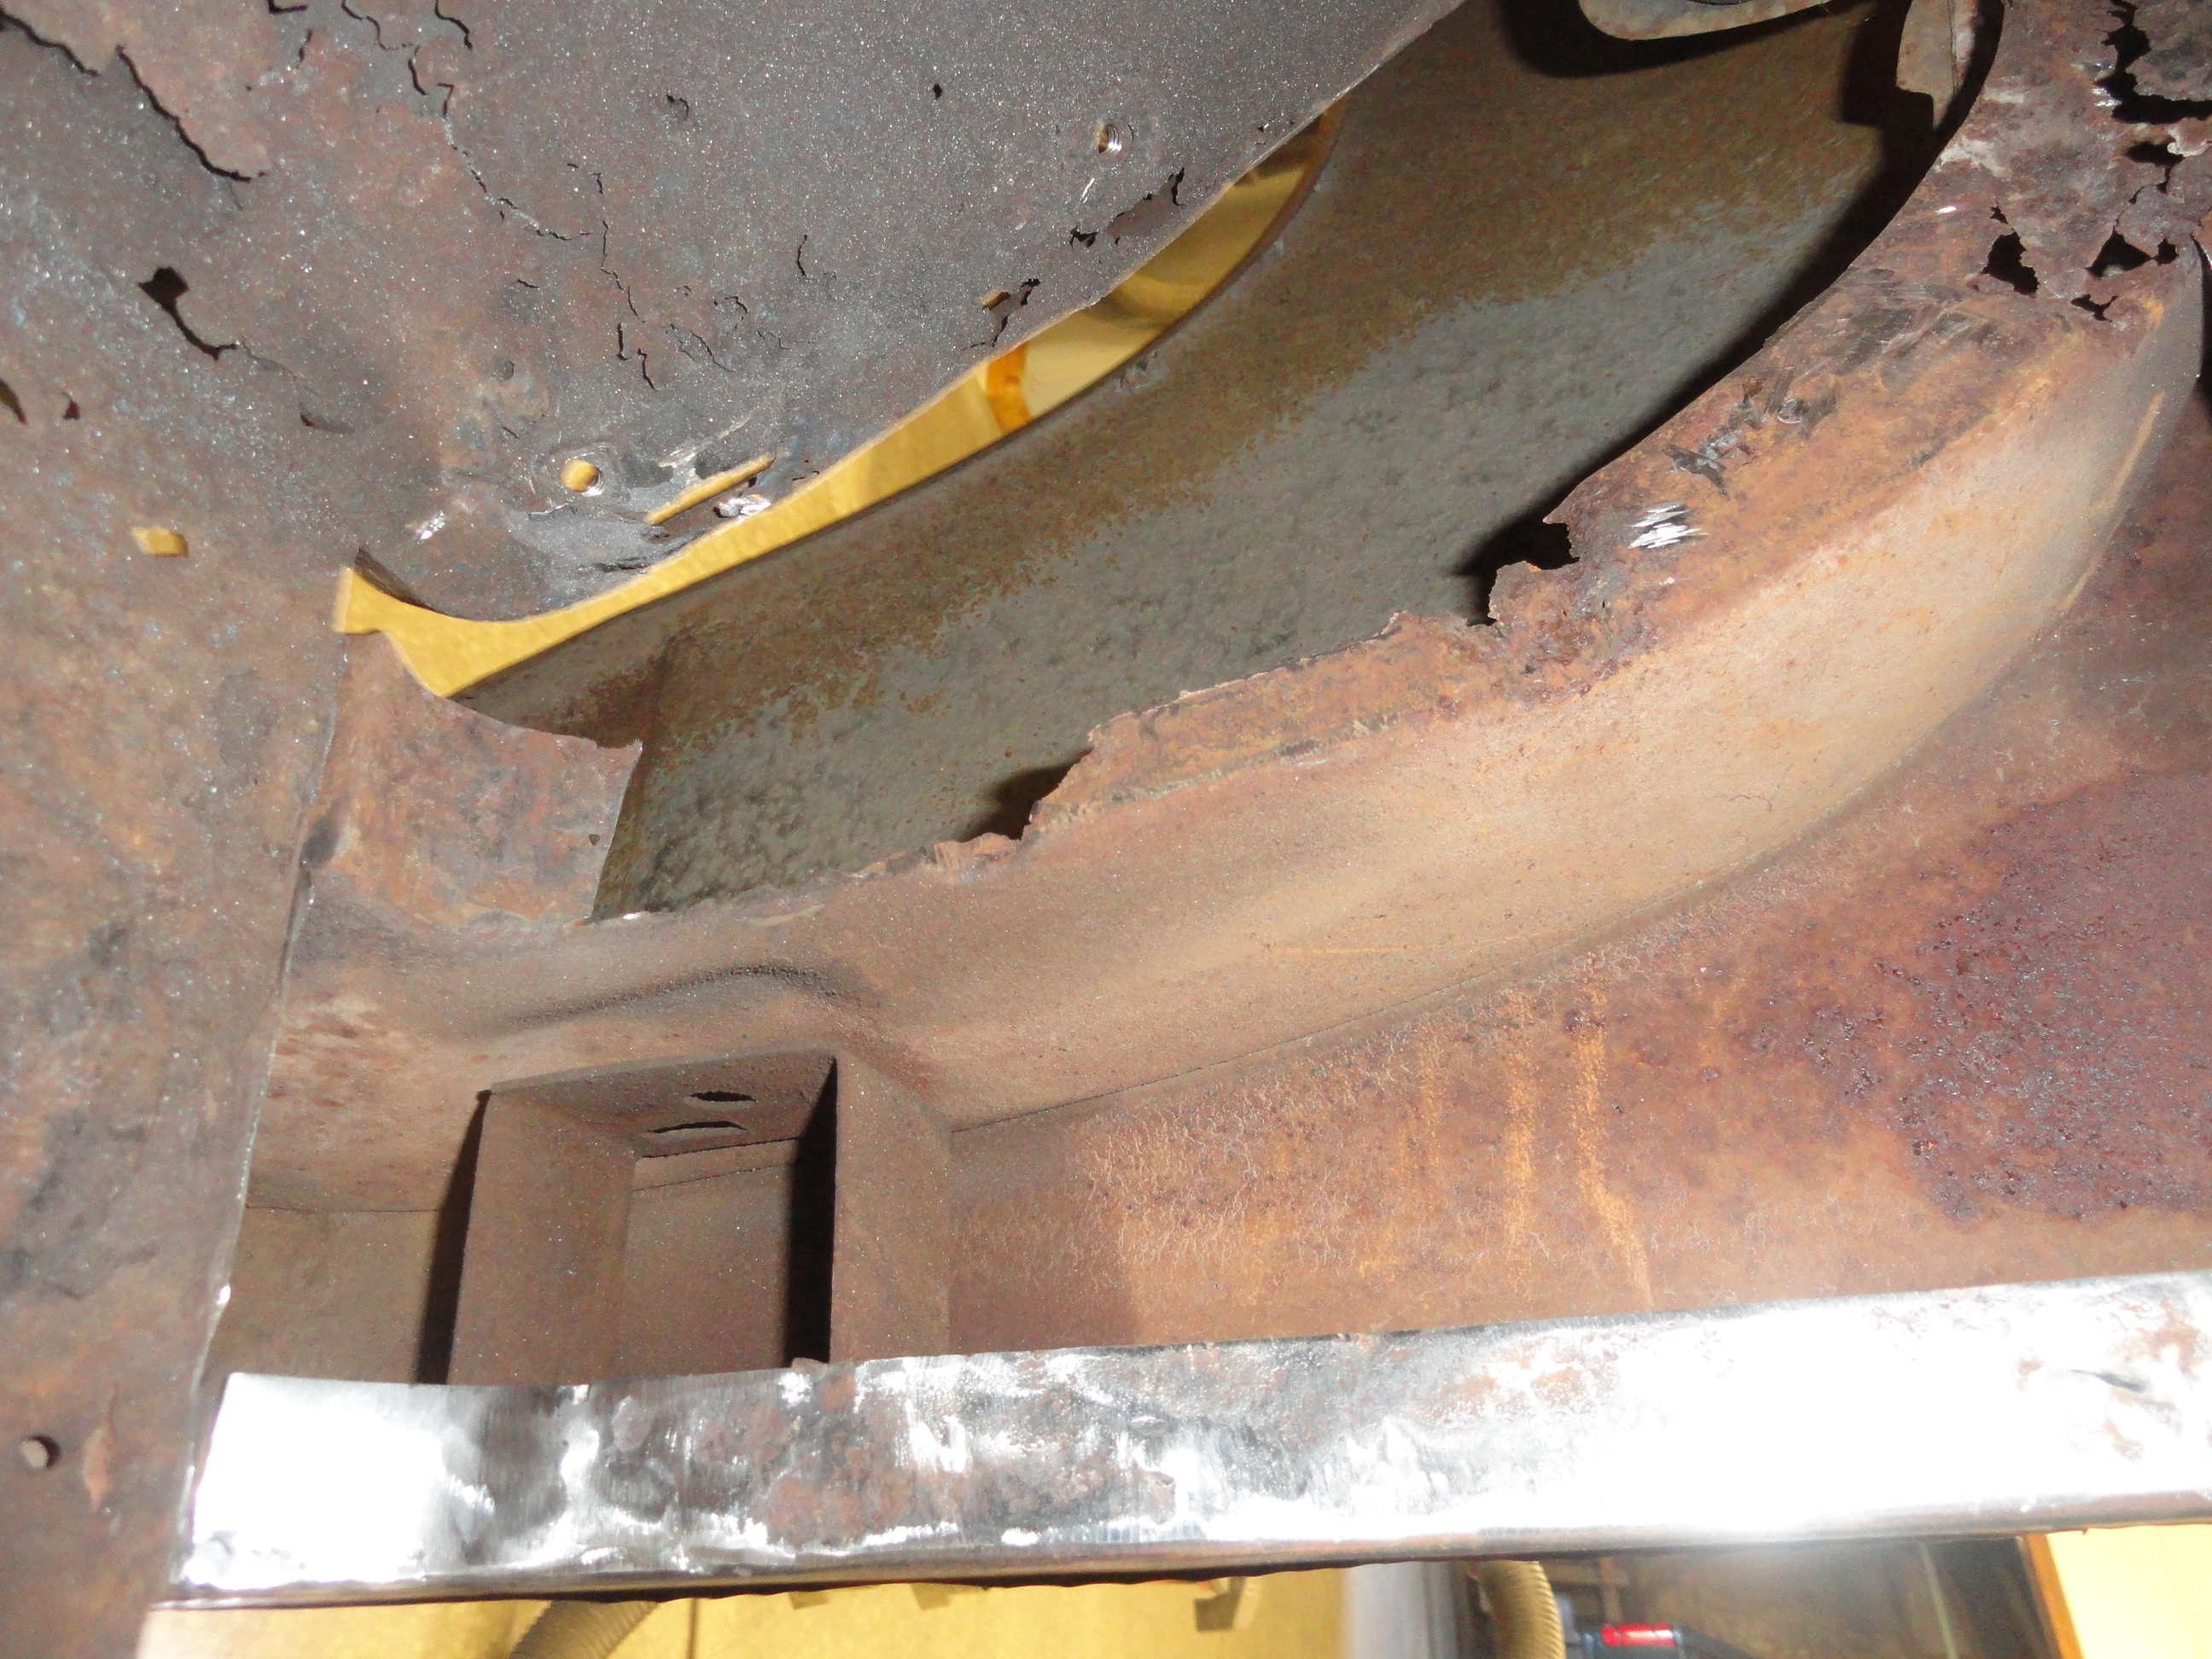
 As you can see, it is possible to make these inner cowl supports like brand new. This is a very important part of the truck because the heavy doors are hung here and we need to have these supports in tact and strong. Now you see why we started with the kick panel? This exposes all of the sheet metal that is probably bad behind it. But before we button up this area, lets take a look under the fender. Since this area is exposed to everything there is, you can plan on spending a few hours on this area as well.
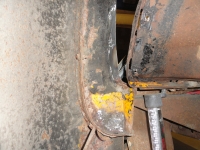 Take your time and attack one hole at a time. You will eventually get there! The Advanced Design series has exposed kick panels and cowl supports under the fender. This is convenient for me now, but is also why the
rusted out areas are so bad in the fender wells. A person needs to spray undercoating in these areas when we are completely done with the repairs. Be sure to cut far enough back to get to good metal. If you do not, your MIG welder will have a tendency to blow holes in the work rather than repair anything. If something happens that you can't find any good metal, it's time to replace the entire piece with an aftermarket one.

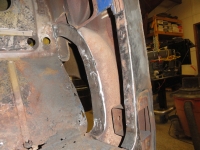
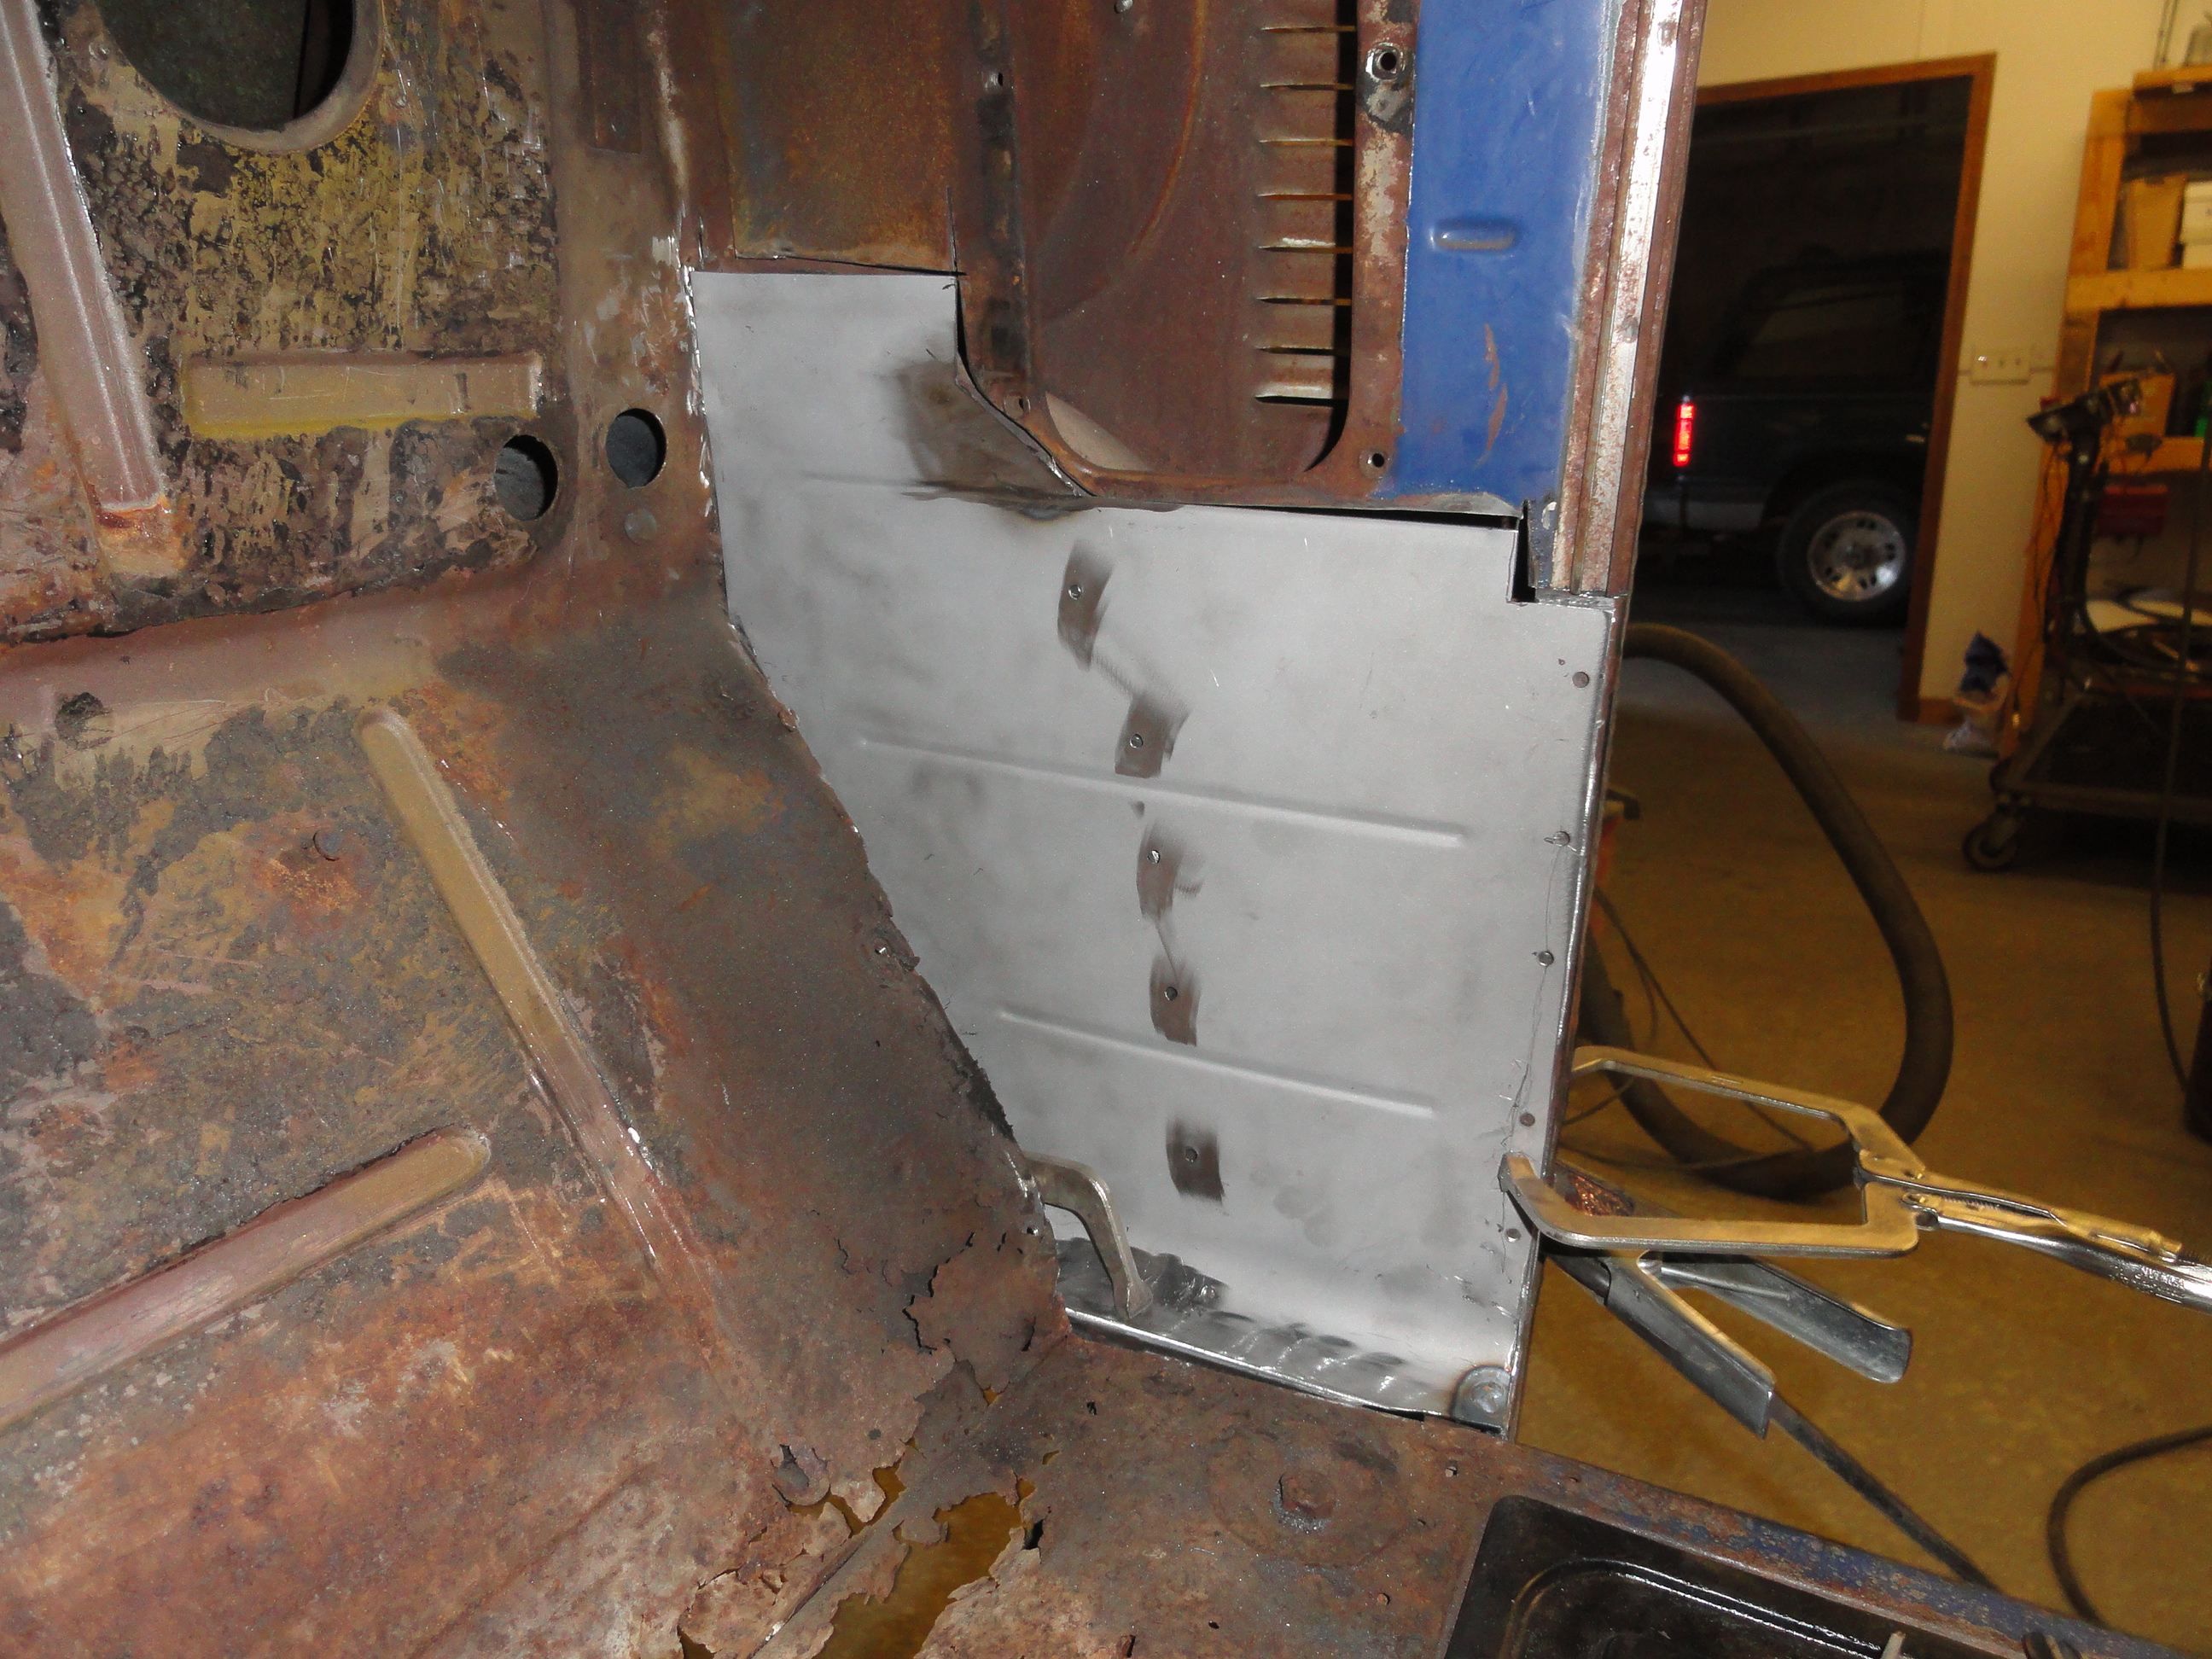
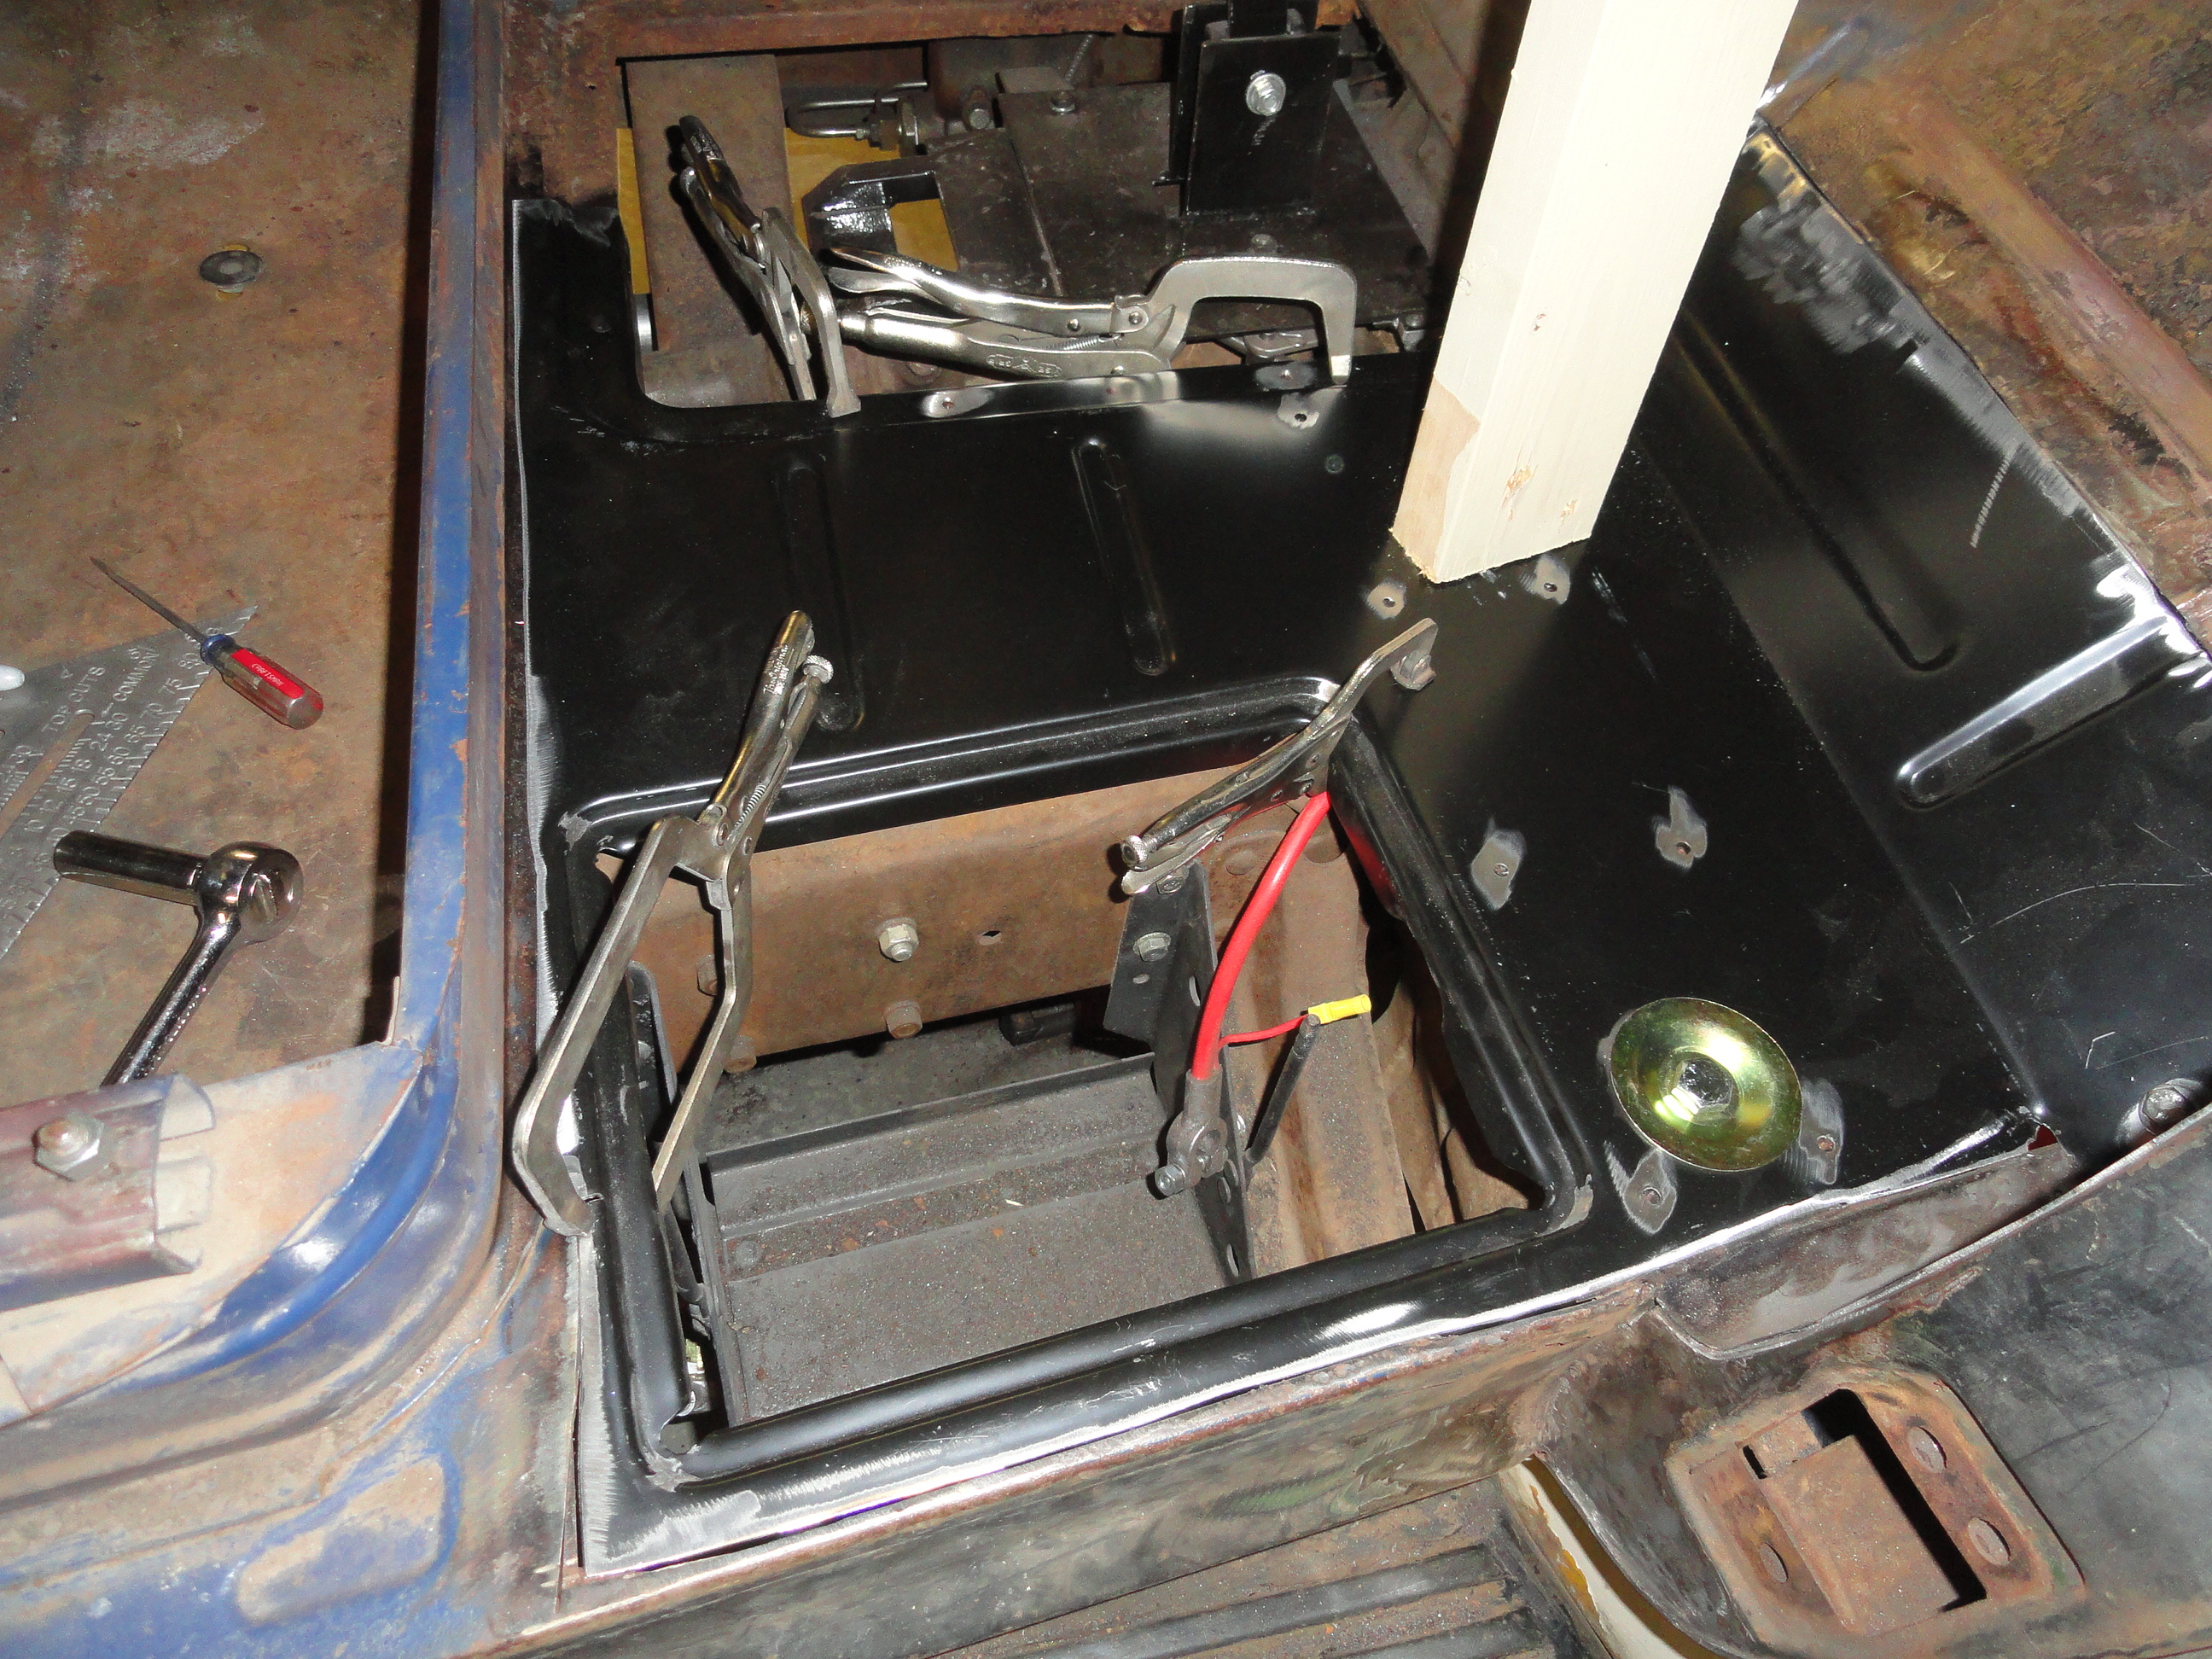
 Time to install the new aftermarket kick panel. A word on vendor purchased sheet metal.. you do not have to use the whole piece. You can replace what is bad. In this case, the heater hole has threaded nutserts that we would rather not have to duplicate. I cut around this area and only go as high as I have to. This also makes it easier to get into the area to weld it in. In the case of the kick panel, it slides past the toeboard into the fender well and butts up against the firewall. The patch kick panel I got was too long so had to be trimmed at the door, but other than that, it fits perfectly. You have to remove the rubber windlace channel to do this. It is spot welded in and you cannot get new from the vendors, so take care to break the spot welds carefully. In my case, the bottom of that channel was rusted out, so I need to replace it. More on that later. I chose to put off replacing that channel until I finished with the floor and toeboard.

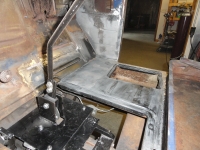
 I like to get the patch panel that includes the floor forward of the seat pedestal and the toeboard together. Both are so badly rusted out that it makes it easier to have that dimension (where the floor meets the toeboard angles) predetermined. I have my criticisms too. There is no metal strip (delineation) between the floorboard and the toeboard. This means nothing really on the passenger side but when we get to the drivers side where there is a tab welded under there, we will address that problem then. Also, fitment is very close, but not exact enough for my tastes. It is what it is, so we will do our best to overcome these obstacles.
Removing this area is somewhat difficult because of the spot welds. Things to take into consideration are, we want the bracing under the edge of the transmission cover to remain in tact and welded to the seat pedestal so care must be taken to find the spot welds, cut them out without bending or ruining that support. Also, the front cab support that runs from the large mounting bolt to the trans cover is spot welded to the floor. Since badly rusted metal shows no signs of where the spot welds are, I had to do a lot of creative grinding work to get the floor out in pieces. Just take it slow and do not do any damage to those two supports. In my case, they were good to re-use. This is not an easy task, so taking your time and thinking things through is definitely in order. The geometry of where those supports meet the floor is critical, so once the floor is all out and the part of the toeboard you wish to replace, there are a few ways to be sure all is in perfect alignment.
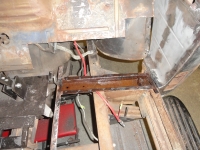
 The way to tell if you have the trans cover brace (seat pedestal to toeboard) in the correct spot is to put the trans cover back on. Bolt it in from the drivers side and then bolt it in from the passenger side. THAT is where the floor is in perfect sync. Once you have that done, go under the cab and mark the bottom of the large mounting hole with a Sharpie. It should be close to the center of its indention. In my case, both tests passed so I was ready for rewelding. Remember, the hardest part of this is the measurements to ensure you have it ready for butt welding in. You cannot be off by more than 1/8" so take your time and measure about 6 times, then make your cuts. I like to leave things 1/8" larger than the hole then fit, then cut, then fit, then cut, etc. That floor was out about 50 times in all just tweaking each side to ensure perfect fitment.
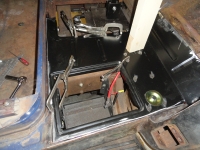
 Weld slowly skipping around the work. Do the same with grinding. To get into the crevasses and stampings, I used a Dremel tool with a grinder wheel. Slowly and meticulously fine tune everything. Once completed, only you will know the floor was ever replaced. You can put a skim coat of filler over the welds if it bothers you, but nobody will ever see it since it's all covered anyway. Nonetheless I do everything I know how to keep the welds clean and the seams from showing. Often that is just not possible, so expert grinding will get you close. Finish the job by replacing the windlass rubber channel. I spot weld them in and then use my Dremel to grind the spots smooth. You have to find this channel at a salvage yard. I have not found a vendor that carries it. That concludes the passenger side. Next week I may be sharing how to repair door hinges before moving to the drivers side. I am happy to answer questions if I left something out that you feel needs to be included. Have a great week!
Passenger Side Sheet Metal Part One:
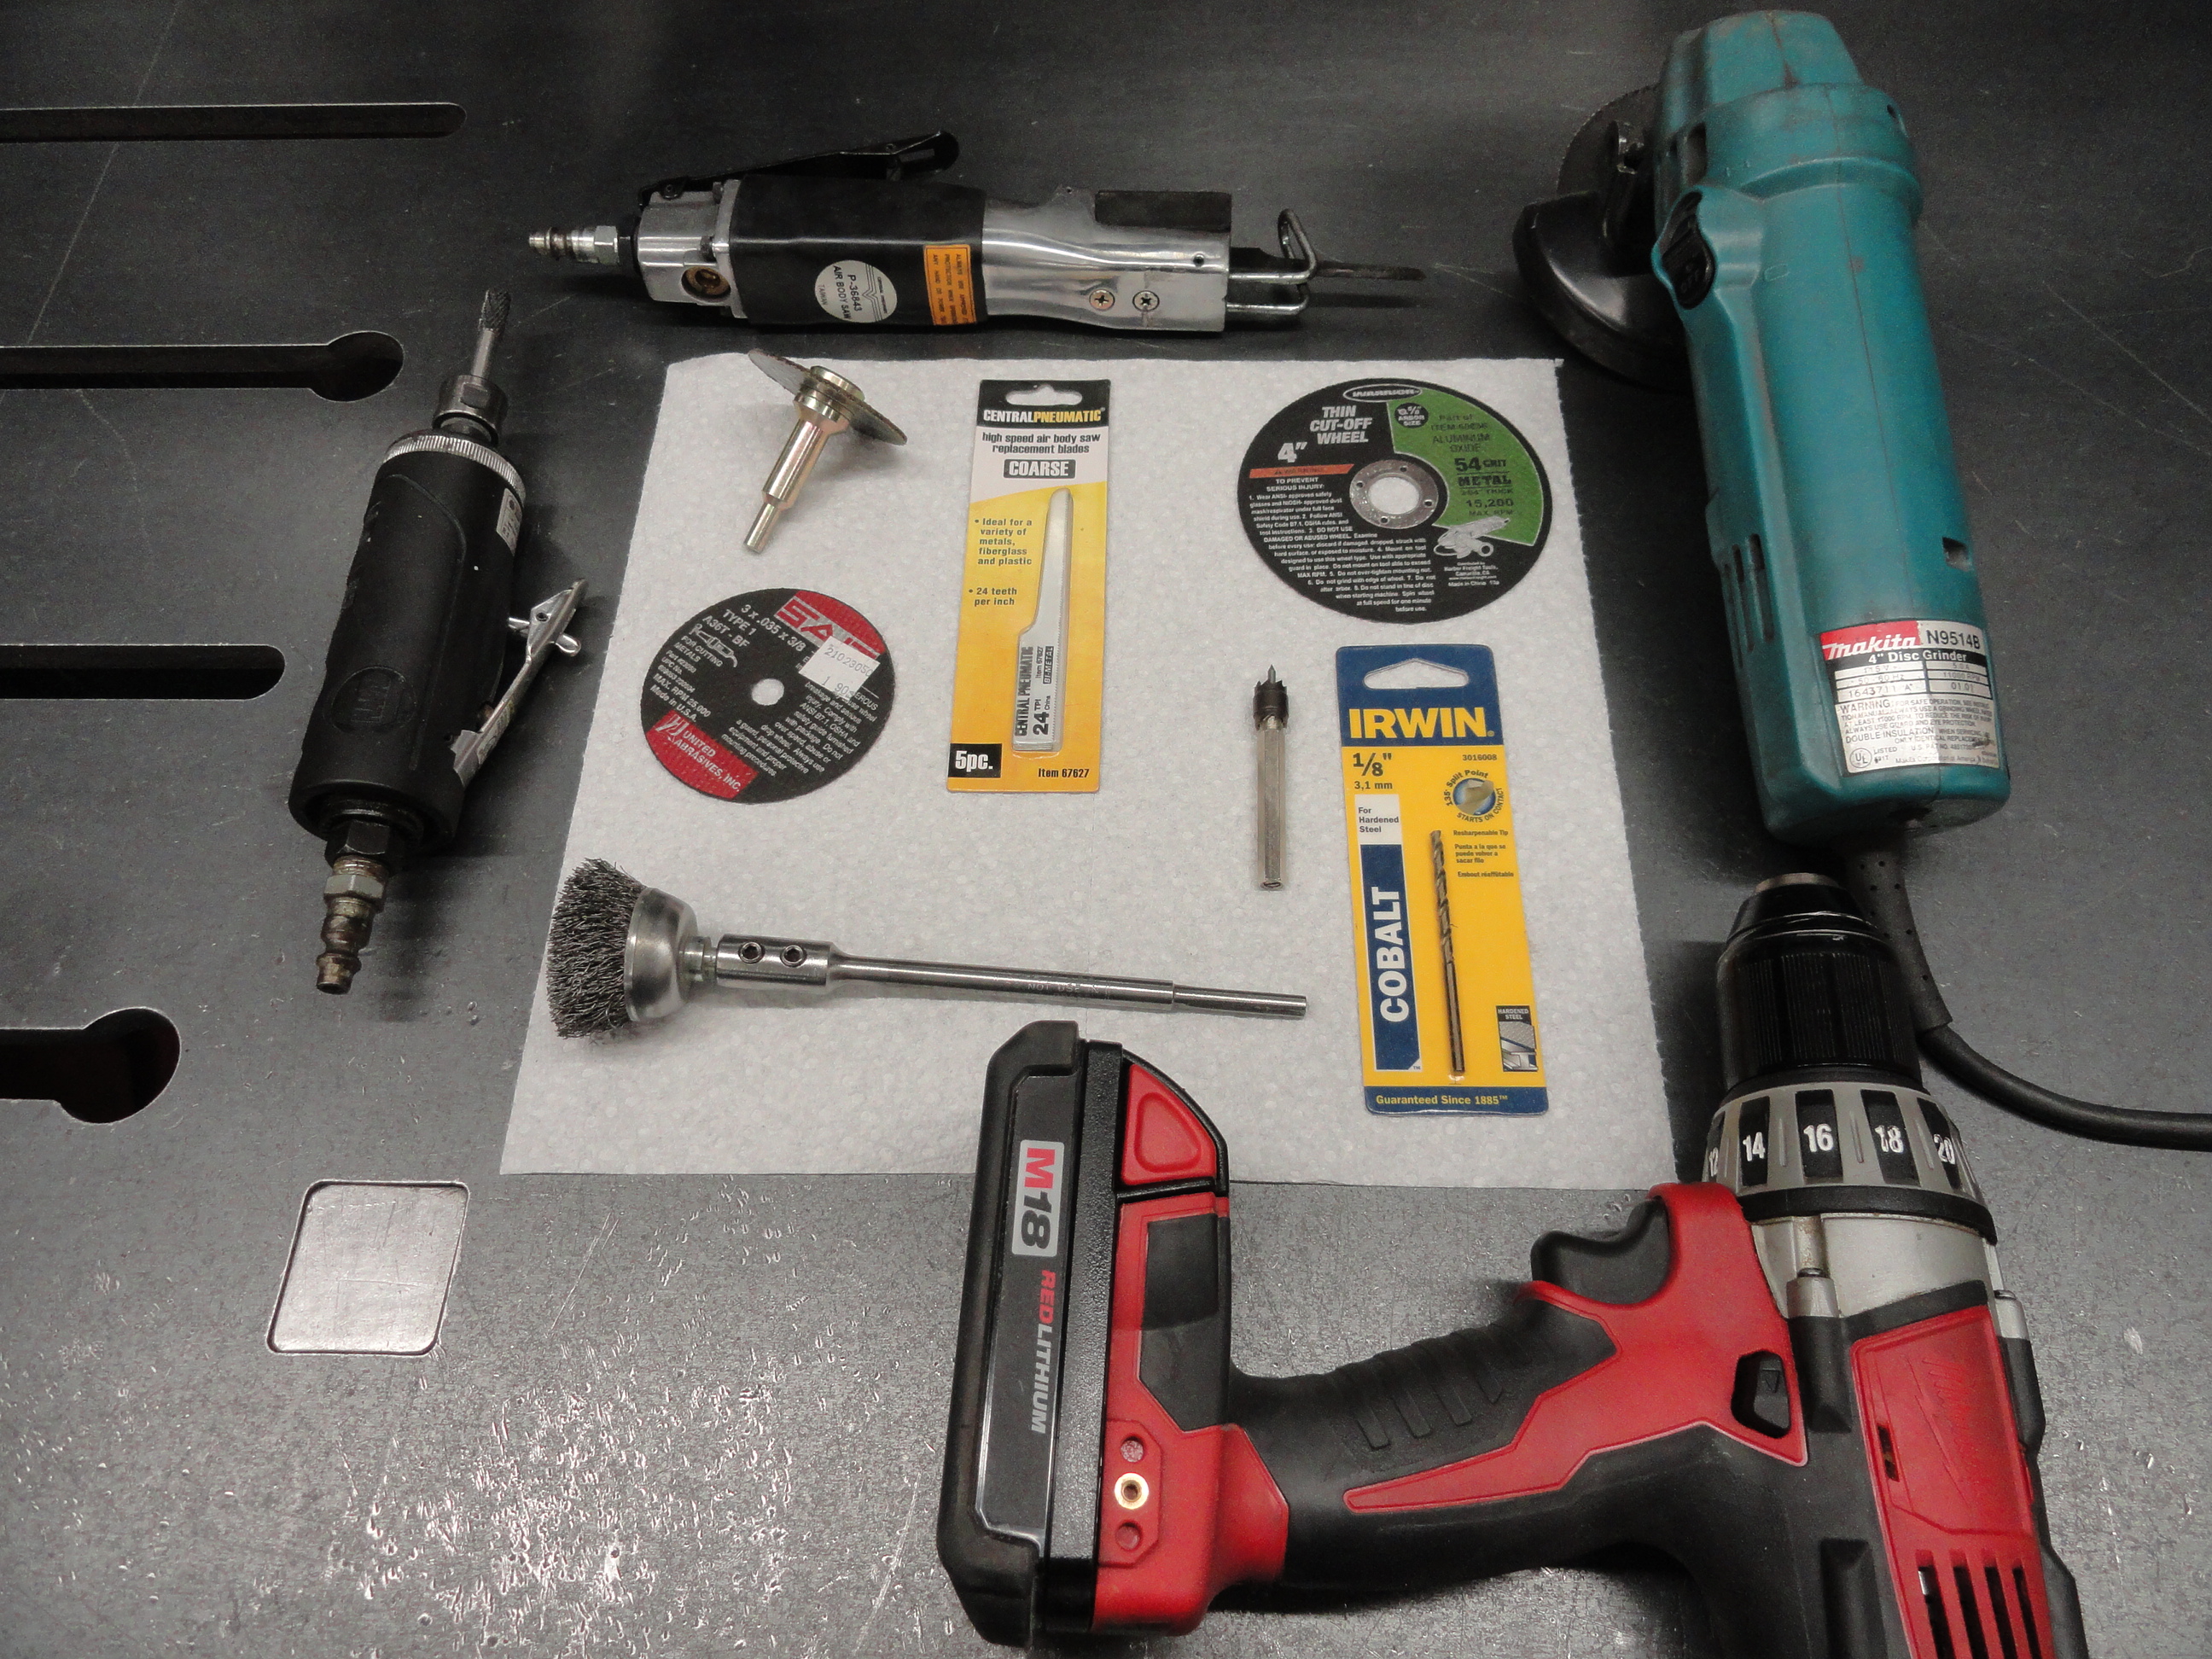
 This is the same 1953 I did the wiring harness on. I can't begin to describe the misery this truck must have went through. I found it sitting in a ditch several years ago so during the rainy season, the cab was just filled with water. I am actually surprised things are not worse. Luckily I didn't pay very much for the truck! Left is a pic of some of the tools needed for this project. Some of these tools are just nice to have. Honestly, most of the work is being done with the Makita Grinder. As you can see, there is a lot of damage. This week we will attack the passenger side, then move on to the driver's side. I am not left handed and find the passenger side to be the most difficult.
 The first place you must go when doing front cab sheetmetal work is the inside kick panel. The reason we go here first is to get access to the front cowl supports that are hidden behind them. You can replace the entire front cowl supports, but that would require removing the fenders. This makes sense in view of what condition the truck is in, but I decided that removing the fenders is crossing the line. You know, that line between a full frame up resto and a decent daily driver? Well, that is the line for me. Without removing the front fenders, we will patch the existing cowl supports. This may seem daunting, but really it's just a matter of shaping the metal and butt welding in the pieces. I go the the local welding shop and get a large piece of 16 gauge sheet steel for doing this. You can then make cardboard templates to fine tune the shape you want, then lay the cardboard on the sheet metal and make the cuts. I use a Porta-Band Bandsaw for this process, but you can also use tin snips or any other metal cutting shear. The key is to take your time. Use clean steel and use a wire brush on the end of a drill to clean the paint or rust off of the truck in the area you are welding. Clean welds will result.
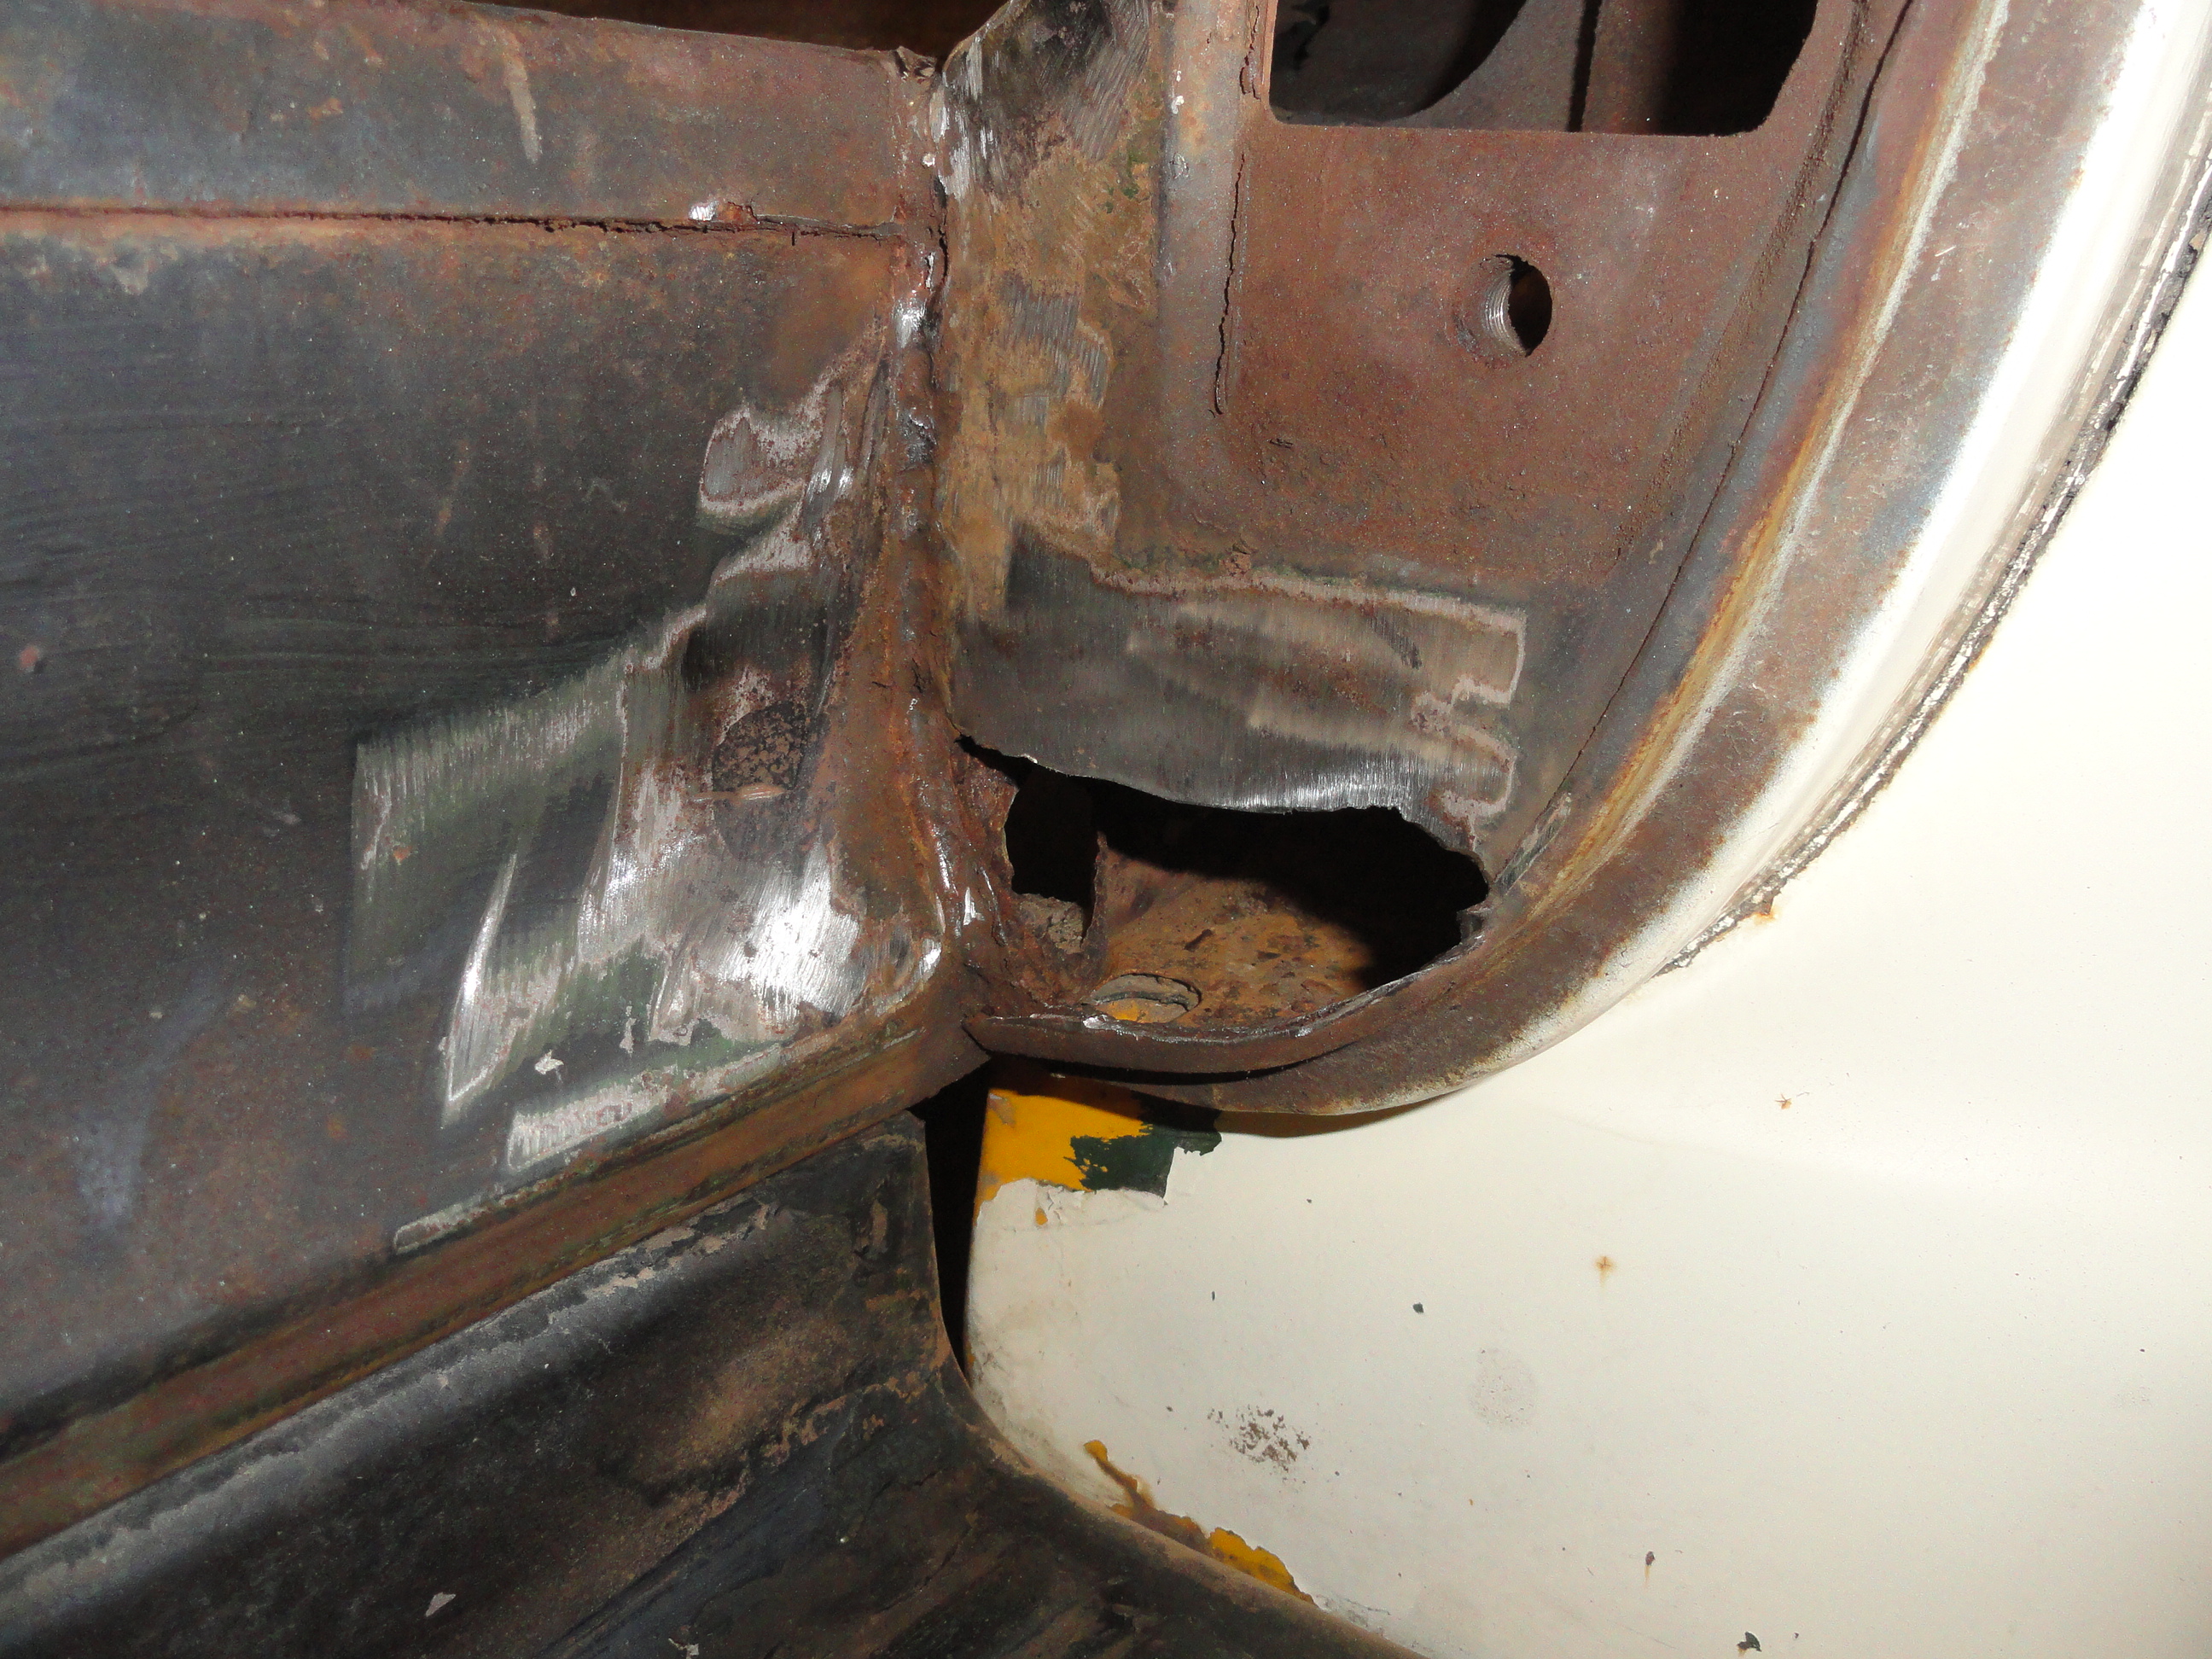
 This is not really that hard folks. Getting over the worry of doing it wrong will be your biggest problem. The next problem is having the patience to do this right. Find the rusted out area and look for pits surrounding the rusted out area. Locate where good metal meets with rusted out metal and cut out the bad area. Usually to make it easier, I cut out a square hole, but in this case, it wasn't that hard to shape a small piece of 16 gauge metal for the patch. Clean both edges for a good solid weld. Everything I do in replacing these pieces is what is called Butt Welding. In other words, there is no overlap of metal. The MIG Welder we use will add metal in the blank space and give it the same strength it had when it was new. Overlapping creates a place for moisture to sit and cause you to have to do it again later.
 Metal is notorious for warping and causing more trouble than its worth. To prevent this very nasty phenomena, I do not stitch the piece in place, rather I skip around and try to add weld in the coolest location. Trust me, warping happens before you know it and it's nasty. It caves the metal in or twists it to a point where you wish you hadn't tried to fix it! Skipping around will ensure a nice straight repair job. This very same problem comes into play when Grinding. You can do a nice straight weld, then warp it with your grinder! So skip around when grinding too. Also, take a break and let it cool down if you are worried about it. If that voice in the back of your head is telling you that you may be getting close to warping, Listen! A good wire feed MIG using at least 75% argon/CO2 gas will do. A 110 version is fine since we need a rather low setting.
 As you can see there isn't a lot left of this particular area. We will shape a piece and butt weld it in. Remember, you can't butt weld to badly rusted, so you have to grind out the piece far enough back to hit good metal for welding. To hold the piece in place, I just hold it up there and make the first tack, however you can use magnets or those fancy butt welding clamps. Once you get the hang of it, it's really not an issue. Another really handy tool is the vise grip clamps for that. Since welding is very hard on vise grip clamps, I normally get mine at Harbor Freight. They are not good quality at all! The Vise Grip brand is much better, but I have a habit of getting too close to the clamp when welding, so this is a good compromise.
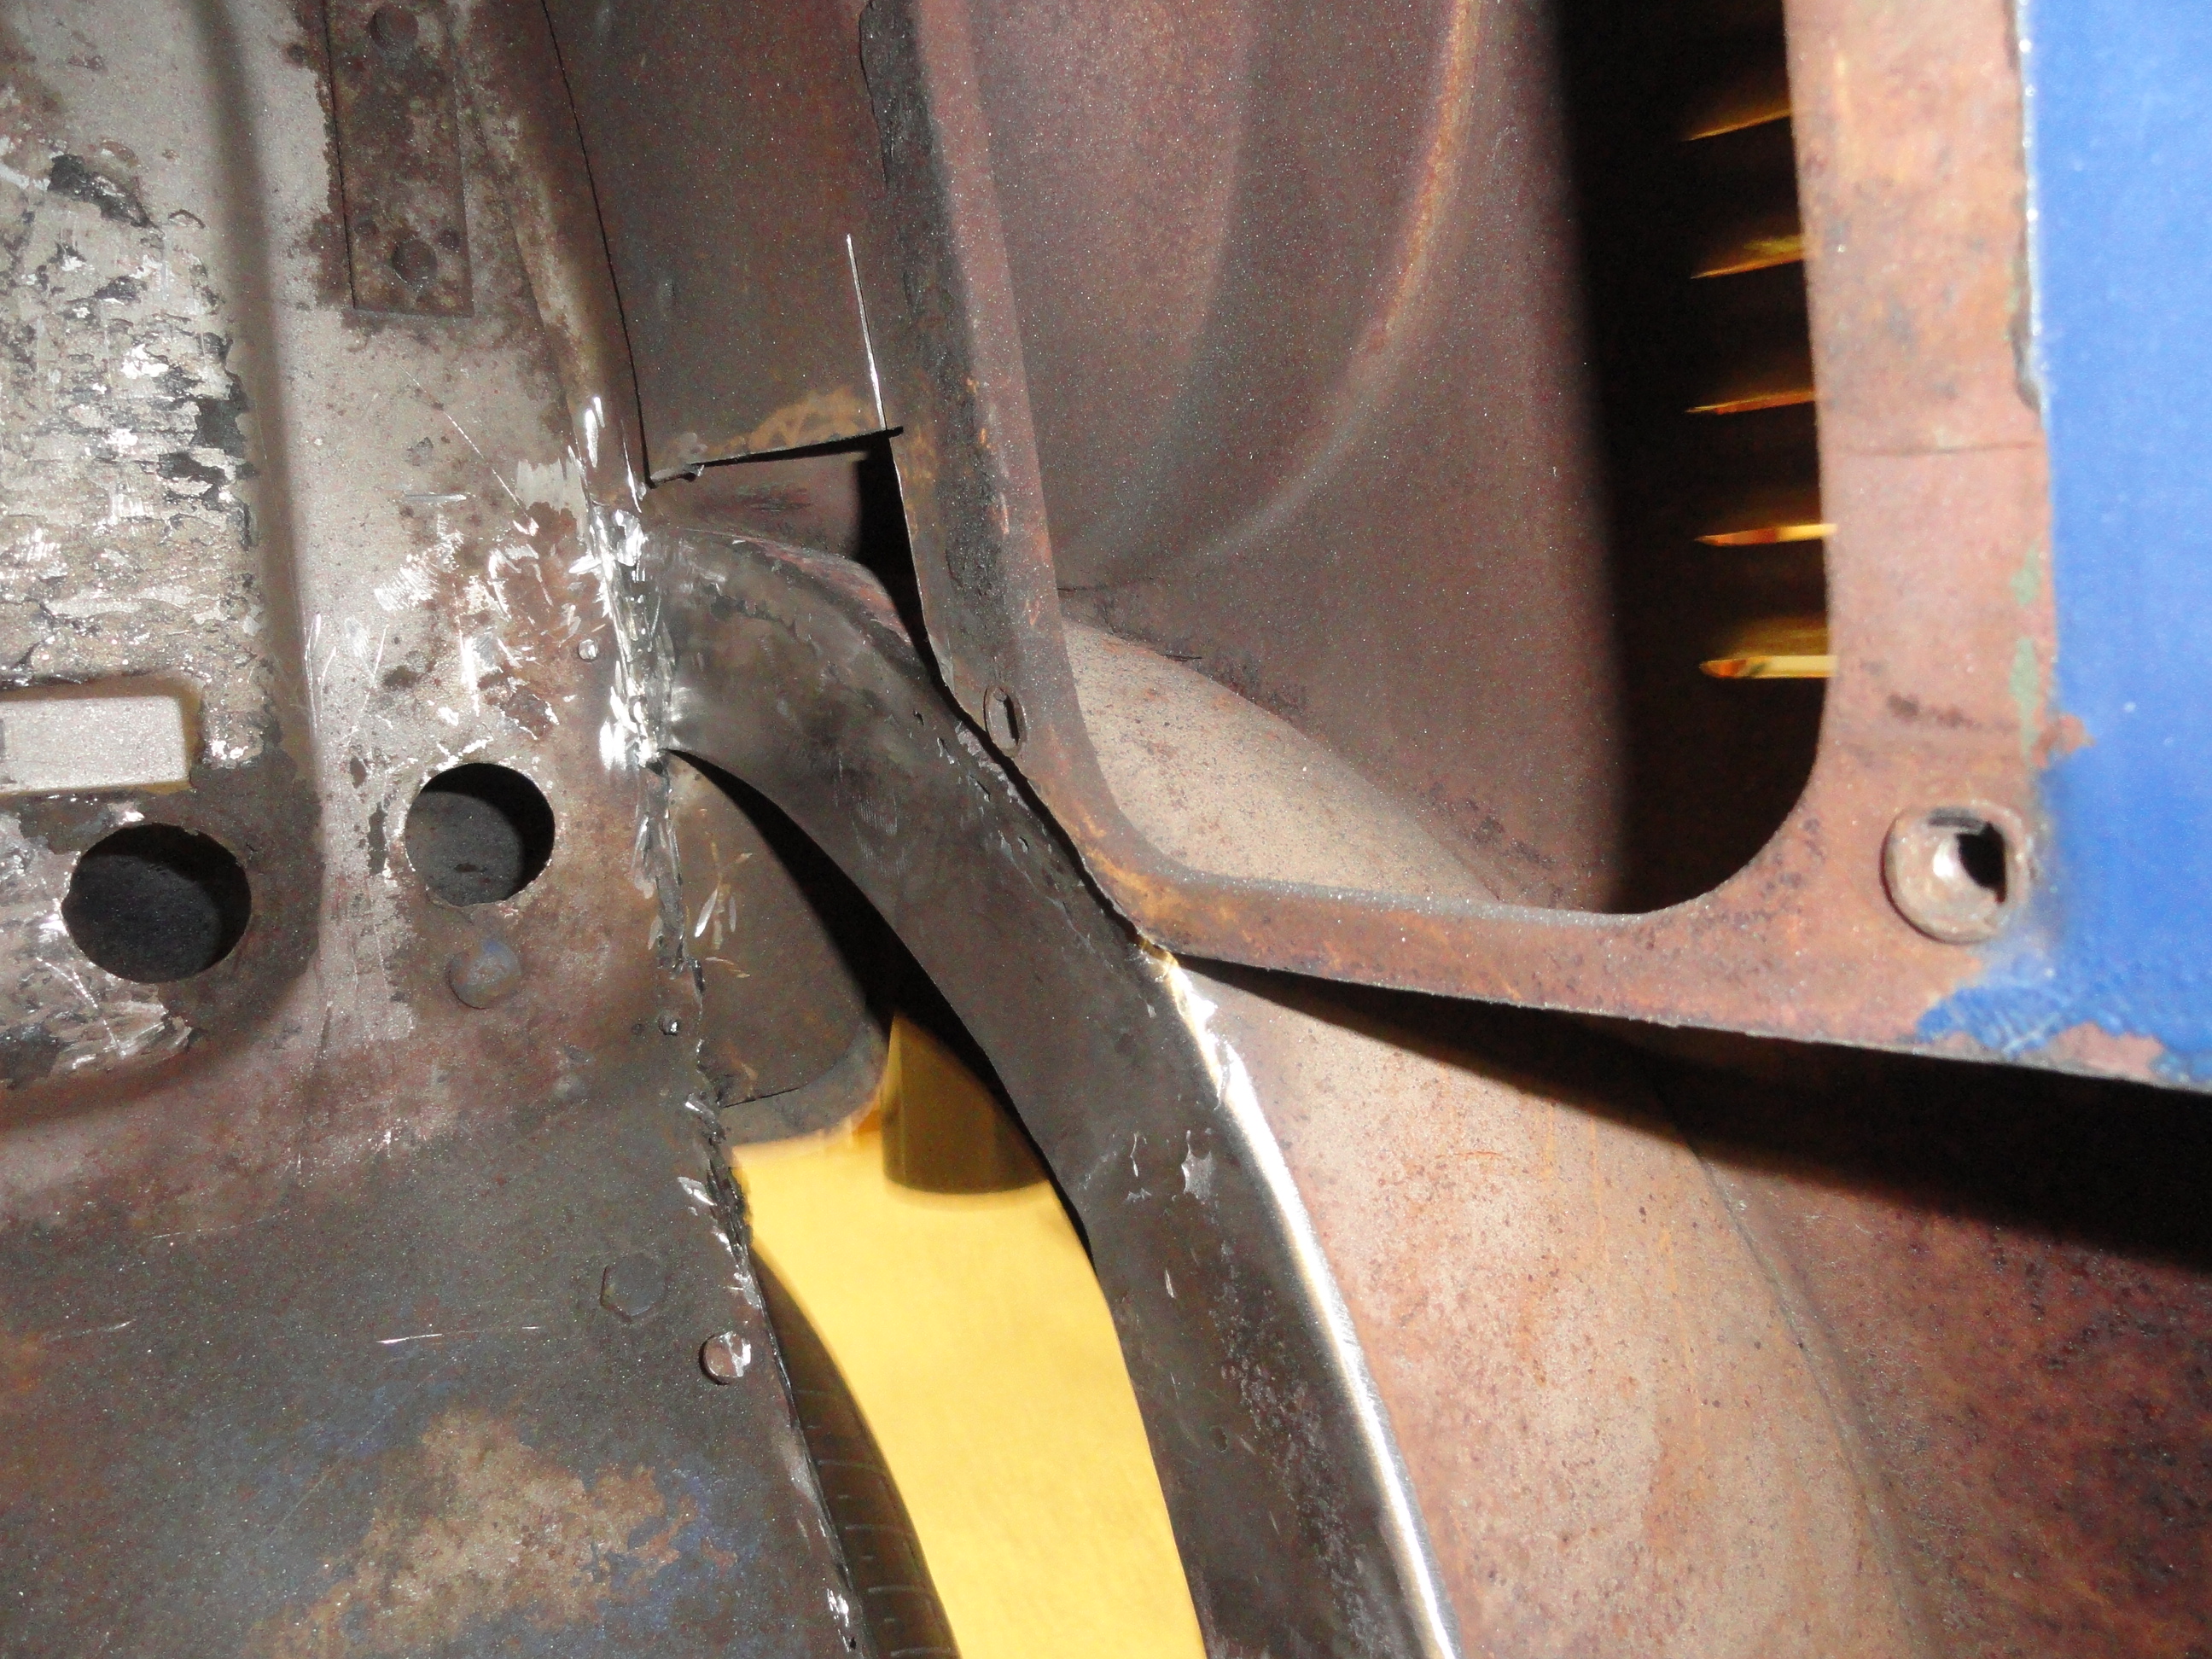
 As you can see, it is possible to make these inner cowl supports like brand new. This is a very important part of the truck because the heavy doors are hung here and we need to have these supports in tact and strong. Now you see why we started with the kick panel? This exposes all of the sheet metal that is probably bad behind it. But before we button up this area, lets take a look under the fender. Since this area is exposed to everything there is, you can plan on spending a few hours on this area as well.
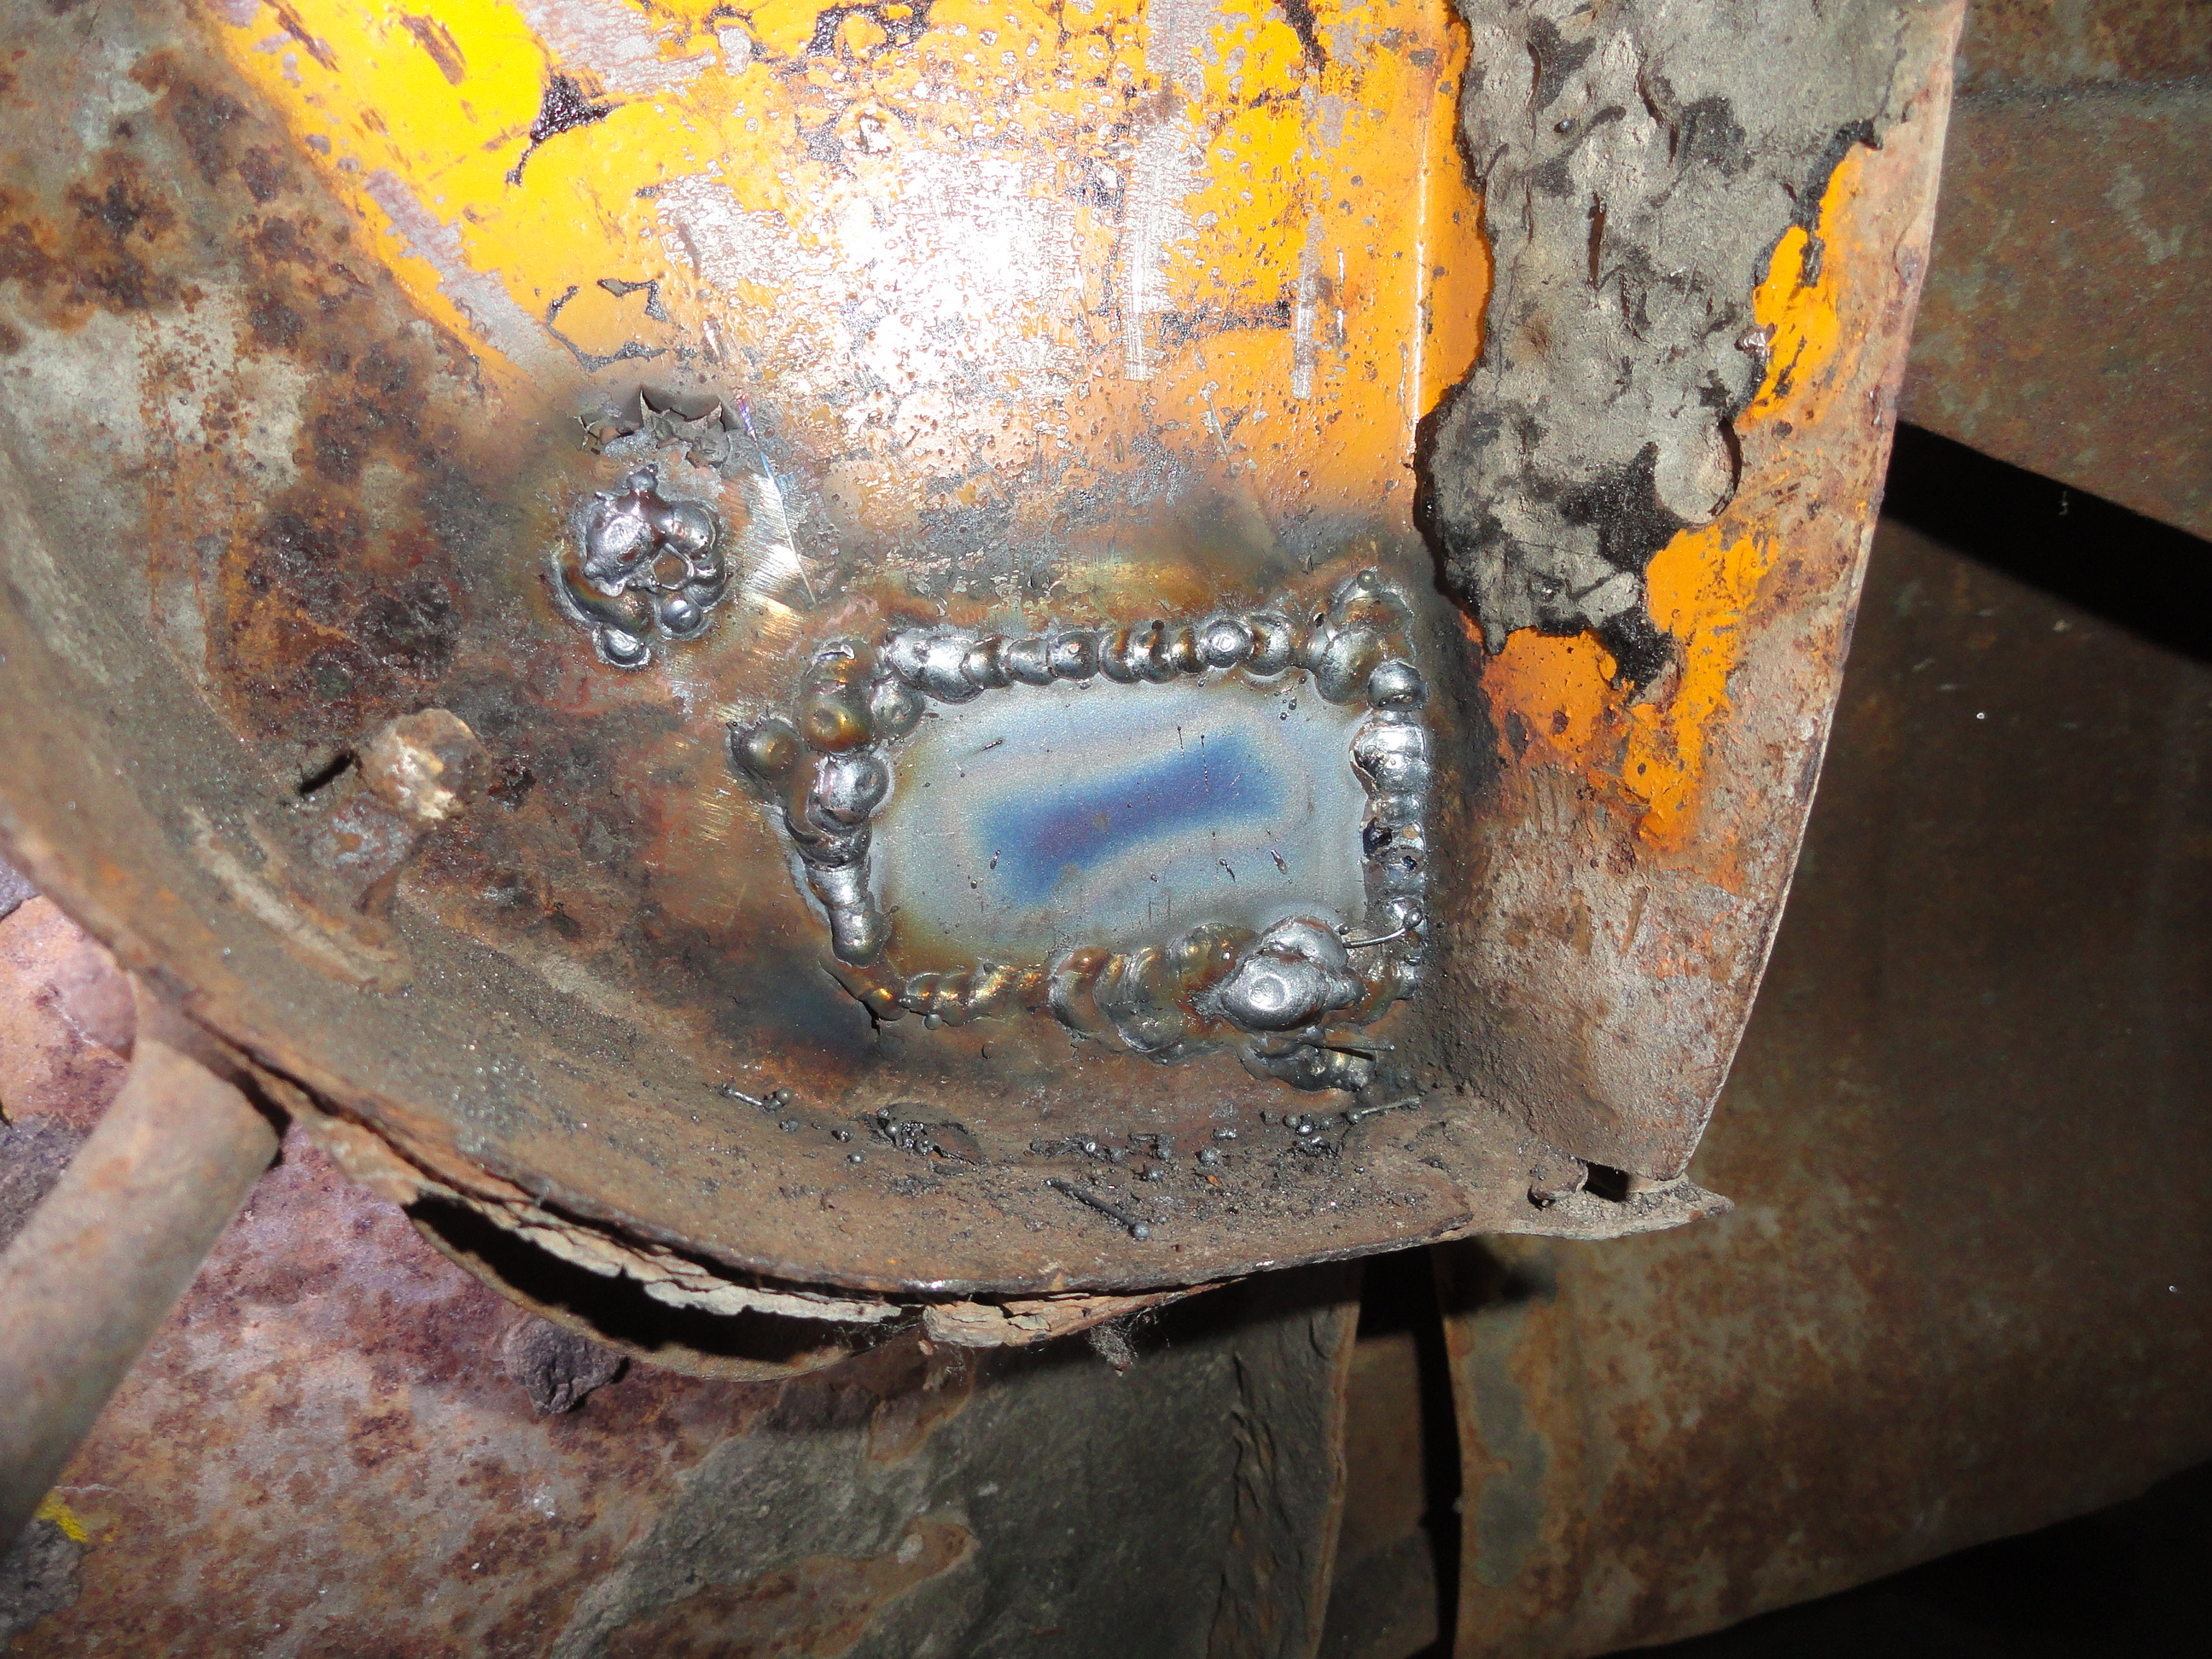
 Take your time and attack one hole at a time. You will eventually get there! The Advanced Design series has exposed kick panels and cowl supports under the fender. This is convenient for me now, but is also why the
rusted out areas are so bad in the fender wells. A person needs to spray undercoating in these areas when we are completely done with the repairs. Be sure to cut far enough back to get to good metal. If you do not, your MIG welder will have a tendency to blow holes in the work rather than repair anything. If something happens that you can't find any good metal, it's time to replace the entire piece with an aftermarket one.
 Time to install the new aftermarket kick panel. A word on vendor purchased sheet metal.. you do not have to use the whole piece. You can replace what is bad. In this case, the heater hole has threaded nutserts that we would rather not have to duplicate. I cut around this area and only go as high as I have to. This also makes it easier to get into the area to weld it in. In the case of the kick panel, it slides past the toeboard into the fender well and butts up against the firewall. The patch kick panel I got was too long so had to be trimmed at the door, but other than that, it fits perfectly. You have to remove the rubber windlace channel to do this. It is spot welded in and you cannot get new from the vendors, so take care to break the spot welds carefully. In my case, the bottom of that channel was rusted out, so I need to replace it. More on that later. I chose to put off replacing that channel until I finished with the floor and toeboard.
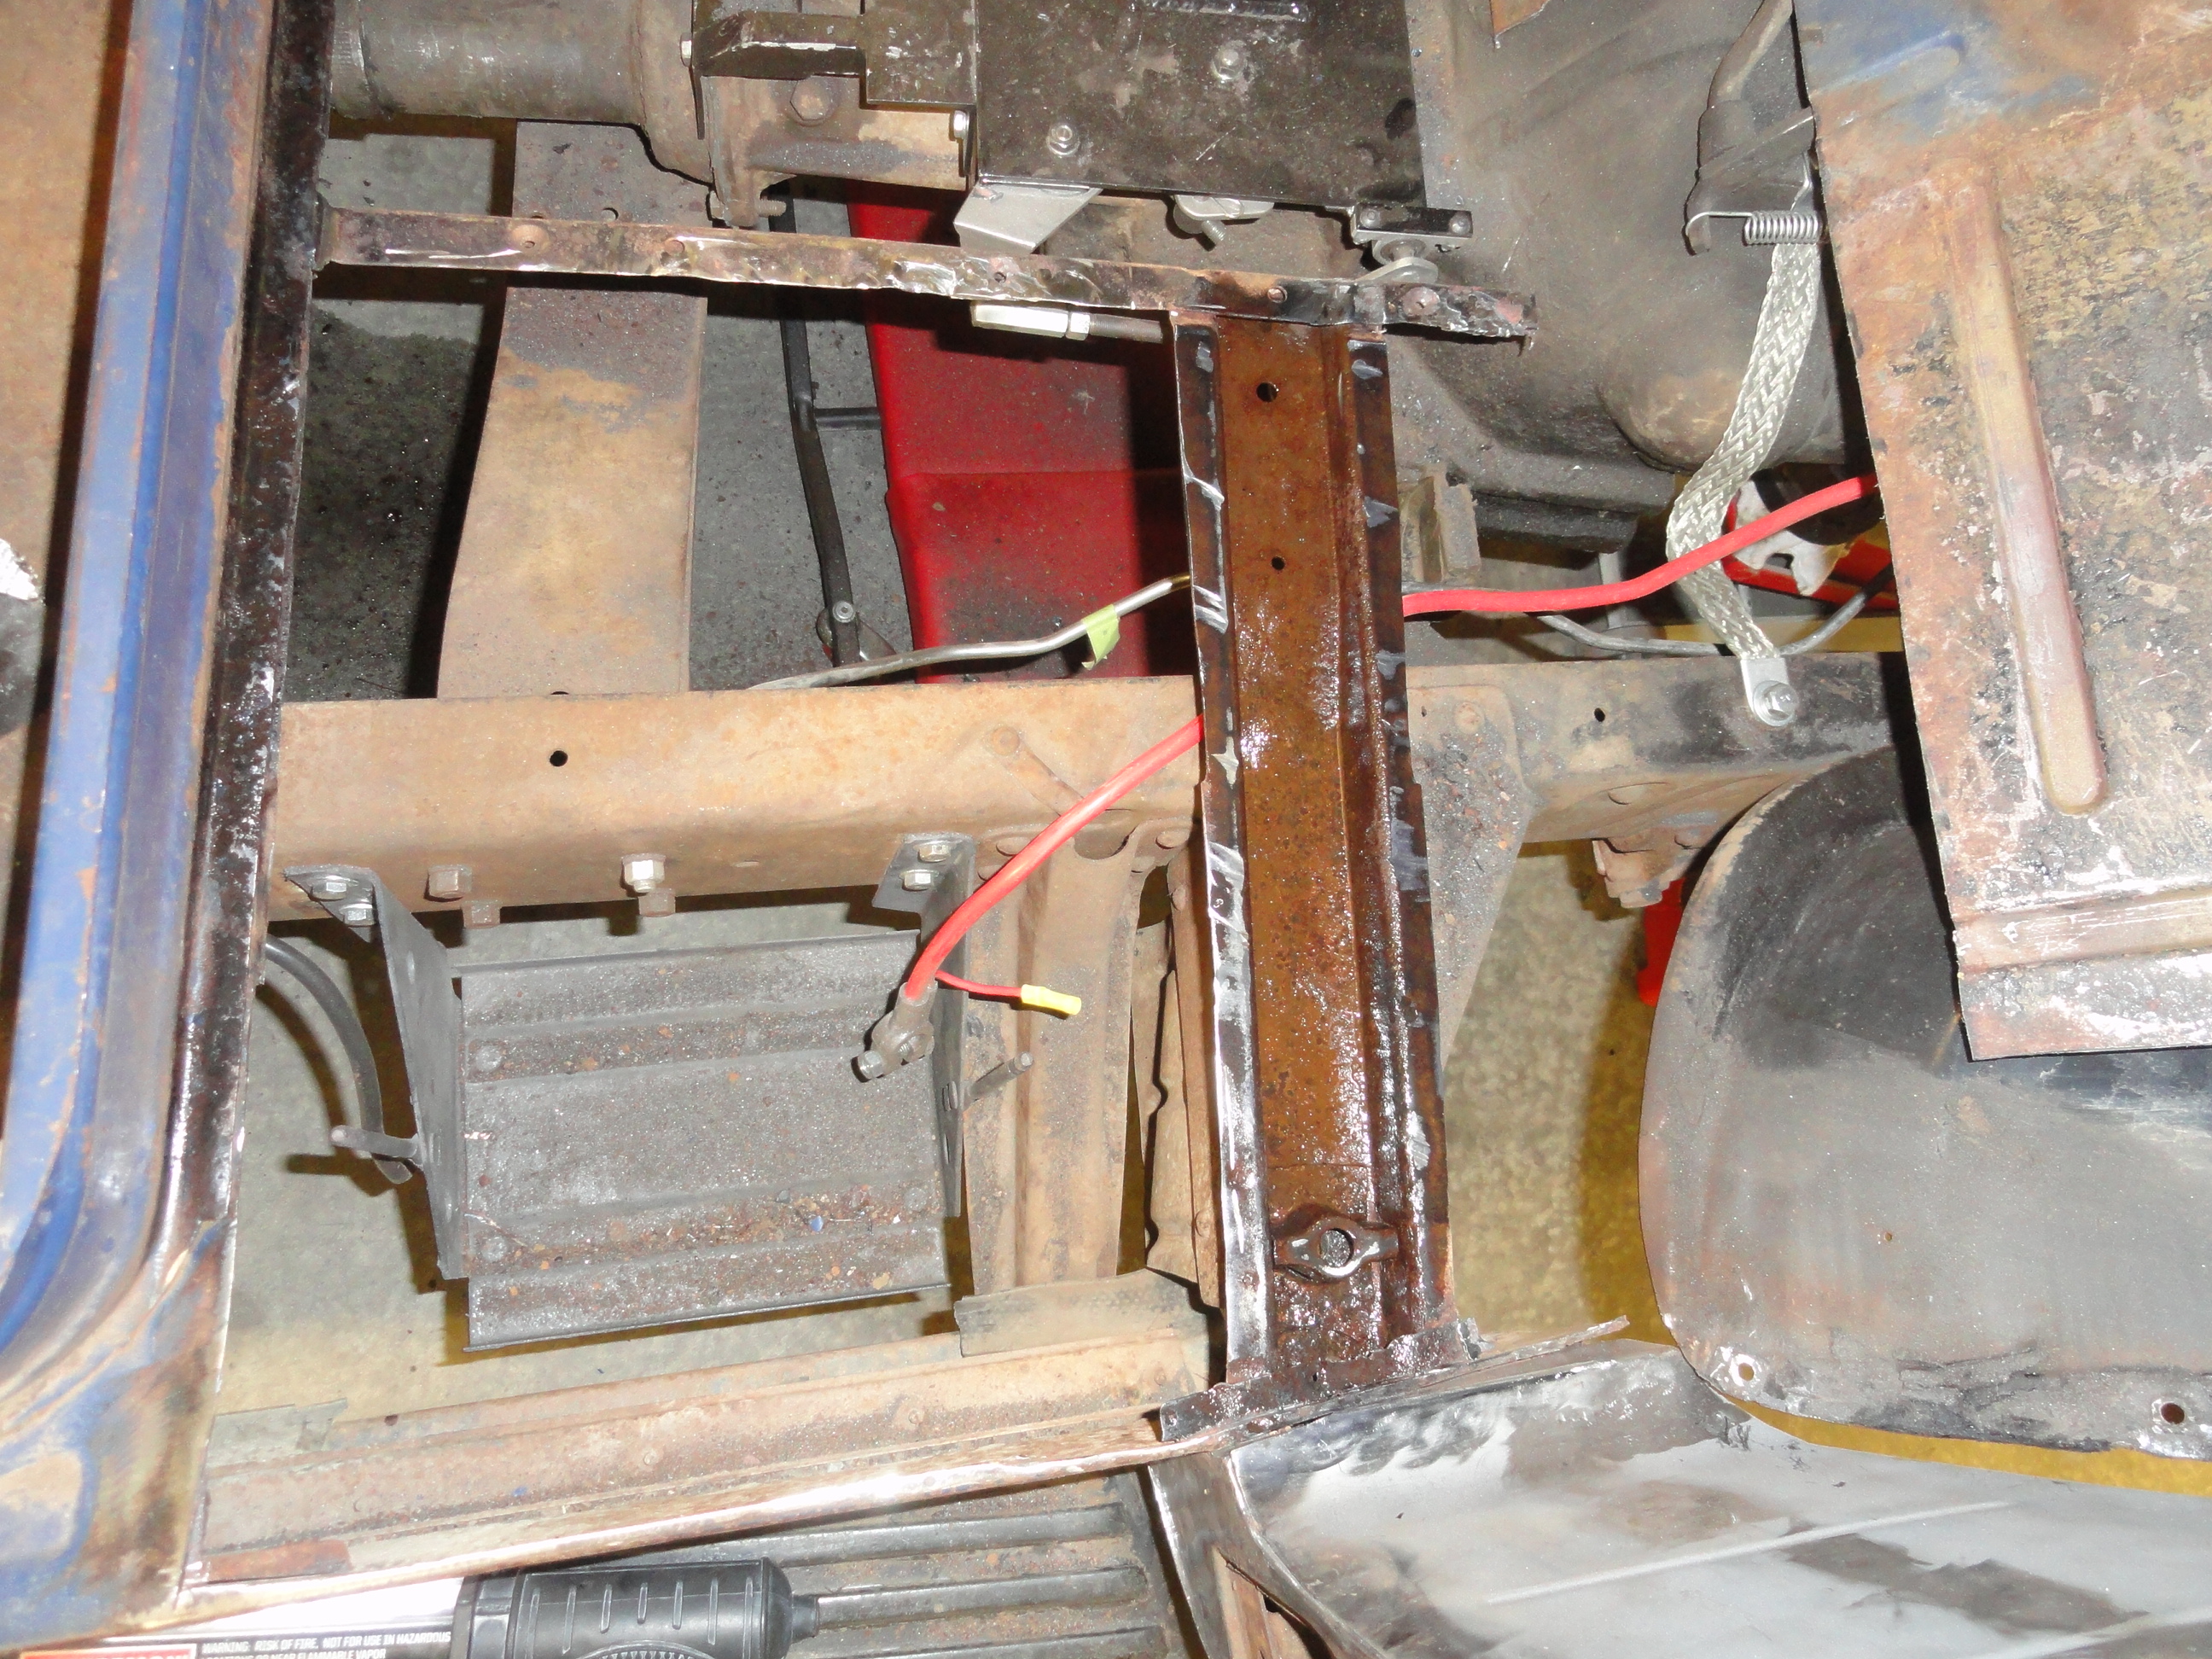
 I like to get the patch panel that includes the floor forward of the seat pedestal and the toeboard together. Both are so badly rusted out that it makes it easier to have that dimension (where the floor meets the toeboard angles) predetermined. I have my criticisms too. There is no metal strip (delineation) between the floorboard and the toeboard. This means nothing really on the passenger side but when we get to the drivers side where there is a tab welded under there, we will address that problem then. Also, fitment is very close, but not exact enough for my tastes. It is what it is, so we will do our best to overcome these obstacles.
Removing this area is somewhat difficult because of the spot welds. Things to take into consideration are, we want the bracing under the edge of the transmission cover to remain in tact and welded to the seat pedestal so care must be taken to find the spot welds, cut them out without bending or ruining that support. Also, the front cab support that runs from the large mounting bolt to the trans cover is spot welded to the floor. Since badly rusted metal shows no signs of where the spot welds are, I had to do a lot of creative grinding work to get the floor out in pieces. Just take it slow and do not do any damage to those two supports. In my case, they were good to re-use. This is not an easy task, so taking your time and thinking things through is definitely in order. The geometry of where those supports meet the floor is critical, so once the floor is all out and the part of the toeboard you wish to replace, there are a few ways to be sure all is in perfect alignment.

 The way to tell if you have the trans cover brace (seat pedestal to toeboard) in the correct spot is to put the trans cover back on. Bolt it in from the drivers side and then bolt it in from the passenger side. THAT is where the floor is in perfect sync. Once you have that done, go under the cab and mark the bottom of the large mounting hole with a Sharpie. It should be close to the center of its indention. In my case, both tests passed so I was ready for rewelding. Remember, the hardest part of this is the measurements to ensure you have it ready for butt welding in. You cannot be off by more than 1/8" so take your time and measure about 6 times, then make your cuts. I like to leave things 1/8" larger than the hole then fit, then cut, then fit, then cut, etc. That floor was out about 50 times in all just tweaking each side to ensure perfect fitment.
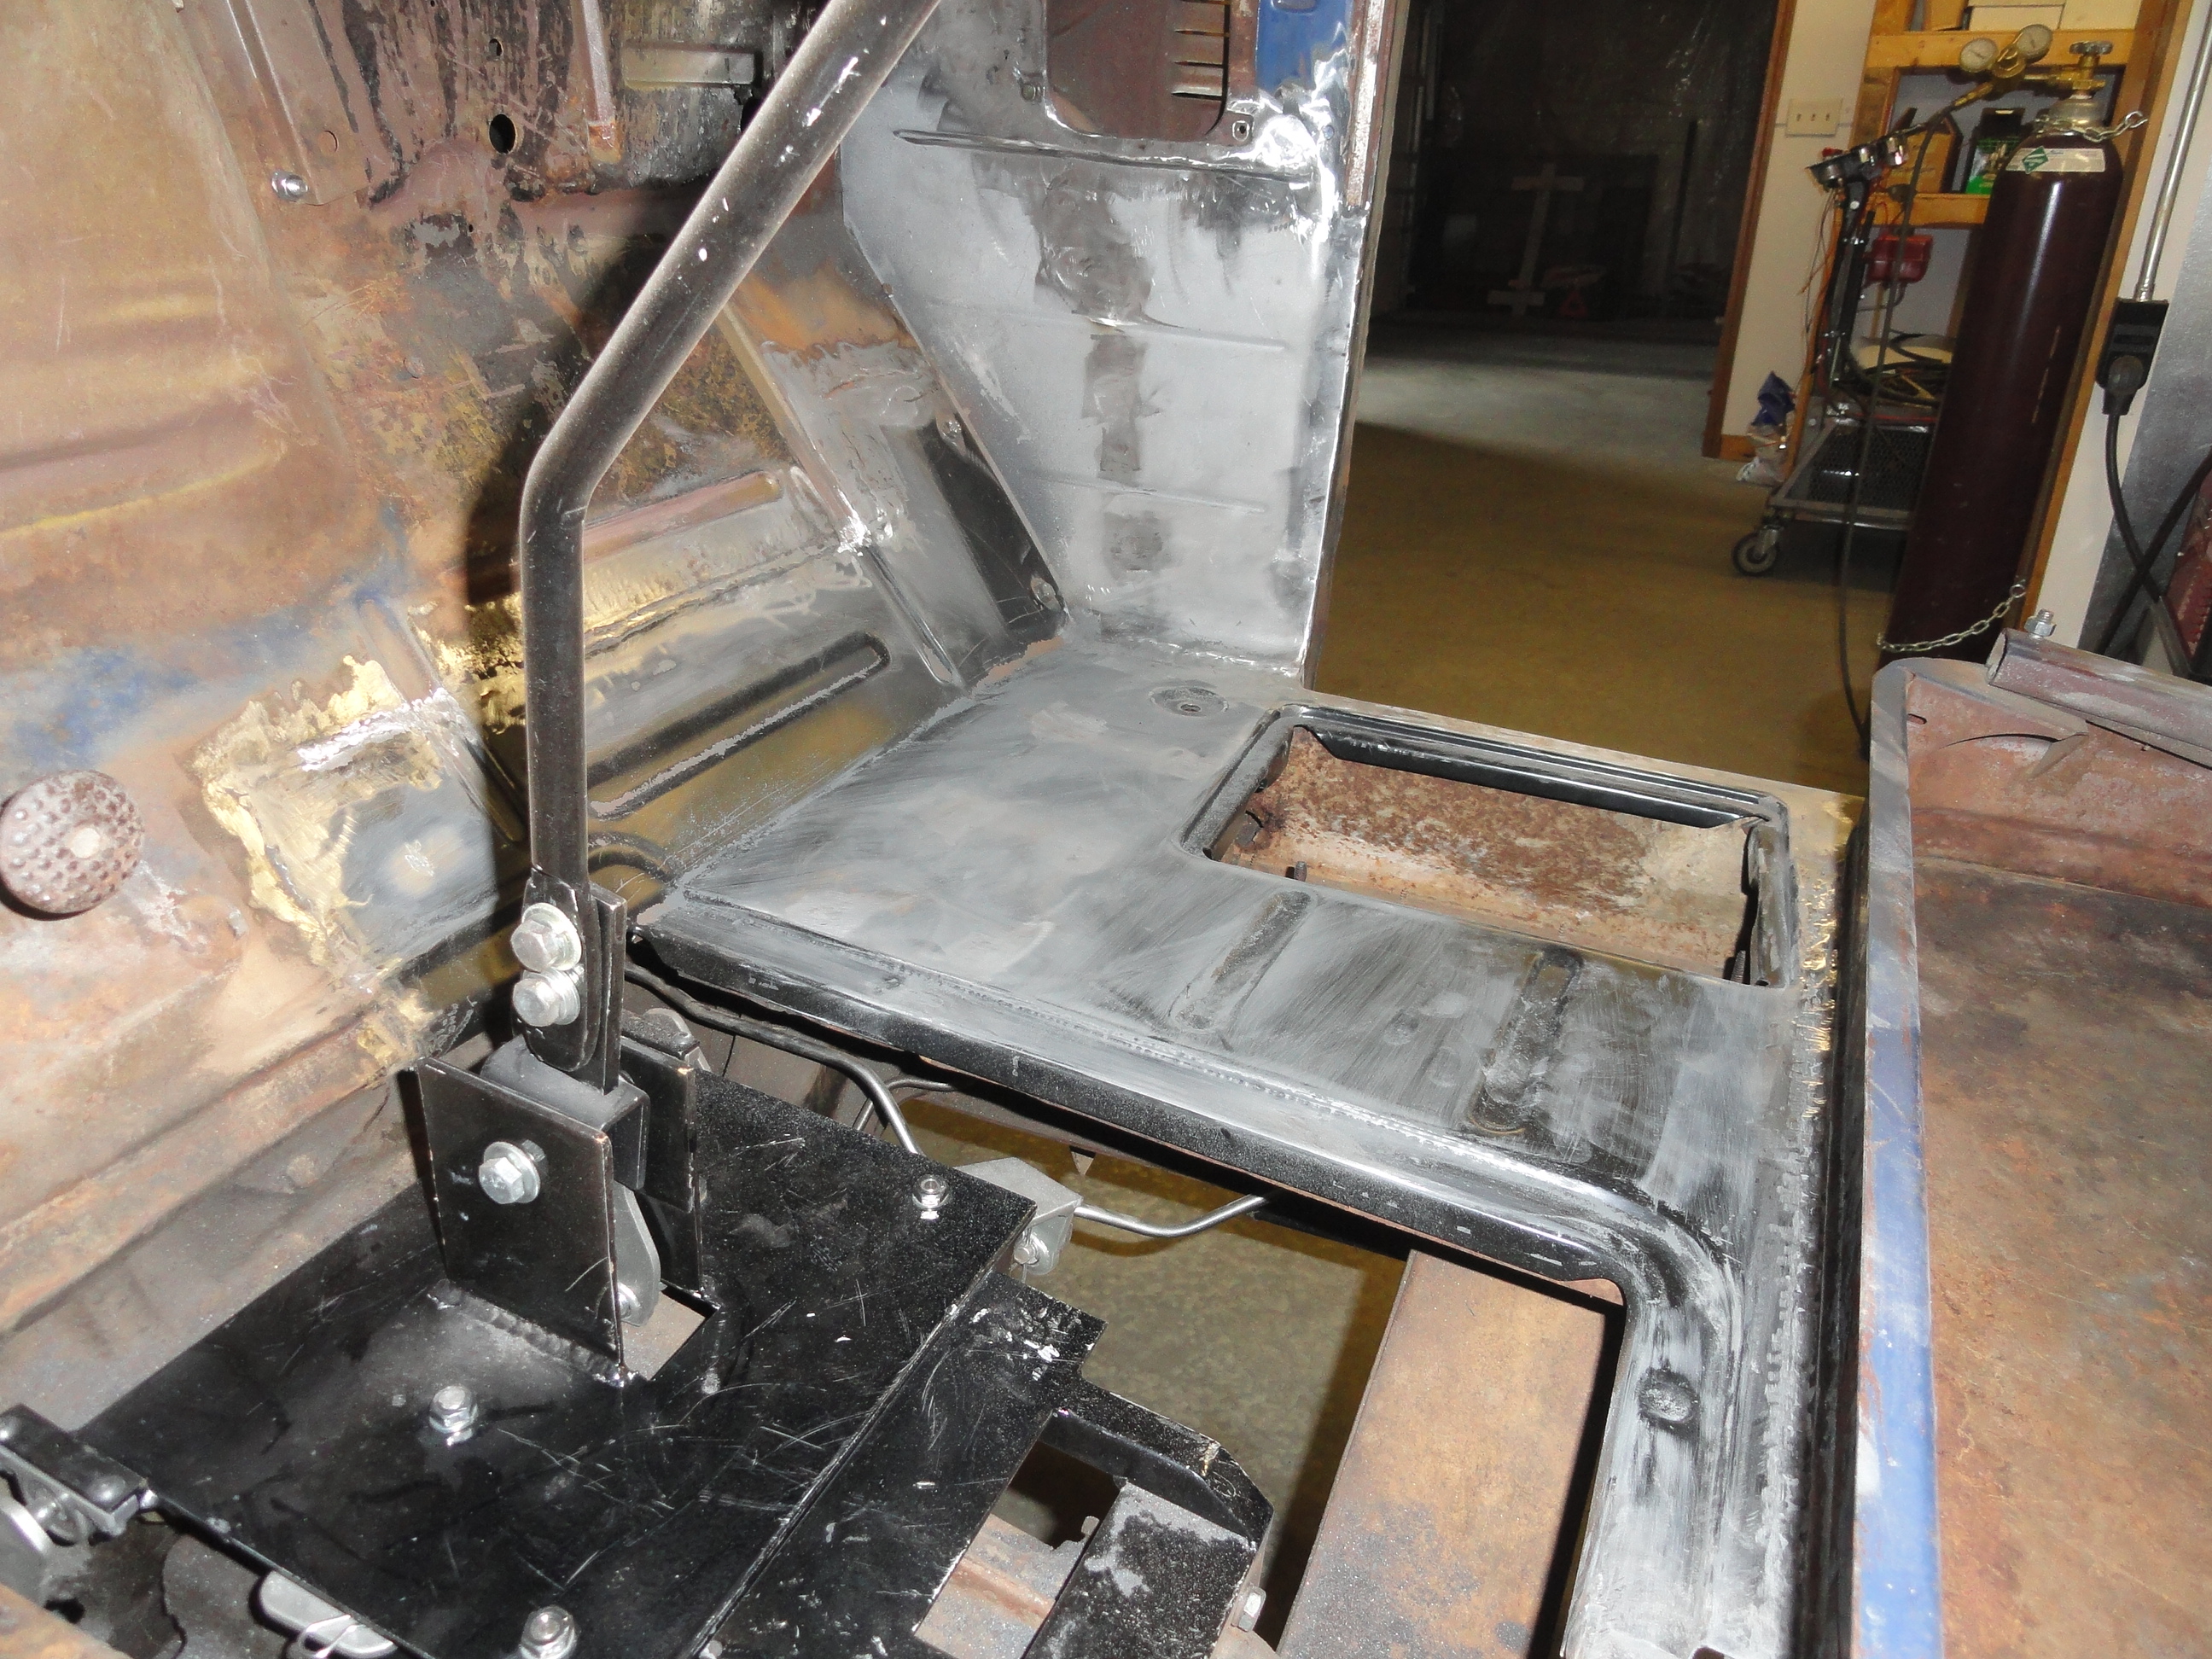
 Weld slowly skipping around the work. Do the same with grinding. To get into the crevasses and stampings, I used a Dremel tool with a grinder wheel. Slowly and meticulously fine tune everything. Once completed, only you will know the floor was ever replaced. You can put a skim coat of filler over the welds if it bothers you, but nobody will ever see it since it's all covered anyway. Nonetheless I do everything I know how to keep the welds clean and the seams from showing. Often that is just not possible, so expert grinding will get you close. Finish the job by replacing the windlass rubber channel. I spot weld them in and then use my Dremel to grind the spots smooth. You have to find this channel at a salvage yard. I have not found a vendor that carries it. That concludes the passenger side. Next week I may be sharing how to repair door hinges before moving to the drivers side. I am happy to answer questions if I left something out that you feel needs to be included. Have a great week!
Comment