


 Welcome to Deves Technet.com Forums. I encourage everyone to register so we can get a better idea of the traffic and its usefulness. Please leave a word or two describing your stay and what we can do to make it more enjoyable. Thanks!
 Tweet
Tweet
Part Two of Electric Fuel Pumps
Welcome to Tip of the Week 54! This week we will continue our research into Electric Fuel Pumps for use on our old Chevy trucks. Despite the peanut gallery in several forums asking stupid things like "Why do you want to do that?" or "Solution waiting for a Problem", we are moving ahead quite nicely. This week we have all sorts of great information to share. Taking one thing at a time, the goal we are working towards is this:
1) We want faster starting of vehicles that have been parked for awhile. You know how after a time period the carbs fuel bowl is empty and you have to crank the starter longer to get it started? We want to eliminate that issue.
2) We want to provide a few different mounting methods. Mounting the pump to the exact same place the mechanical pump used to be allows us to use our same Hard Lines without modification. The other mounting method will be inside the frame rail so we can augment the existing mechanical pump and leave them both in.
3) We are doing all of this using OEM parts that have been approved in vehicles already. This eliminates any arguments about the feasibility.
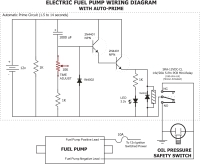
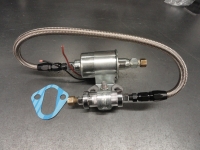
So to accomplish the above, we need to first create an automatic priming circuit. This circuit must also include an OEM Fuel Cutoff Safety Switch which in our case is based on the presence of oil pressure. The Standard Motor Products OEM PS133 will be the Oil Pressure Switch to do this job. For the Fuel Pump we will use Spectra Premium's OEM SP1170. This is ideal because the metal Can that the pump is housed in is NOT grounded. As an OEM pump, I do not think they are allowed to ground the Can. Good for us!
All we have to do now is pull out our electronics textbooks and see if we can figure out how to make the Auto-Prime Circuit. I am very motivated because I have never owned one of these trucks that didn't require longer cranking after sitting for awhile. Let's fix that once and for all! So the above right schematic is roughly how we are going to accomplish this. I am still developing the circuit so do not jump in until next week, but this one works great. I am hoping I can replace the Darlington Pair transistor setup with a single more powerful transistor to eliminate parts required. Wiring it this way will give us an adjustable 1.5 to 14 seconds of automatic priming before the pump cuts out to be deferred to the fuel safety switch. The above has been tested and works perfectly and what I like about it most is it uses the Negative side of things. This is desirable because we do not want +12 volts anywhere we do not absolutely have to. Ground is present everywhere. I would like to hear your thoughts on this because the Spectra Premium's OEM Instructions have us switching 12v power instead of ground. This IS fuel we are talking about here!
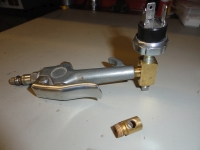
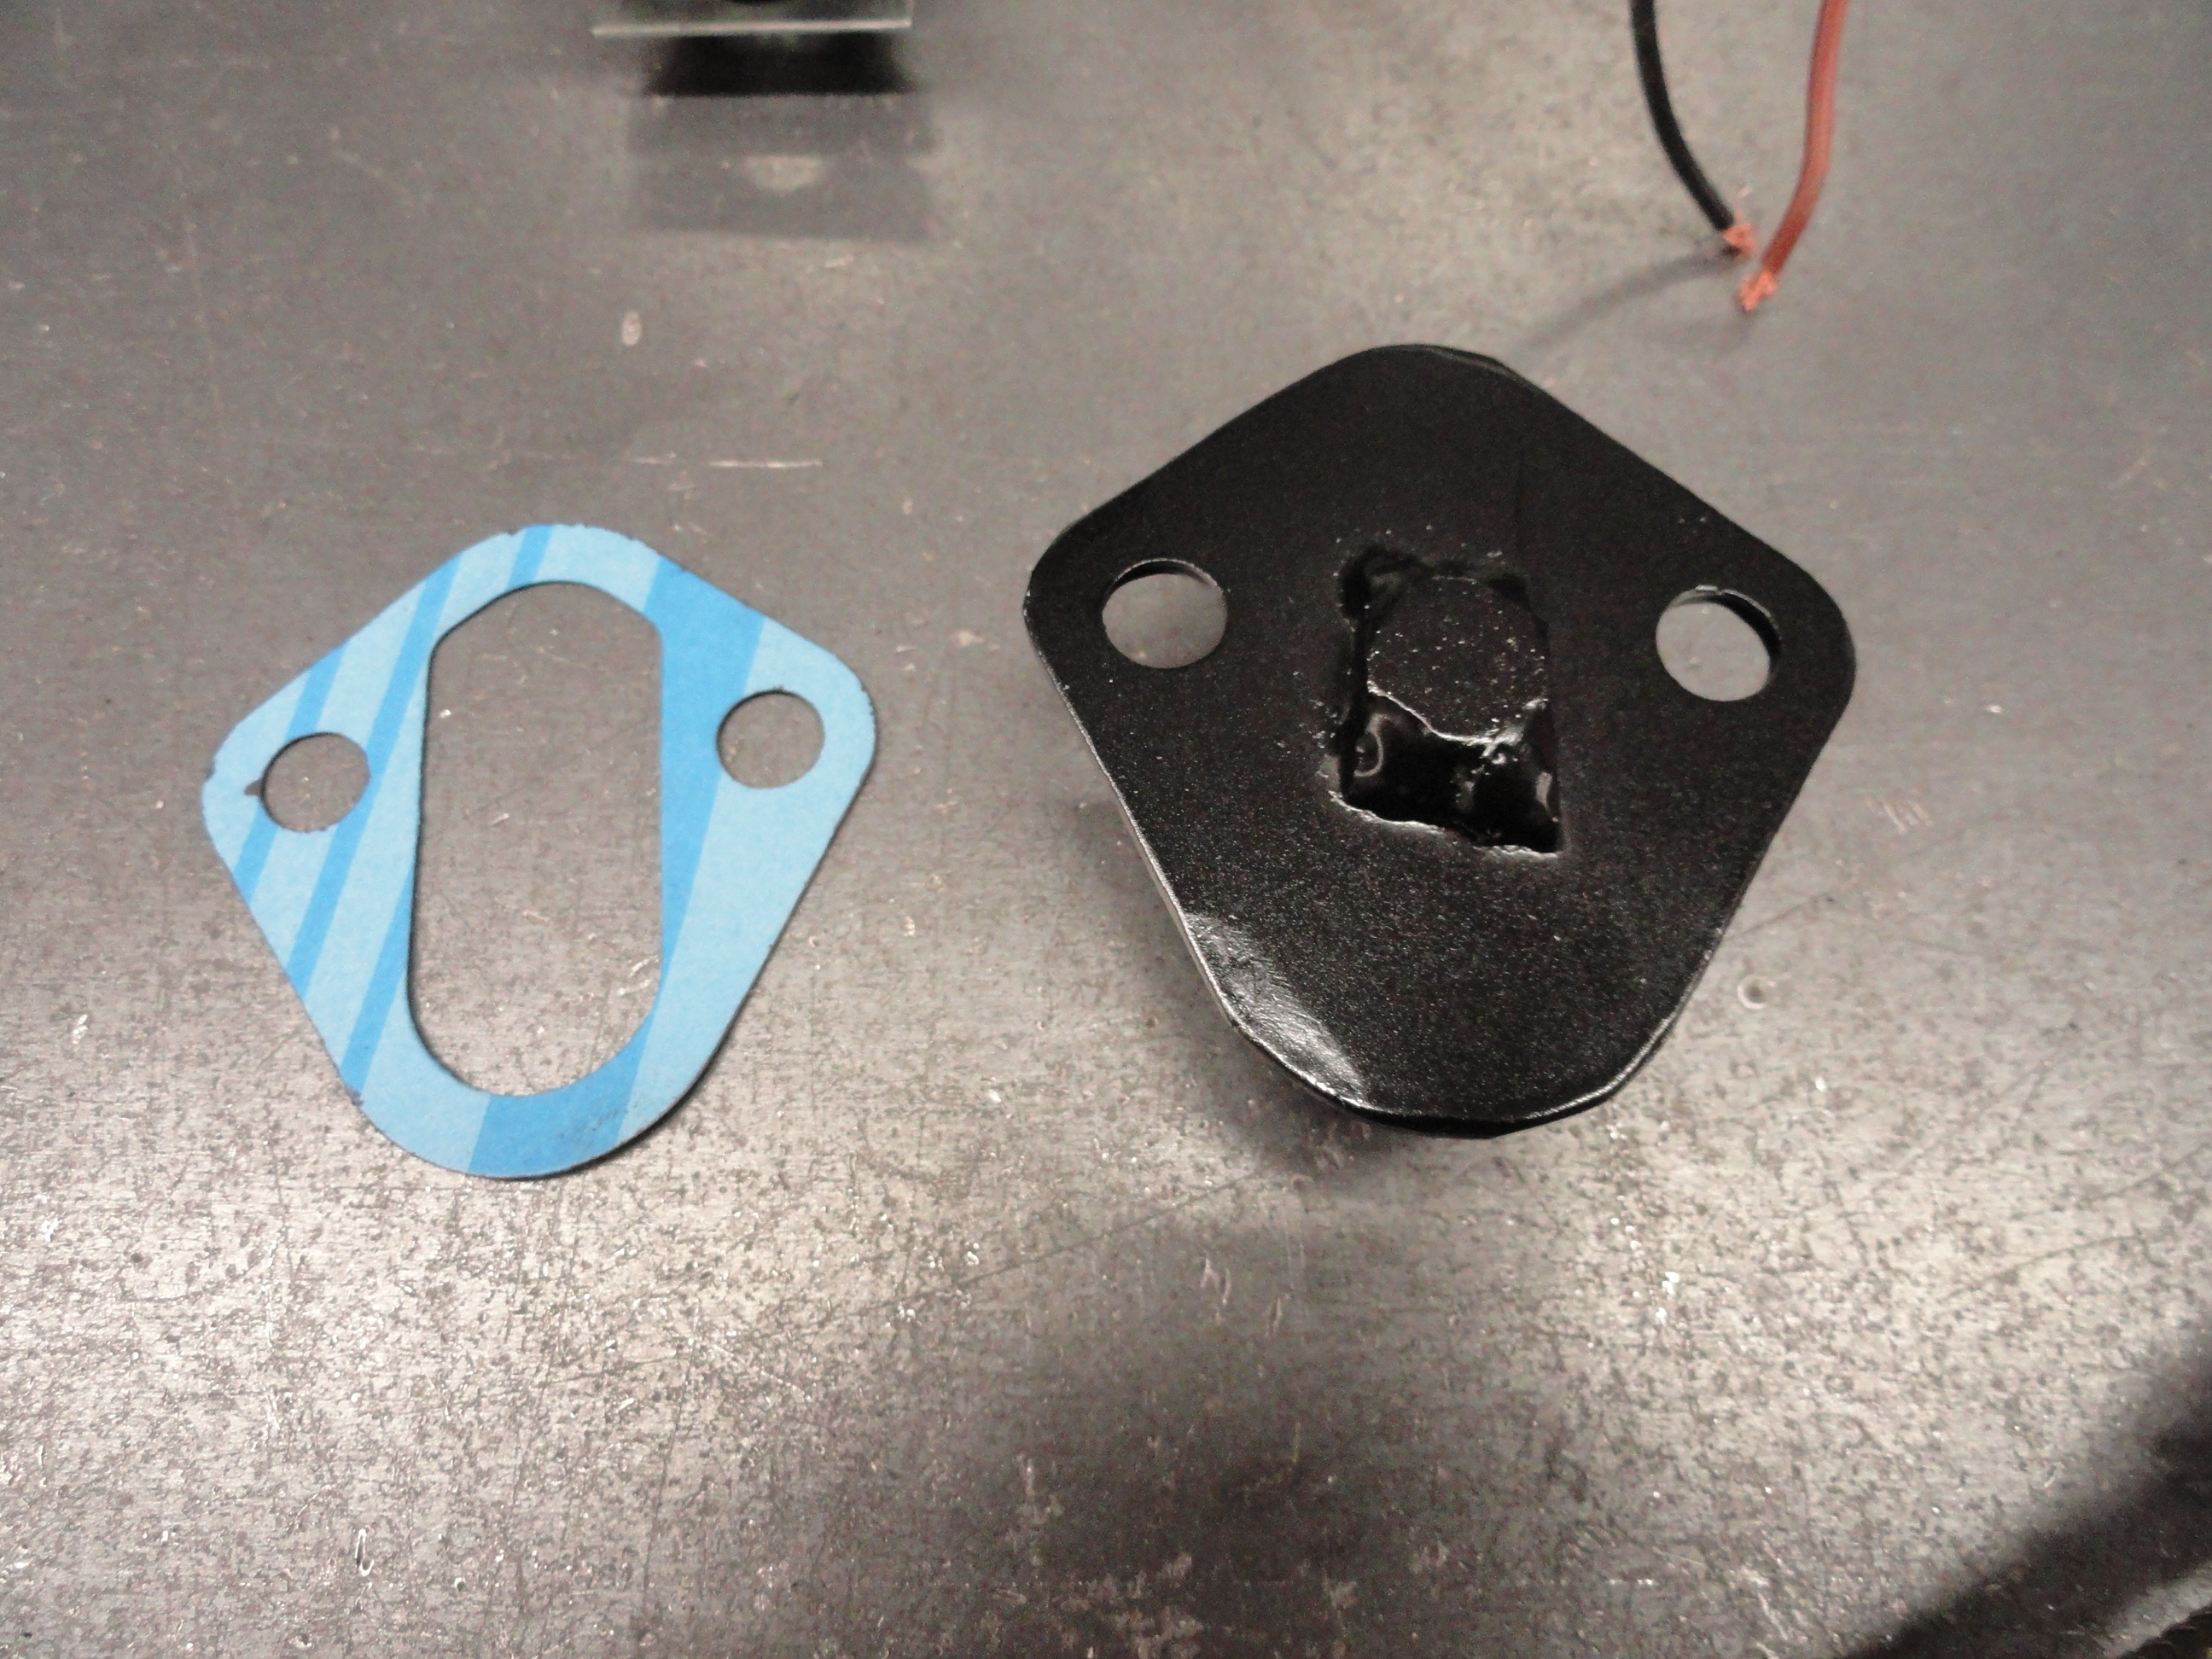
 In case you didn't know, your standard air blower gun for your air compressor has a threaded end on it. That threaded end happens to be 1/8" - 27 Threads so 1/8" NPT screws right in. So let's start off assuming you do not want to augment your mechanical pump, rather you want to replace it. Why have to rebend new hard lines for this? Let's make a bracket that will bolt right to the engine block in the same place. Start by using a fuel pump gasket to get the shape, then cut the shape out of 14 gauge sheet steel. Drill the two mounting holes using a 3/8" drill bit. Even though they are 5/16 mounting bolts, I prefer them to be a little bigger so any slight mistake I make in drilling the mounting holes will not get in the way. In the center of the piece, drill a 27/64" hole to accommodate a 1-1/2" 3/8" Coarse thread bolt. Weld the bolt from the back securely then grind it so it stays within the boundaries of the cutout of the gasket (and engine block). Paint it whatever color floats your boat!

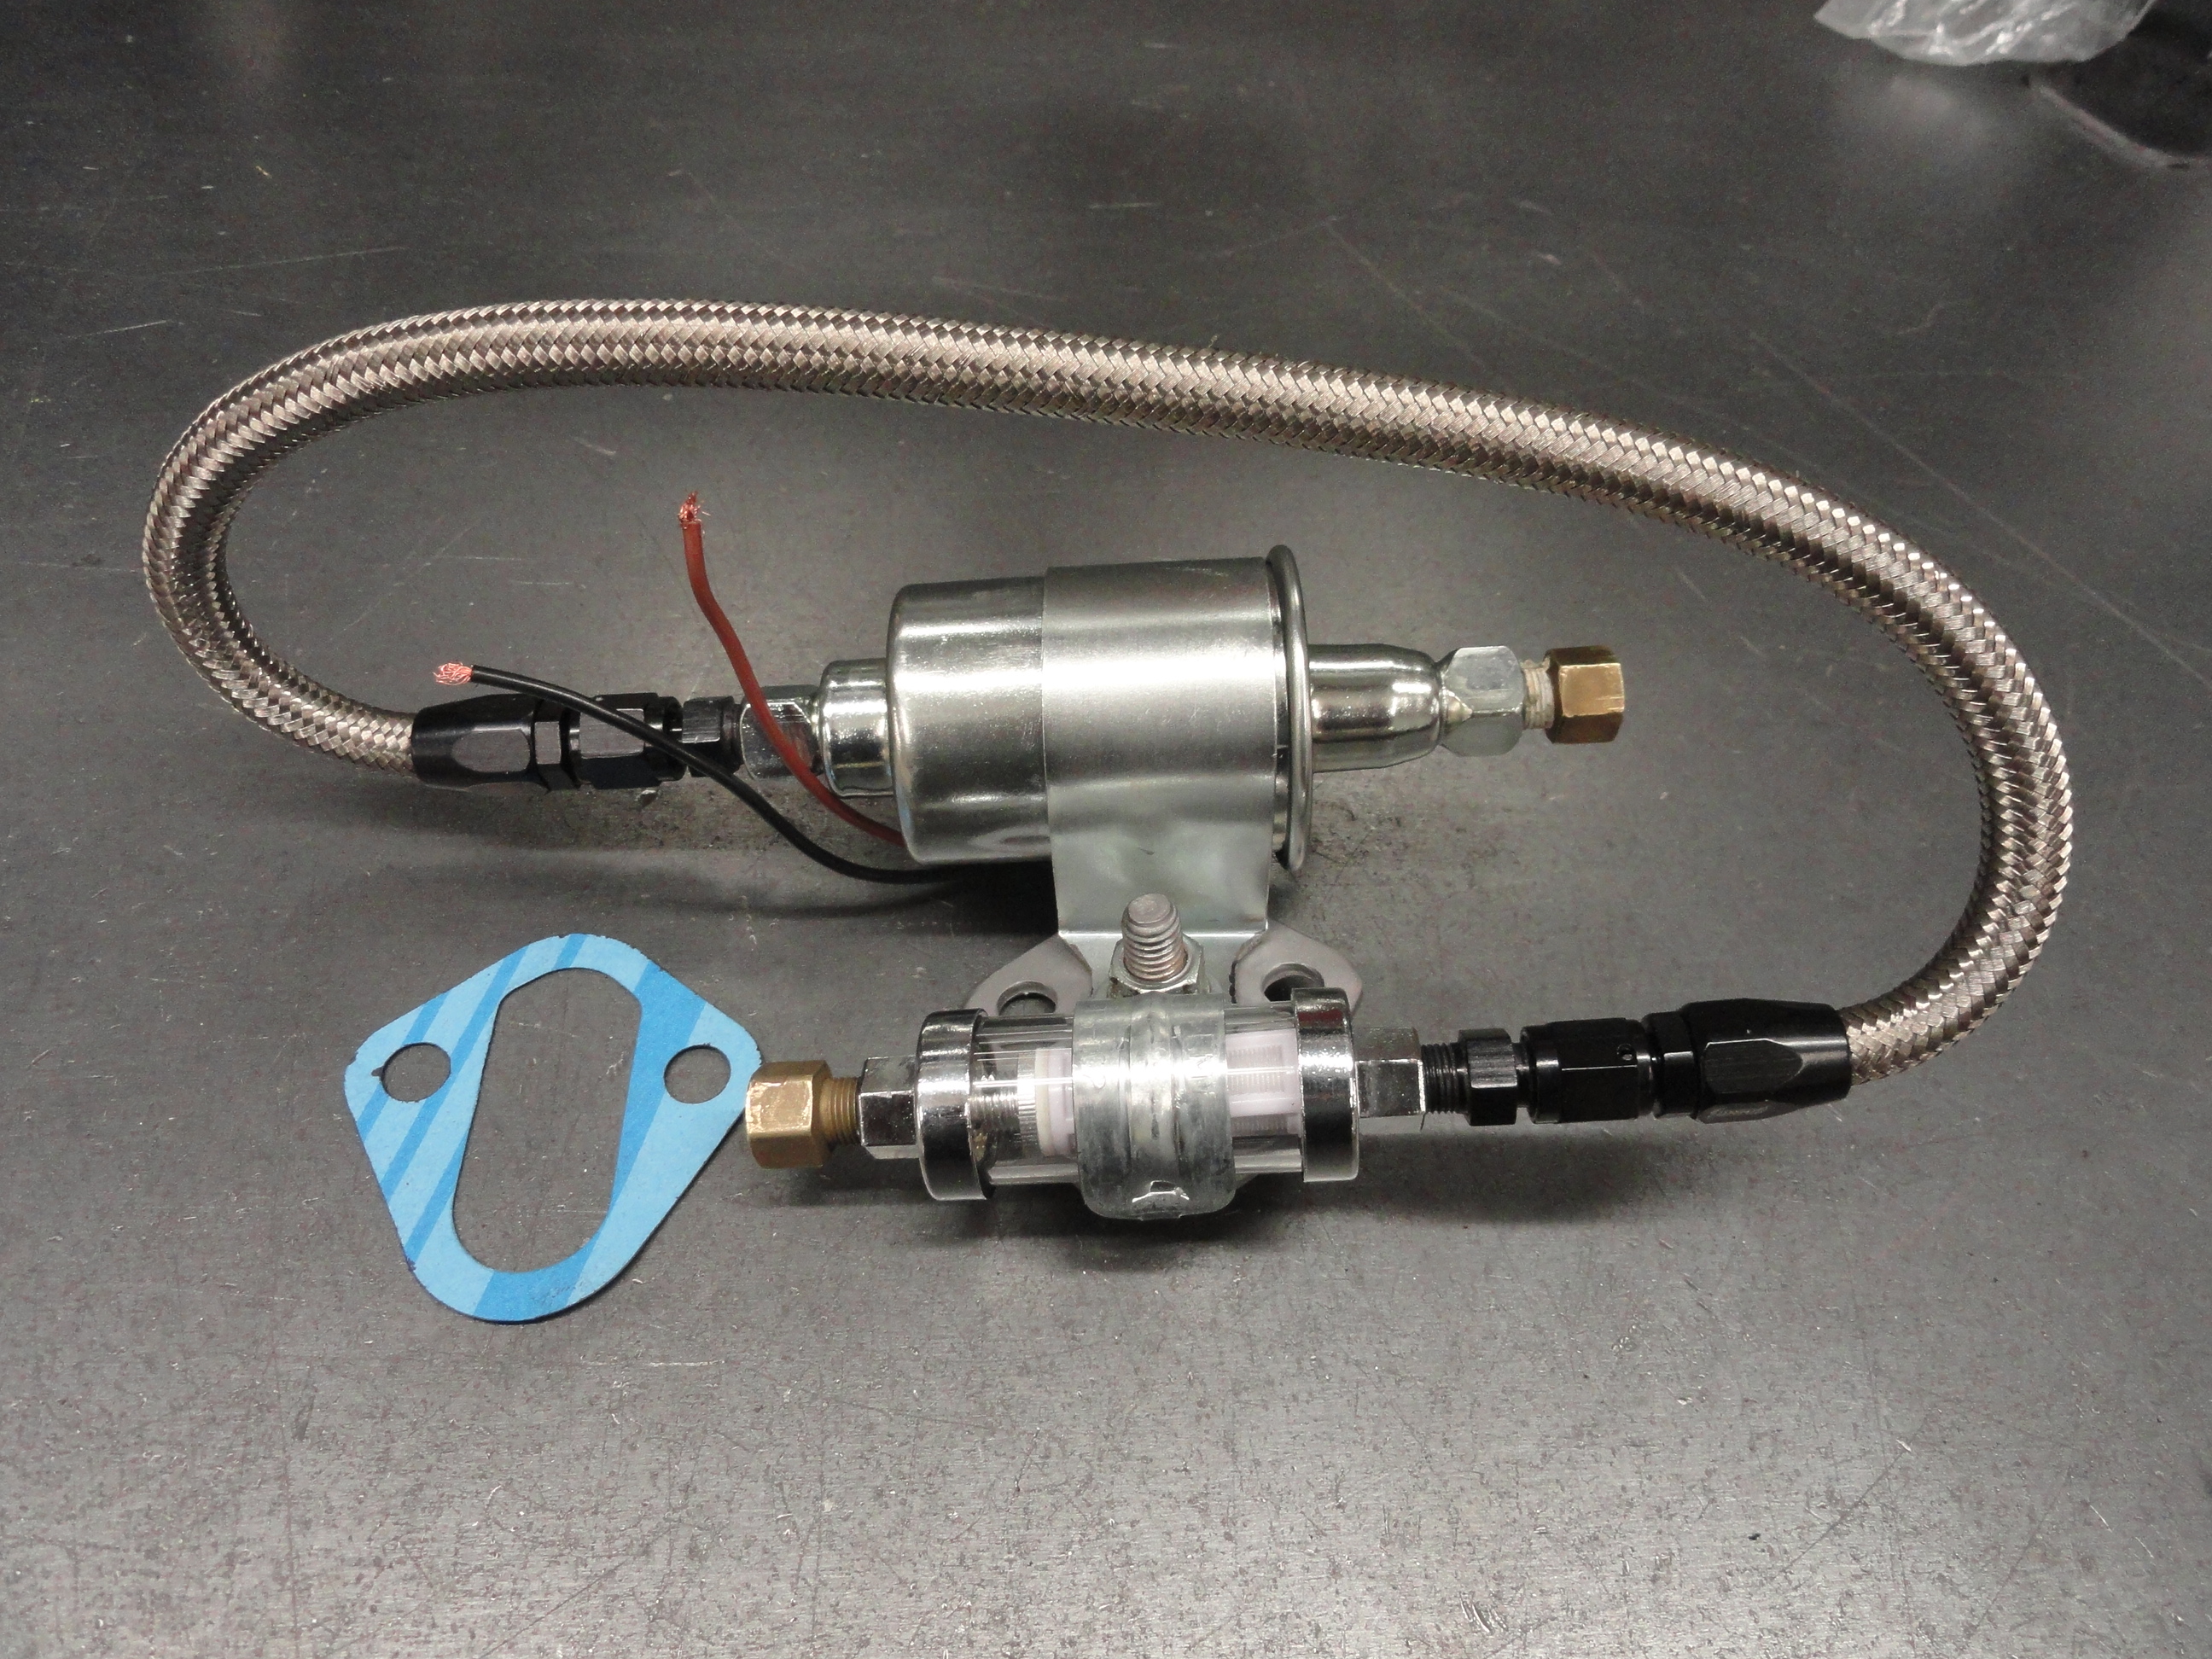
 This bracket will fit nicely and the bolt puts the electric pump in right about the same place as the outlet for the mechanical pump up to the Carb. For some of us who invested in stainless steel lines, that's a big deal! By welding the bolt in place securely, we can use the same gasket and always have the ability to change out the pump without removing this bracket. Since this instruction also includes a glass fuel filter before the pump using this same bracket, we can connect the hard line from the fuel tank right up too!

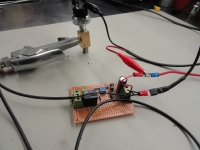 The electronic development process requires a step process where we first mock the circuit up on the Proto Board and use jumpers all over to connect it. That is what the white circuit board is for. This allows us to reuse the circuit board for the next project and nothing is soldered. Next we make a little more final but not board out of generic prototyping circuit cards like the brown one shown. This is just a board with lots of holes in it with solder pads on the bottom side. Now we solder all the parts in place and use small solid wire to connect everything. If this circuit works as we want it, we then go to a program called DipTrace and build a professional board in the computer which will be sent off to our favorite circuit board maker for a final professional circuit. We then take these boards and solder the components on ourselves to save money.
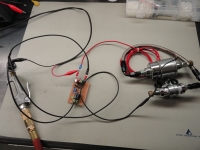
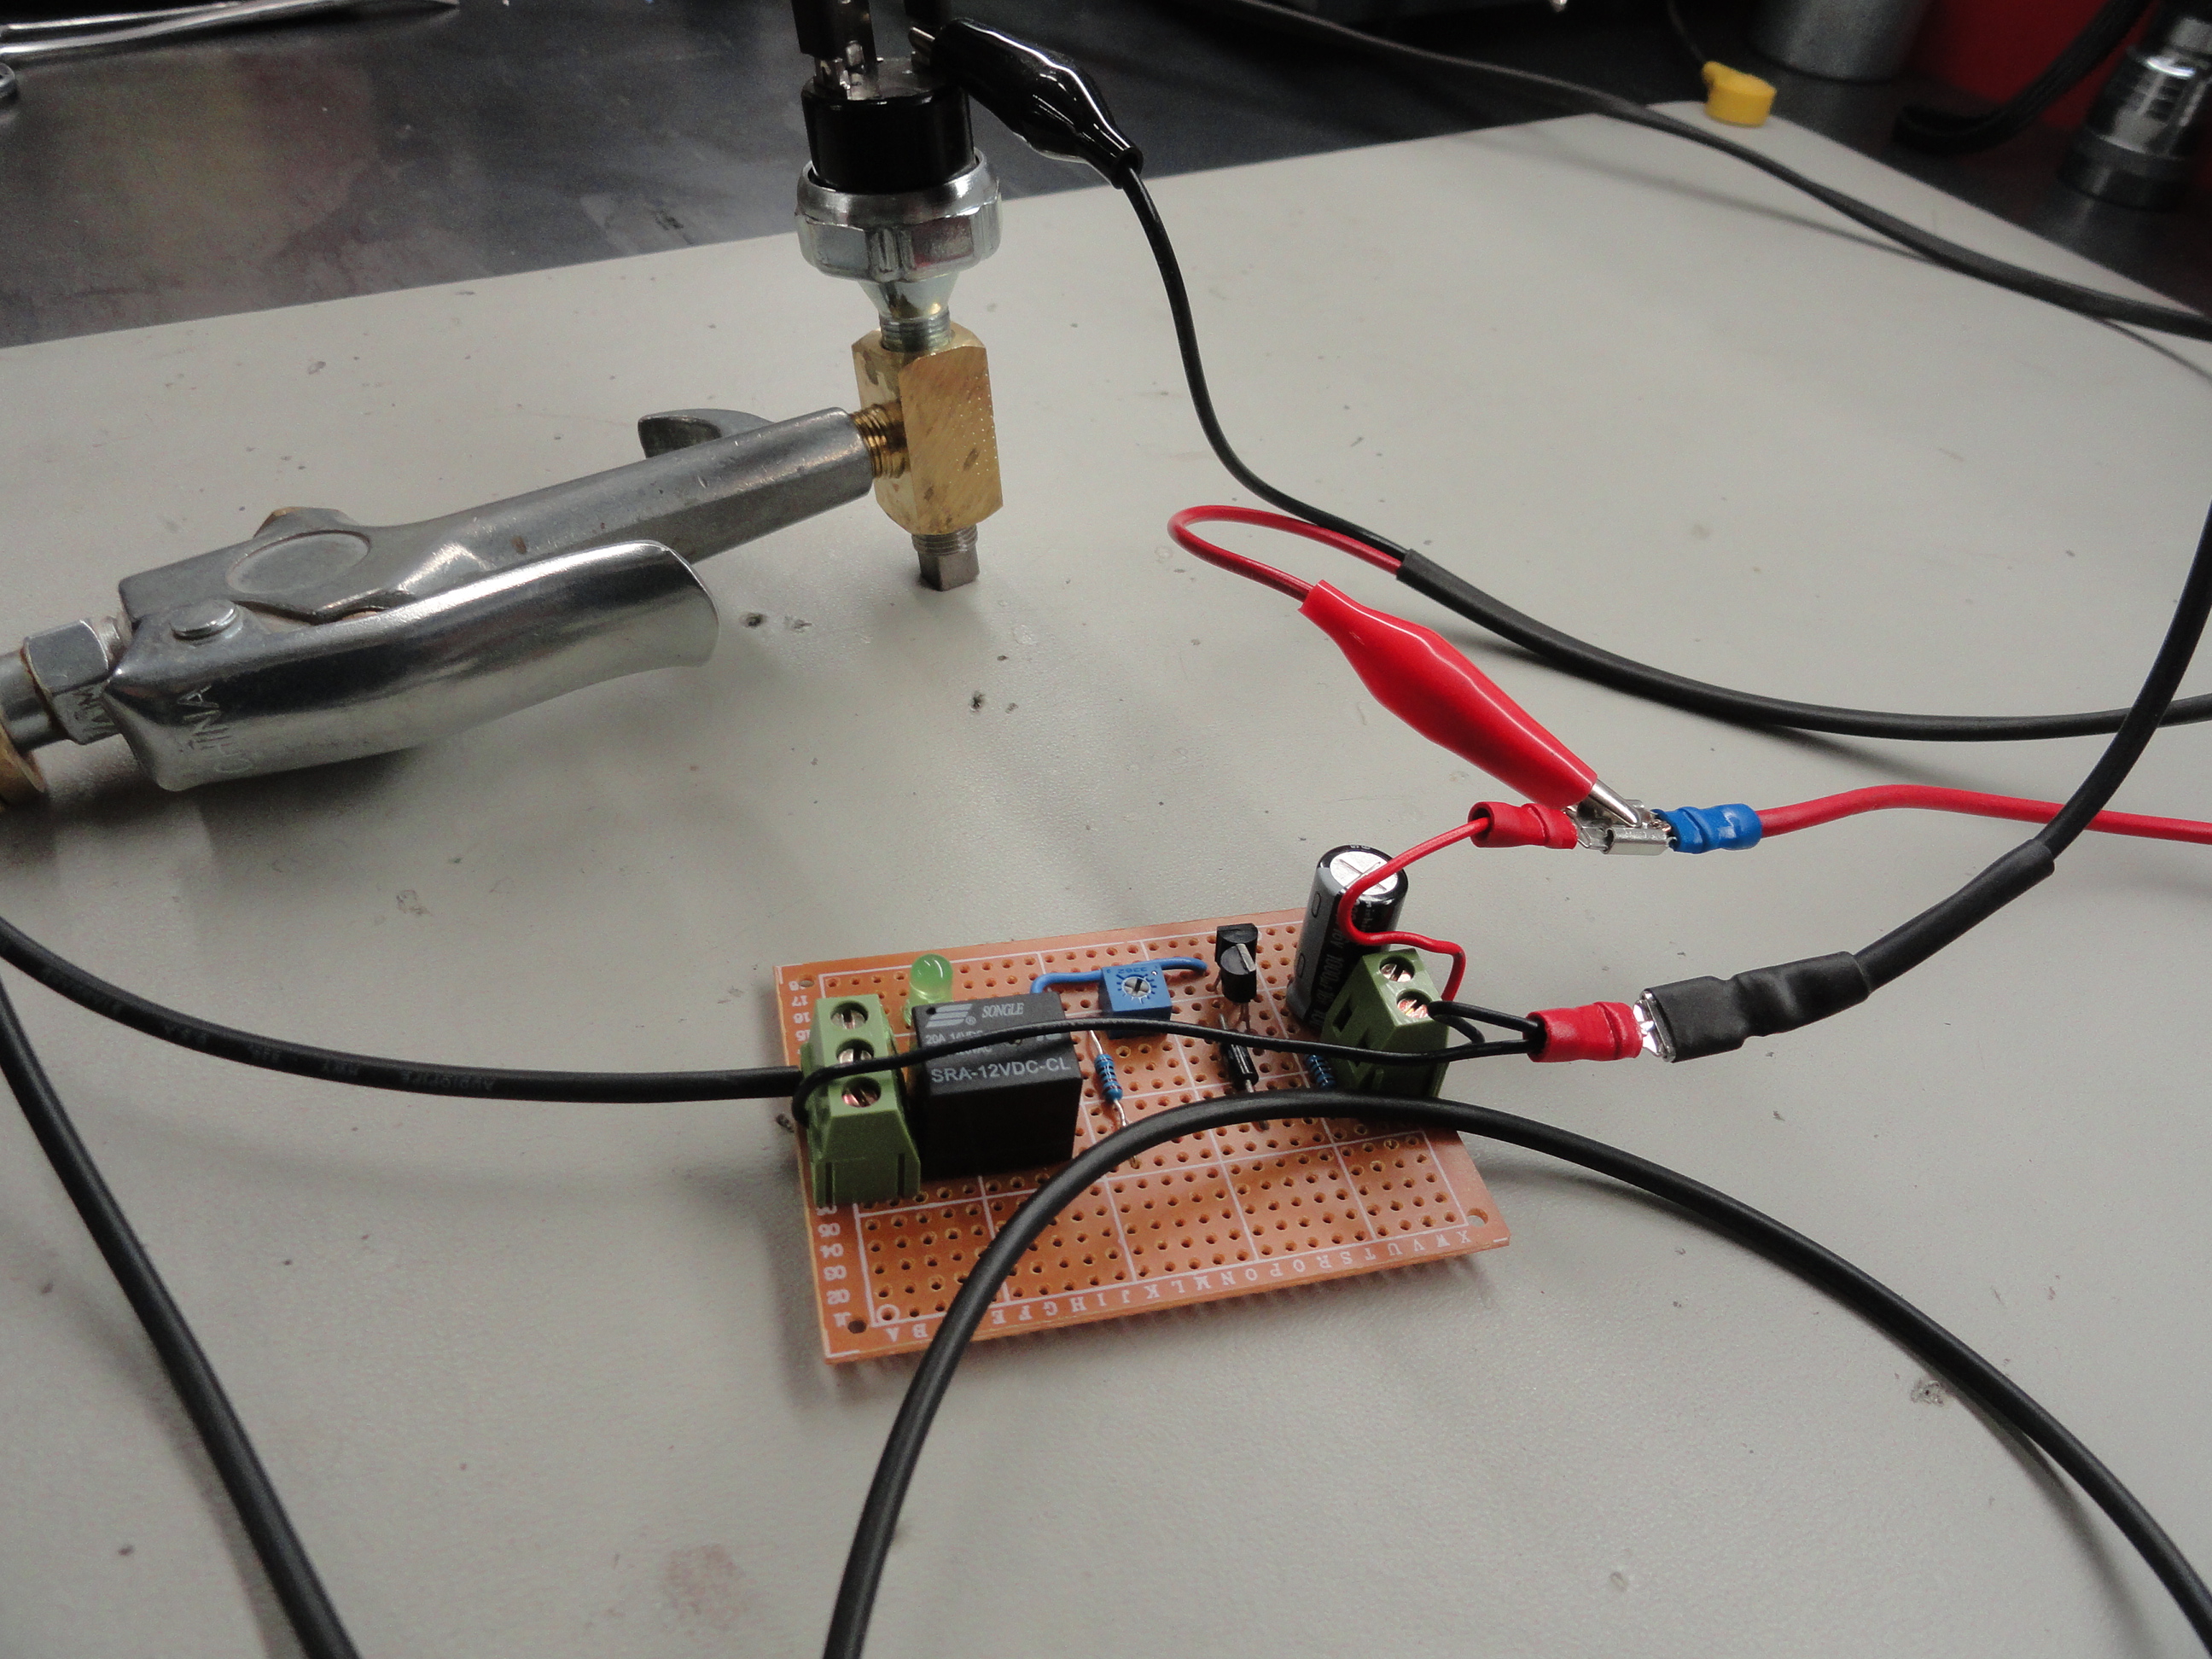
 The final electrical test for this prototype is done to see how well the circuit plays with the Oil Pressure/Fuel Safety Switch. We use air pressure instead of oil pressure to test the safety switch and test to see if the circuit does its job. The bench power supply emulates the 12 volt battery in the vehicle with the power supply on/off switch acting as the ignition switch. Turn on the IGN switch and the pump comes on right away for anywhere (you choose) from 1.5 to 14 seconds then shuts down until 12 psi oil pressure is present. The reason I wanted the time adjustable was because different vintage vehicles have different volume of Carburetor fuel bowls. Try adjusting the circuit to 5 seconds and see from there where you need to adjust it for the best performance.
Seeya Next week with updates to this article that should finalize the circuit and get us on the path to finalizing things. Also, we will be testing the idea of using an electric pump to augment the existing mechanical one. This is done on larger trucks or long distance haulers to ensure they always get where they are going. I want to see if we can do this for our trucks so we will use the test engine to find out fuel pressure issues and do some testing on the different configurations. You can see the entire picture gallery for this project HERE. Also, I do not do this alone. I collaborate on everything I do. So please thank another Dave (inwo on All About Circuits forum) for this one! Dave's efforts helped make this possible. No one person knows everything so we are much better off as a society when we LISTEN to each other.
Welcome to Tip of the Week 54! This week we will continue our research into Electric Fuel Pumps for use on our old Chevy trucks. Despite the peanut gallery in several forums asking stupid things like "Why do you want to do that?" or "Solution waiting for a Problem", we are moving ahead quite nicely. This week we have all sorts of great information to share. Taking one thing at a time, the goal we are working towards is this:
1) We want faster starting of vehicles that have been parked for awhile. You know how after a time period the carbs fuel bowl is empty and you have to crank the starter longer to get it started? We want to eliminate that issue.
2) We want to provide a few different mounting methods. Mounting the pump to the exact same place the mechanical pump used to be allows us to use our same Hard Lines without modification. The other mounting method will be inside the frame rail so we can augment the existing mechanical pump and leave them both in.
3) We are doing all of this using OEM parts that have been approved in vehicles already. This eliminates any arguments about the feasibility.

So to accomplish the above, we need to first create an automatic priming circuit. This circuit must also include an OEM Fuel Cutoff Safety Switch which in our case is based on the presence of oil pressure. The Standard Motor Products OEM PS133 will be the Oil Pressure Switch to do this job. For the Fuel Pump we will use Spectra Premium's OEM SP1170. This is ideal because the metal Can that the pump is housed in is NOT grounded. As an OEM pump, I do not think they are allowed to ground the Can. Good for us!
All we have to do now is pull out our electronics textbooks and see if we can figure out how to make the Auto-Prime Circuit. I am very motivated because I have never owned one of these trucks that didn't require longer cranking after sitting for awhile. Let's fix that once and for all! So the above right schematic is roughly how we are going to accomplish this. I am still developing the circuit so do not jump in until next week, but this one works great. I am hoping I can replace the Darlington Pair transistor setup with a single more powerful transistor to eliminate parts required. Wiring it this way will give us an adjustable 1.5 to 14 seconds of automatic priming before the pump cuts out to be deferred to the fuel safety switch. The above has been tested and works perfectly and what I like about it most is it uses the Negative side of things. This is desirable because we do not want +12 volts anywhere we do not absolutely have to. Ground is present everywhere. I would like to hear your thoughts on this because the Spectra Premium's OEM Instructions have us switching 12v power instead of ground. This IS fuel we are talking about here!

 In case you didn't know, your standard air blower gun for your air compressor has a threaded end on it. That threaded end happens to be 1/8" - 27 Threads so 1/8" NPT screws right in. So let's start off assuming you do not want to augment your mechanical pump, rather you want to replace it. Why have to rebend new hard lines for this? Let's make a bracket that will bolt right to the engine block in the same place. Start by using a fuel pump gasket to get the shape, then cut the shape out of 14 gauge sheet steel. Drill the two mounting holes using a 3/8" drill bit. Even though they are 5/16 mounting bolts, I prefer them to be a little bigger so any slight mistake I make in drilling the mounting holes will not get in the way. In the center of the piece, drill a 27/64" hole to accommodate a 1-1/2" 3/8" Coarse thread bolt. Weld the bolt from the back securely then grind it so it stays within the boundaries of the cutout of the gasket (and engine block). Paint it whatever color floats your boat!
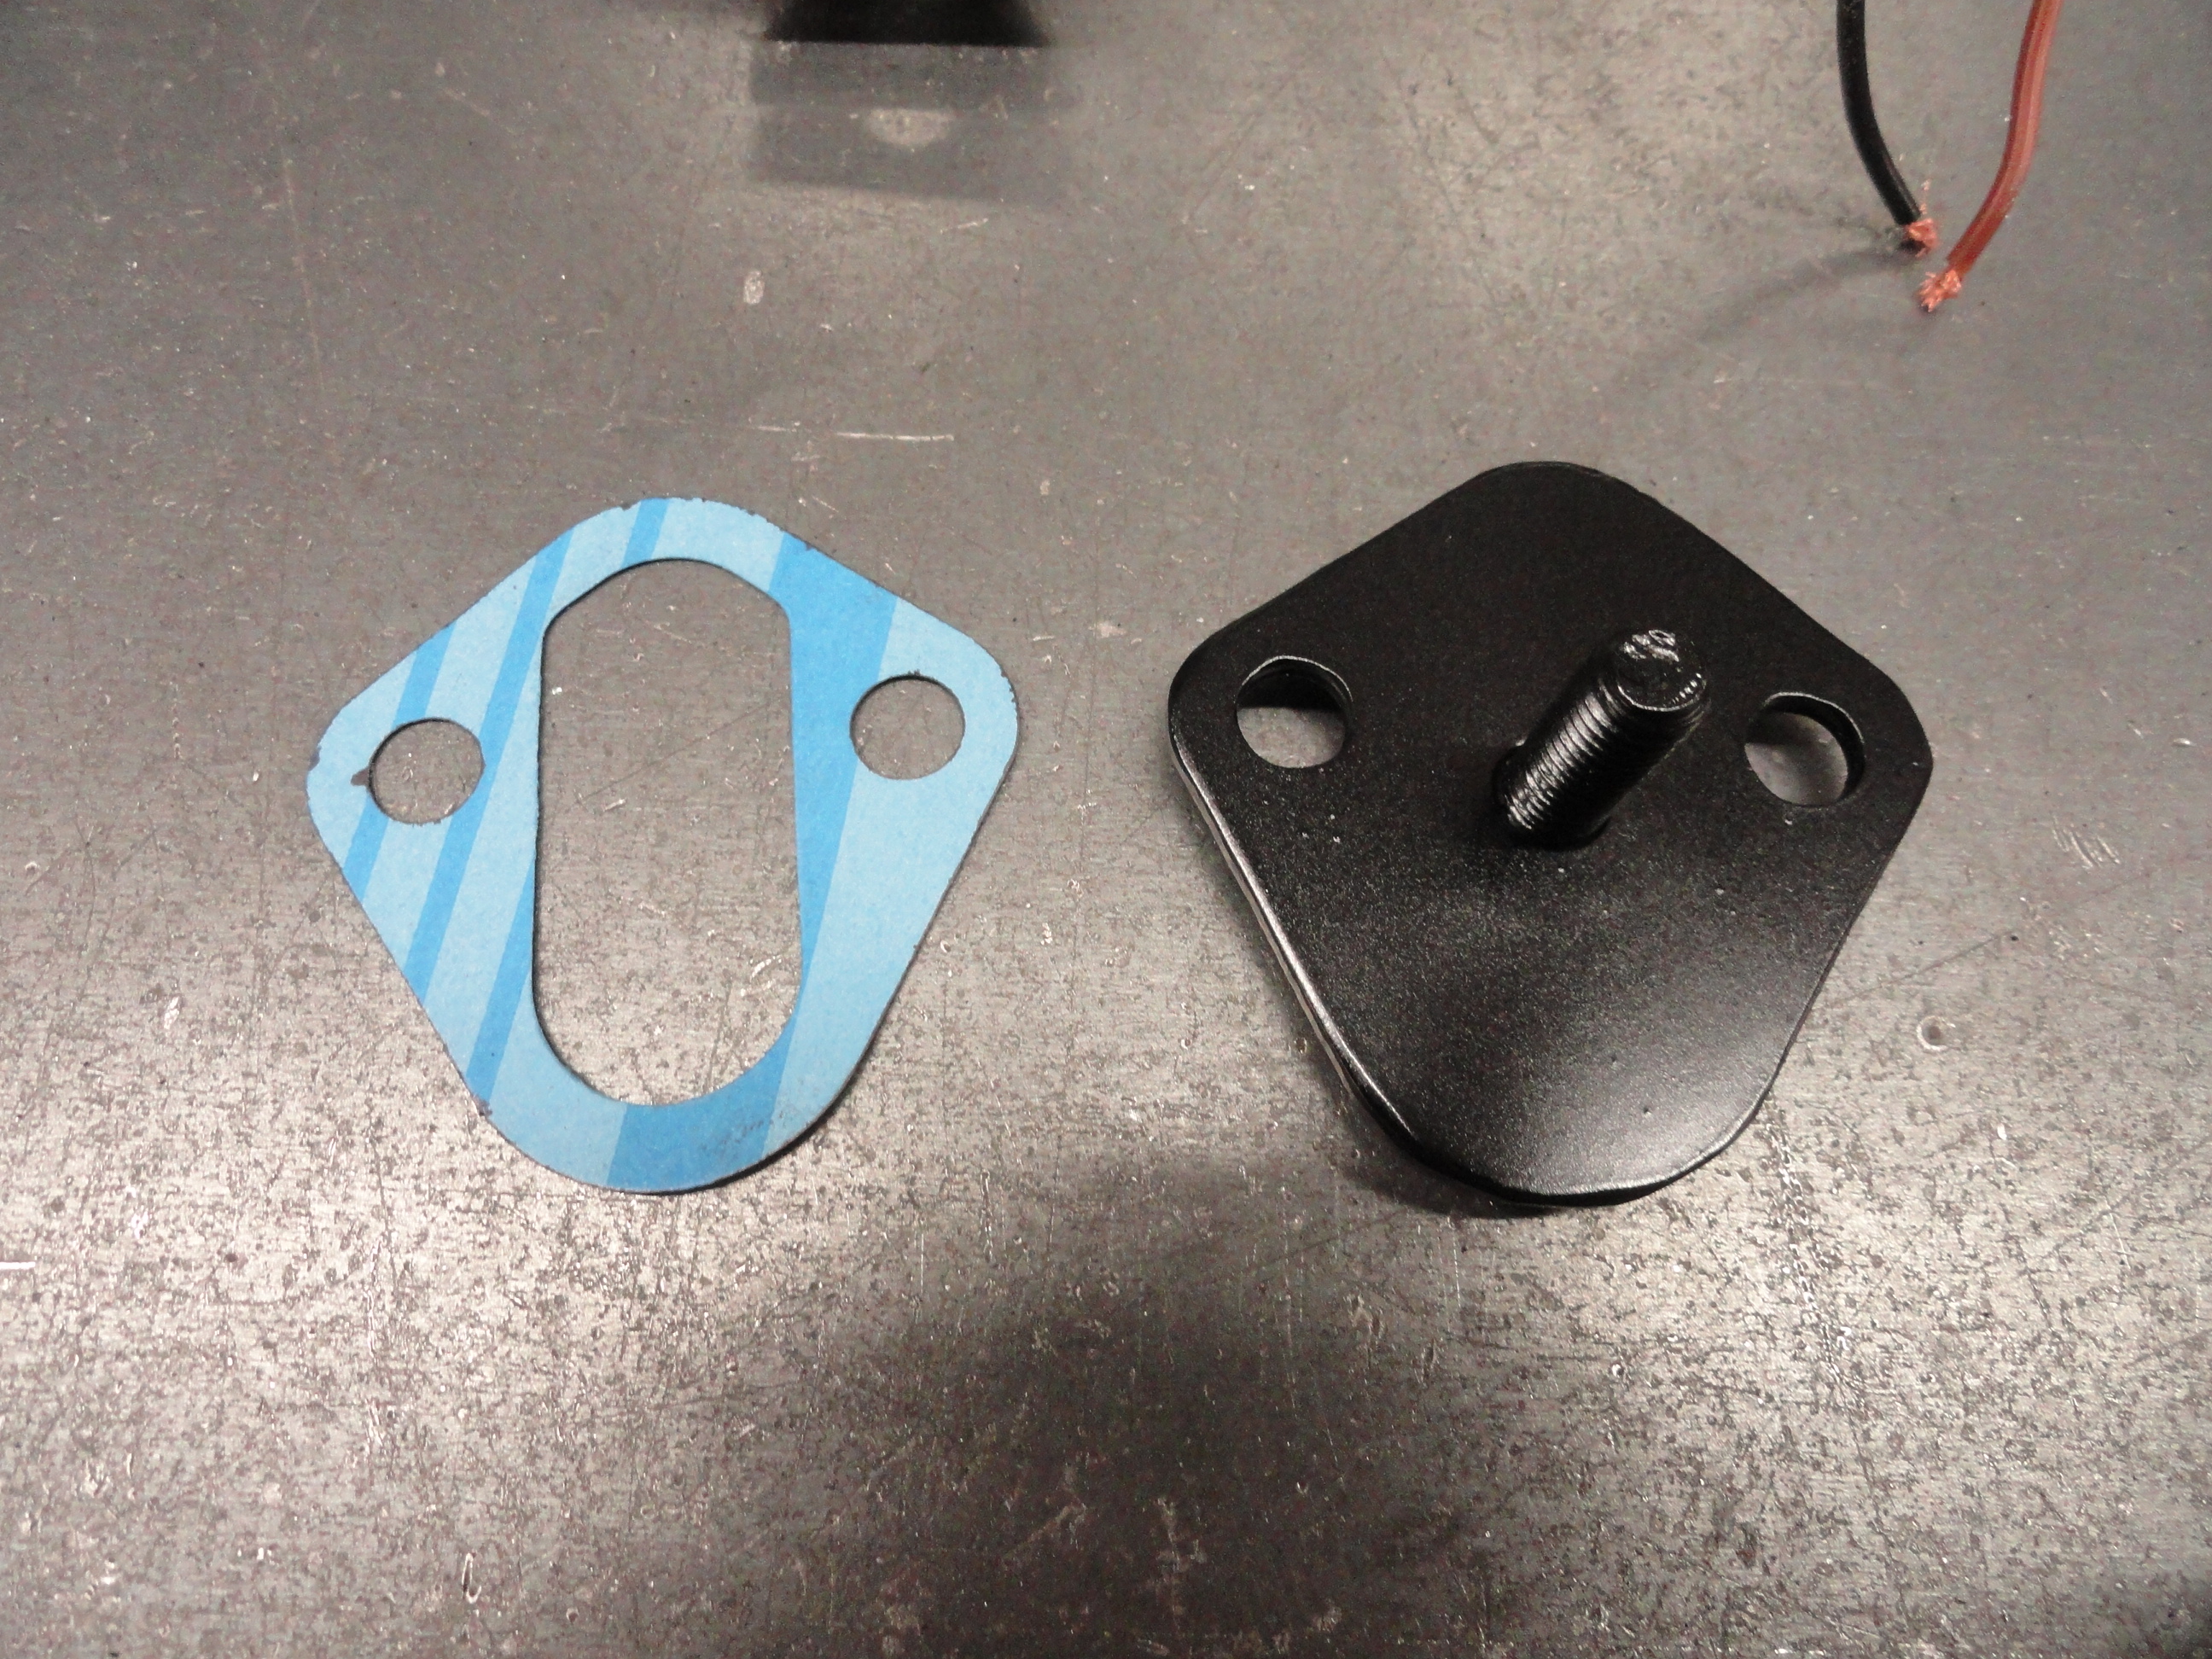
 This bracket will fit nicely and the bolt puts the electric pump in right about the same place as the outlet for the mechanical pump up to the Carb. For some of us who invested in stainless steel lines, that's a big deal! By welding the bolt in place securely, we can use the same gasket and always have the ability to change out the pump without removing this bracket. Since this instruction also includes a glass fuel filter before the pump using this same bracket, we can connect the hard line from the fuel tank right up too!
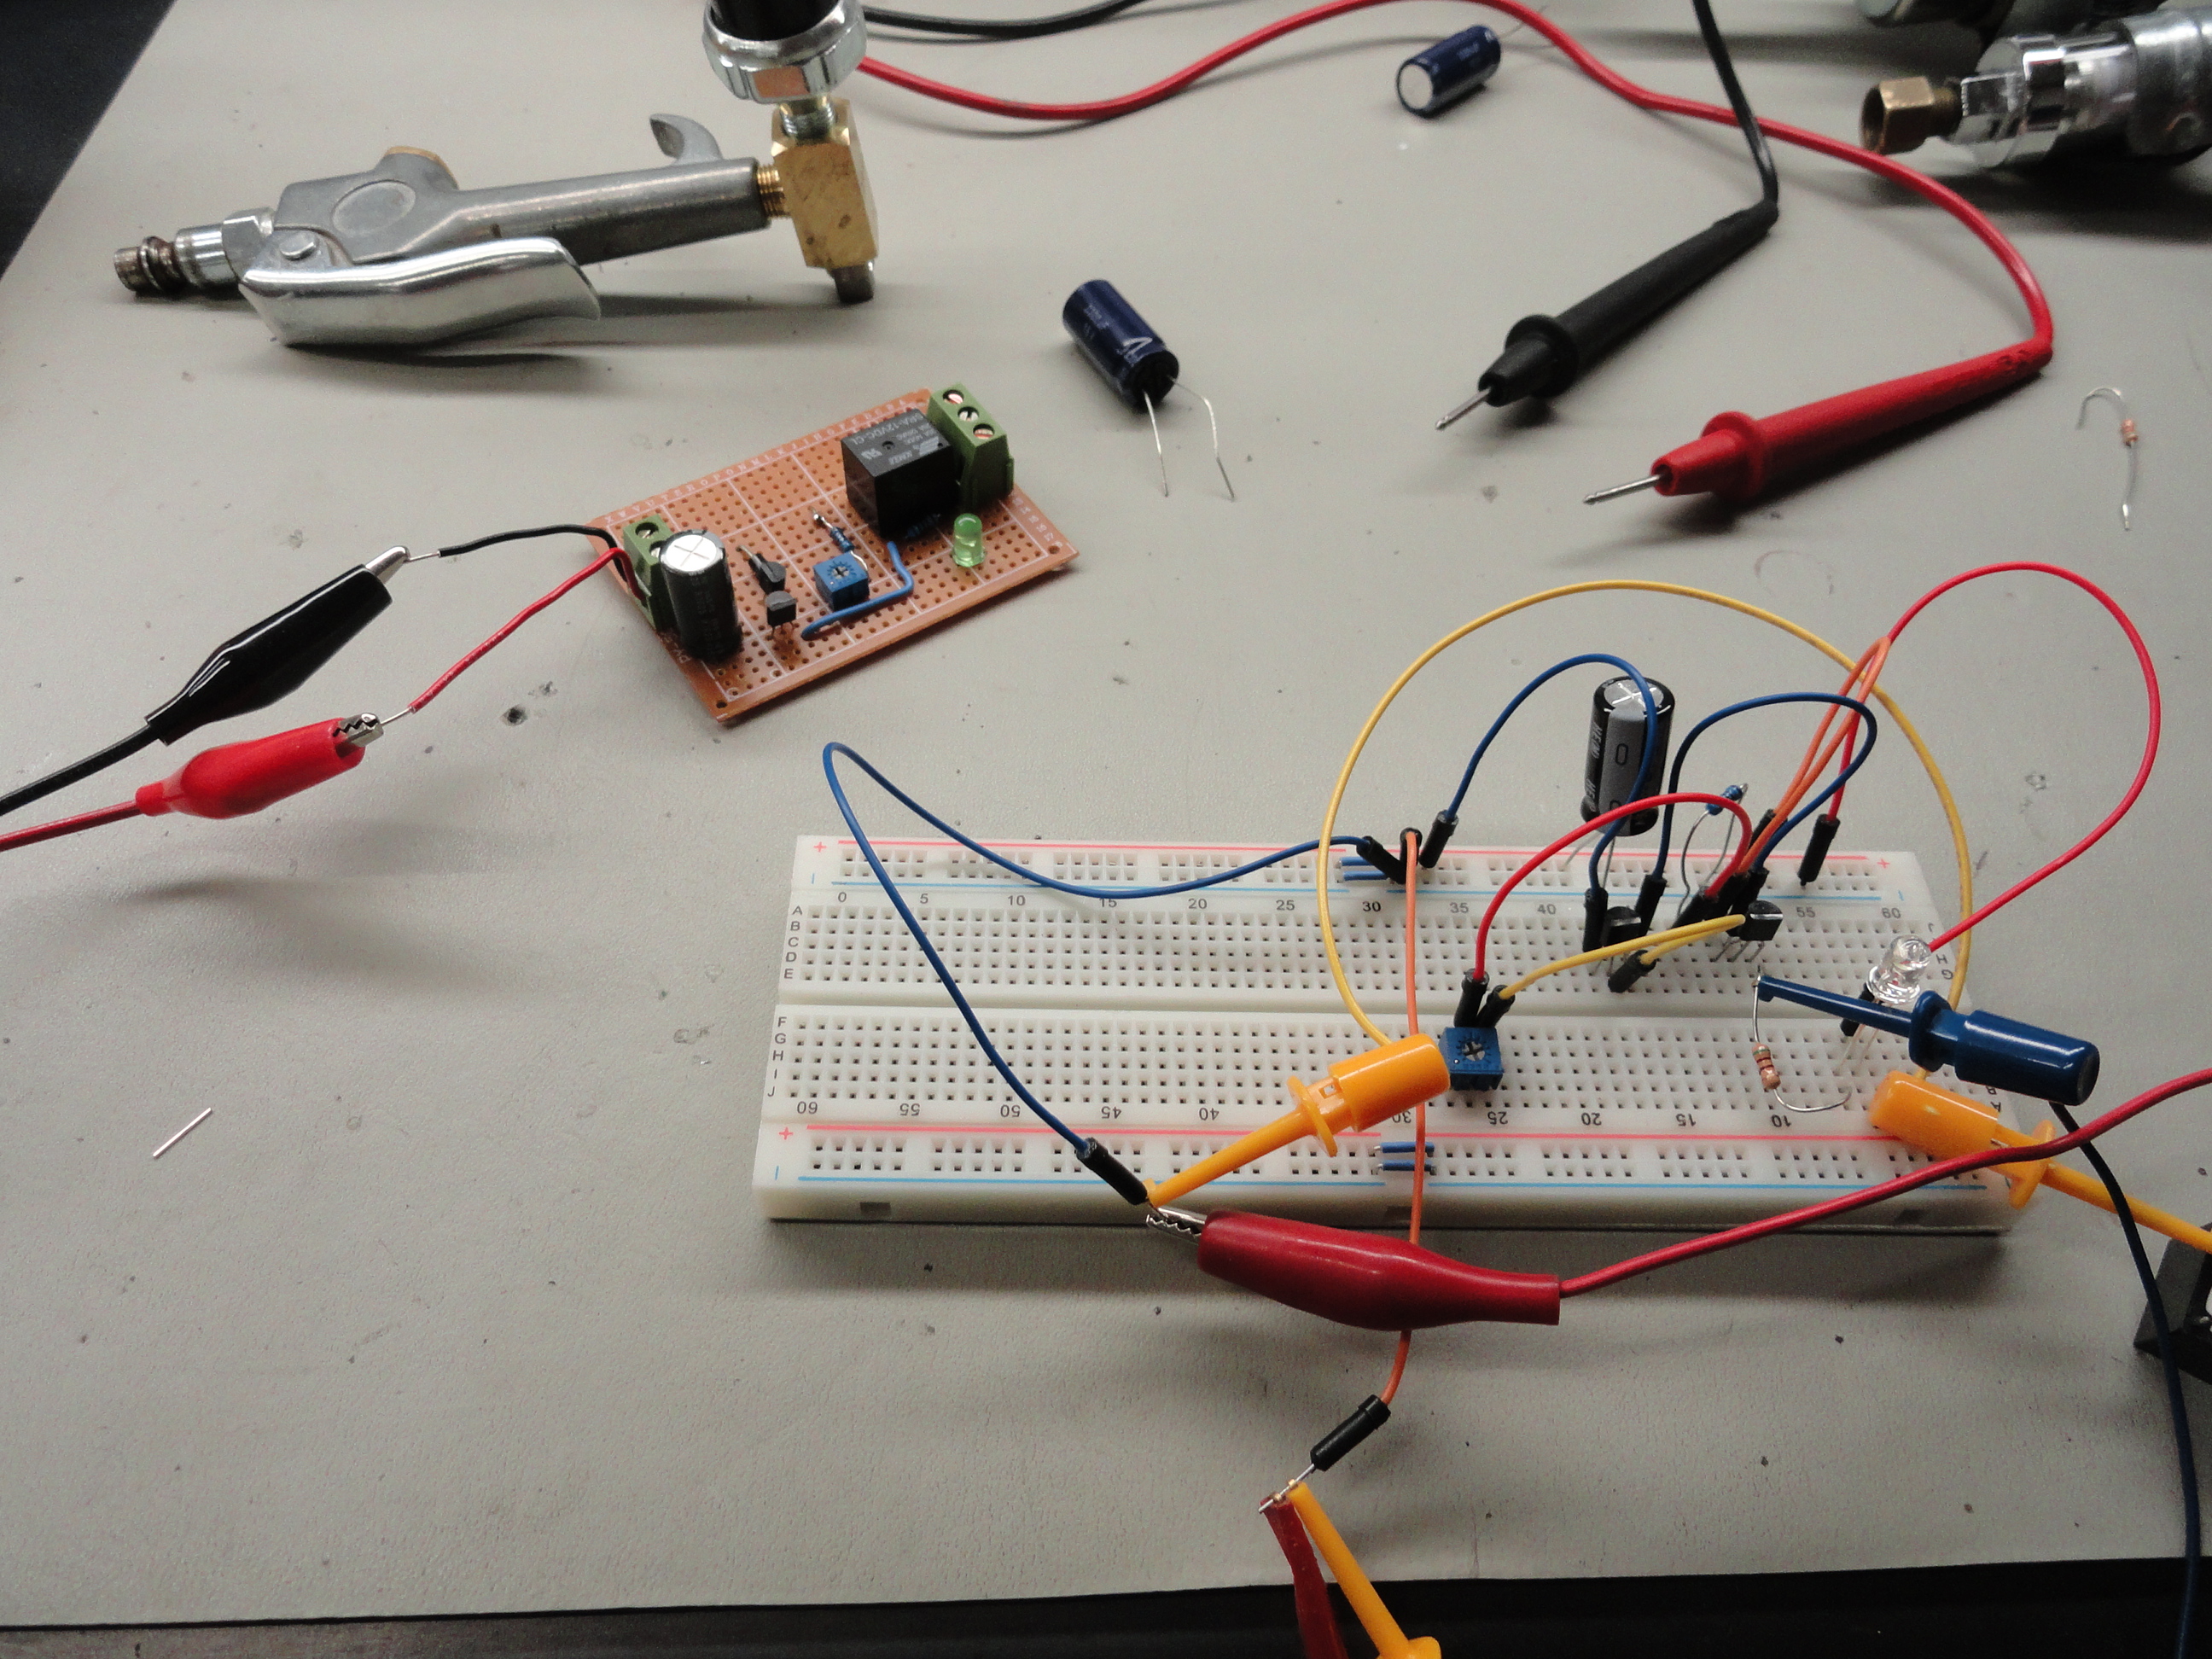
 The electronic development process requires a step process where we first mock the circuit up on the Proto Board and use jumpers all over to connect it. That is what the white circuit board is for. This allows us to reuse the circuit board for the next project and nothing is soldered. Next we make a little more final but not board out of generic prototyping circuit cards like the brown one shown. This is just a board with lots of holes in it with solder pads on the bottom side. Now we solder all the parts in place and use small solid wire to connect everything. If this circuit works as we want it, we then go to a program called DipTrace and build a professional board in the computer which will be sent off to our favorite circuit board maker for a final professional circuit. We then take these boards and solder the components on ourselves to save money.
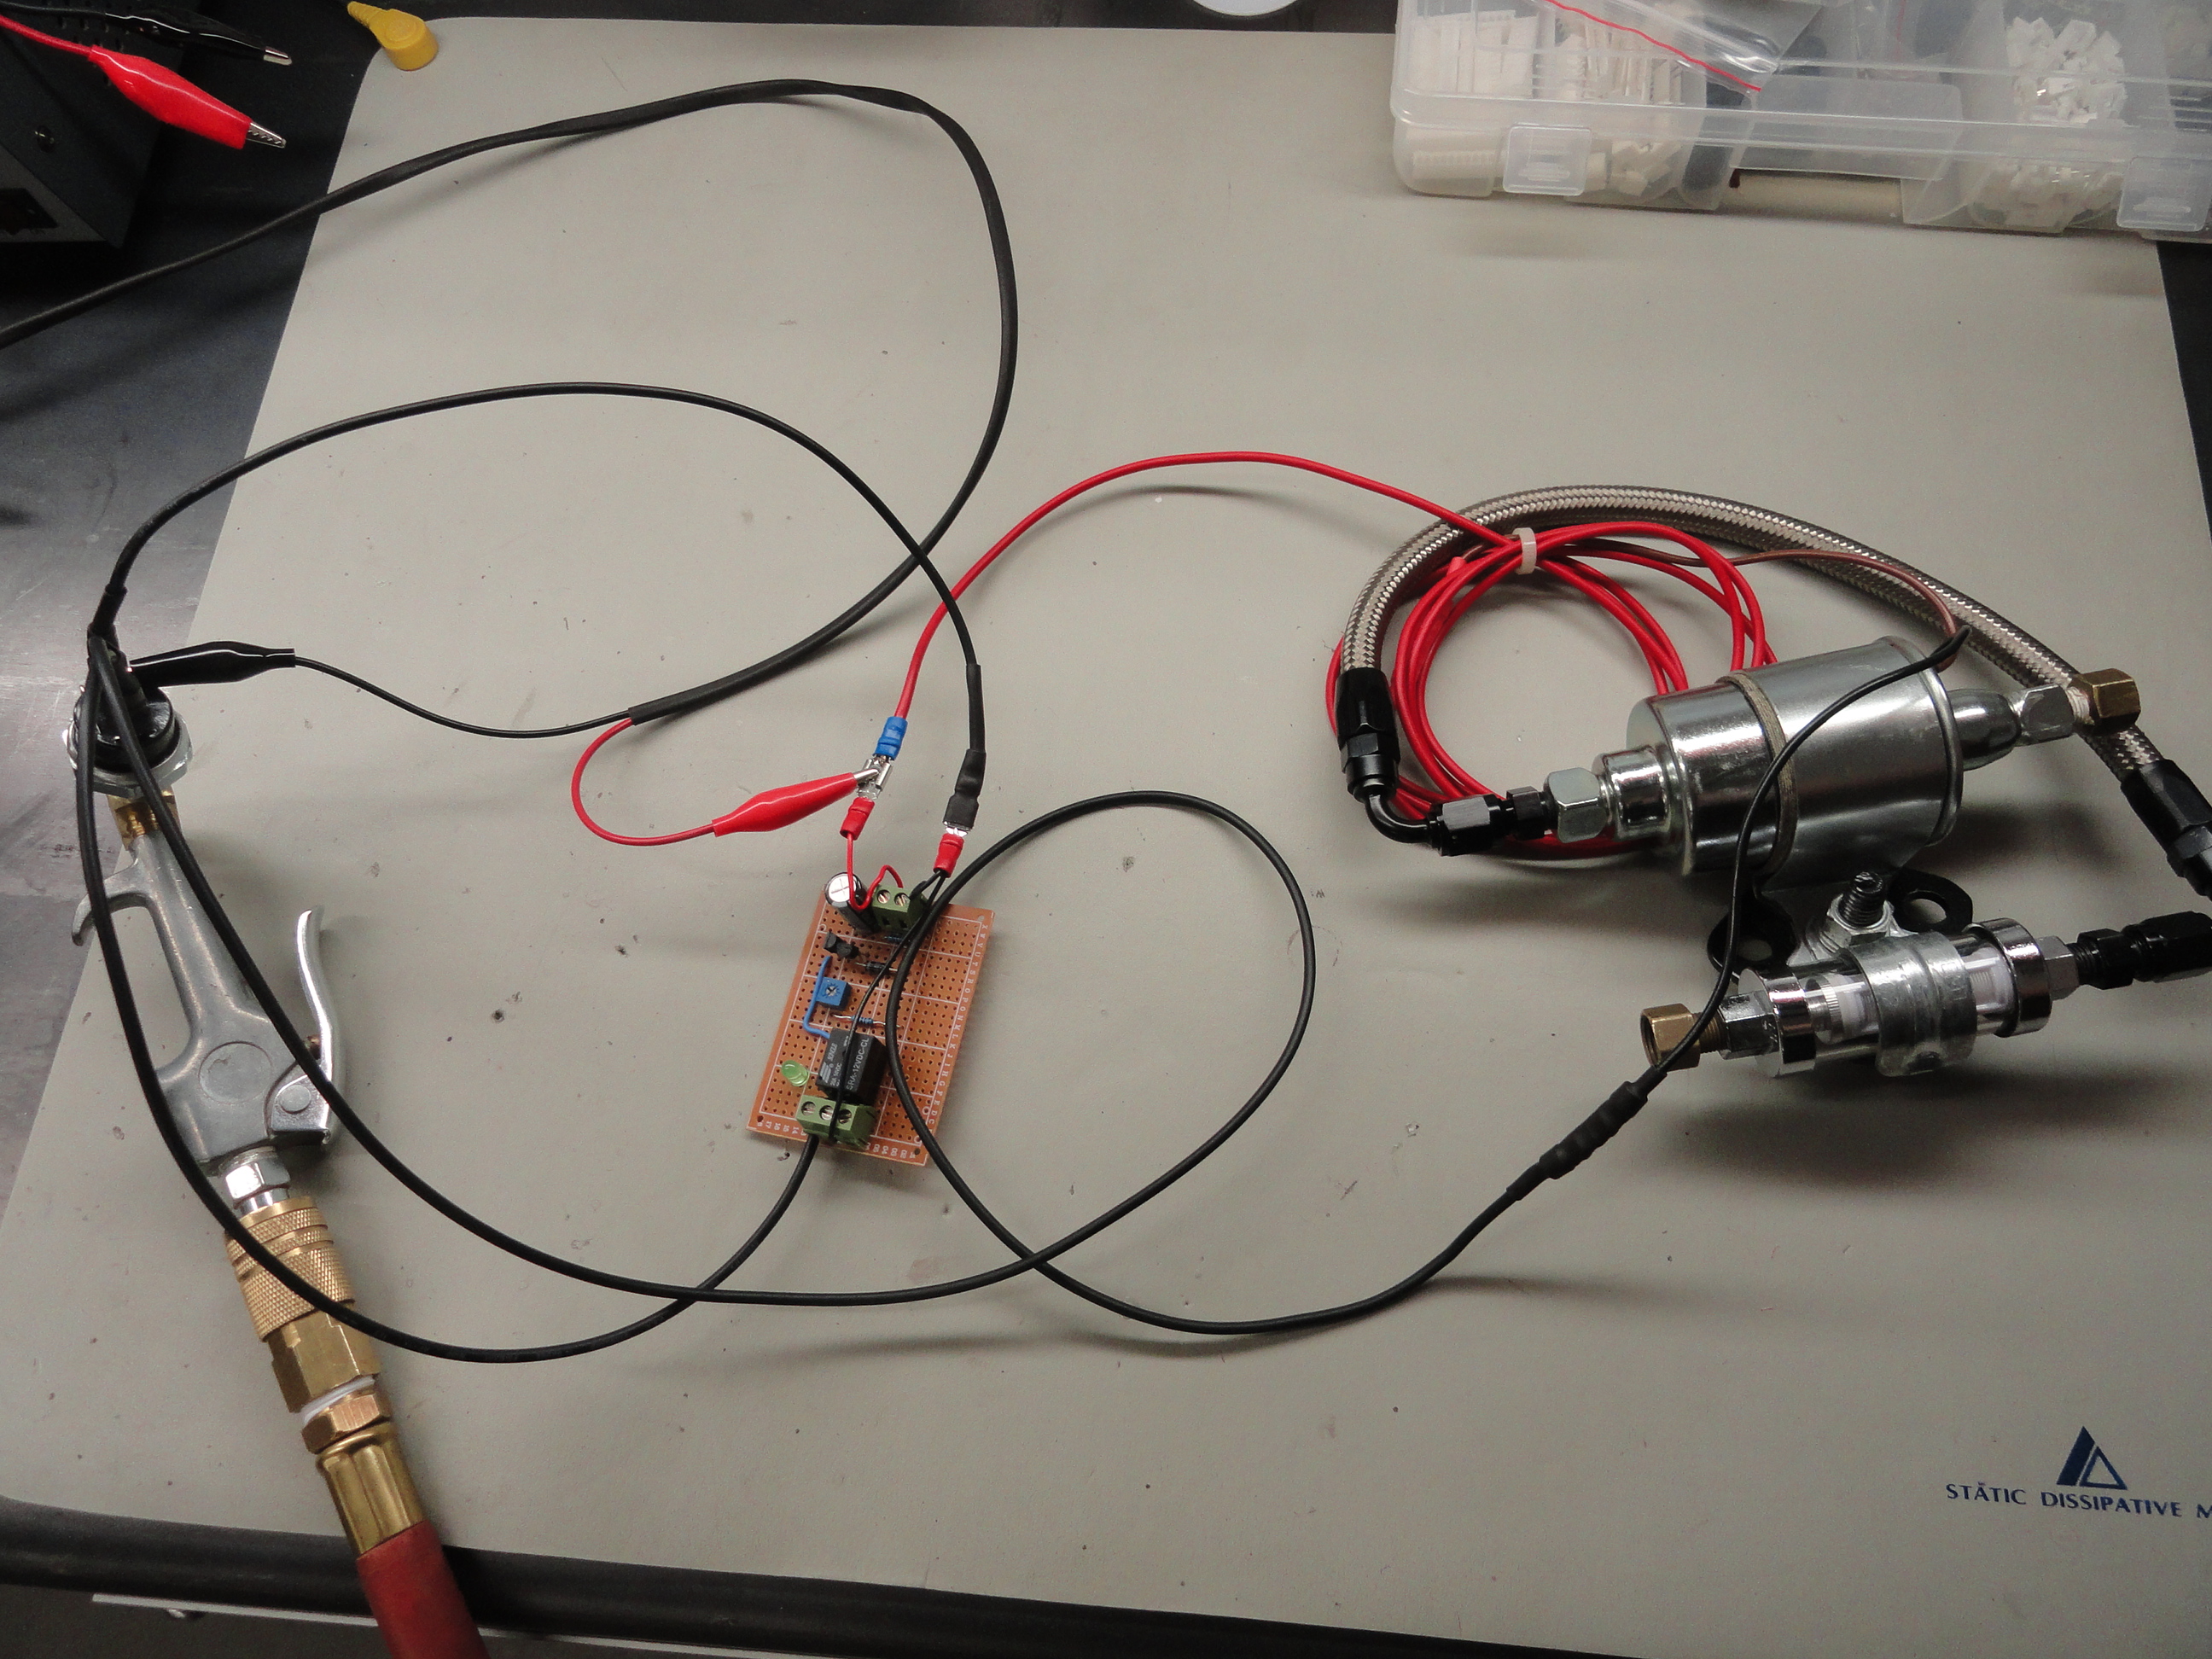
 The final electrical test for this prototype is done to see how well the circuit plays with the Oil Pressure/Fuel Safety Switch. We use air pressure instead of oil pressure to test the safety switch and test to see if the circuit does its job. The bench power supply emulates the 12 volt battery in the vehicle with the power supply on/off switch acting as the ignition switch. Turn on the IGN switch and the pump comes on right away for anywhere (you choose) from 1.5 to 14 seconds then shuts down until 12 psi oil pressure is present. The reason I wanted the time adjustable was because different vintage vehicles have different volume of Carburetor fuel bowls. Try adjusting the circuit to 5 seconds and see from there where you need to adjust it for the best performance.
Seeya Next week with updates to this article that should finalize the circuit and get us on the path to finalizing things. Also, we will be testing the idea of using an electric pump to augment the existing mechanical one. This is done on larger trucks or long distance haulers to ensure they always get where they are going. I want to see if we can do this for our trucks so we will use the test engine to find out fuel pressure issues and do some testing on the different configurations. You can see the entire picture gallery for this project HERE. Also, I do not do this alone. I collaborate on everything I do. So please thank another Dave (inwo on All About Circuits forum) for this one! Dave's efforts helped make this possible. No one person knows everything so we are much better off as a society when we LISTEN to each other.
Comment